Custom Rotary Switch Takes A Motor

There are certain challenges we all will have to face sooner or later. Changing a flat tire in the rain, trying to put on a shirt that doesn’t quite fit, or producing a 16 position rotary switch for a replica computer front panel. There was a time when something like this would be a major undertaking, but with the help of a 3D printer [Mike Gardi] was able to build good looking switches that were big enough to be motor driven.

Switches of course are old tech, and there are plenty of ways to make contacts. [Mike] settled on using 16 small magnets and reed switches. This works, but you probably wouldn’t want to use it where the switch might get close to an external magnet. It does however make for a neat assembly without a lot of mechanical work. It also resists wear compared to a brush type arrangement.

The switch is a little large, but it could probably be made smaller with proper contacts. However, you still need at least some magnets to provide the detents without making mechanical changes.

We couldn’t help but think of the homemade rotary switches from the do it yourself computer that used sewing thread spools, wires, and paper clips. It would be fun to revisit that computer with an eye to making things using a 3D printer. We liked the knob, but if you only need a reproduction knob, there are other ways to go.

Automated Tuning Of Linux Audio

Audio systems in Linux are terrible. You’ve never known true pain until you’ve tried to set up a recording or broadcasting workstation running Linux. I did, twenty years ago, and nothing has changed since. This wasn’t really a problem when Linux was either used in server spaces or some nerd’s battle station, but now we have small single board computers that everyone uses and wants to turn into a modular synth. Welcome to paintown, because the Linux audio stack is terrible.

For the past ten years, [Dynobot] has been working on improving audio in Linux. This is a decade of reading manuals from IBM and Oracle, and a deep knowledge of how to adjust settings so audio actually works. All of this work is now combined into a single script that improves everything. This means the priority of the Audio group is changed, the thread priority is better, the latency is better, and for anyone who wants to set up a local streaming service, the network latency is better. It’s not everything, and there’s no mention of recording multitrack audio, but we’ll accept the baby steps here.

There are two relevant Github repositories for this, the first containing audio adjustments for Debian-based systems, including the Raspberry Pi. This should work on any single board computer running Debian, and has been tested on all the Raspberry Pis, the Allo Sparky, ASUS Tinkerboard, and the Odroid C2. There’s also a version for TinyCore-based Linux systems that improves the priority of the audio threads, changes the thread scheduling from ‘whatever’ to FIFO, and improves the latency. If you’re running Linux, and you’re doing something with audio, this is what you need.

FindyBot3000 Is Listening And Ready To Help

It’s a problem every maker faces at one time or other – how to organise the ever-growing mass of components in the workshop. Some give up and just live with box upon box of disordered parts. That wasn’t good enough for [Inventor22], though – who created FindyBot3000 to tackle the job. 

The first step is to source a set of those tiny component drawers we all know and love. These are then combined with WS2812B LED strips, which act as indicators for each individual drawer. A Particle Photon is used as the brains of the operation, and drives the strips. So far, so good.

Of course, blinking LEDs are great and all, but it’s the voice control where things get really interesting. Through Google Home and IFTTT, it’s possible to give commands to the Particle Photon. This can be used to manage the parts in the drawers, as well as to quickly highlight the location of various components. It’s backed up with an Azure backend, which manages the component database and keeps track of everything.

It’s a tidy build that does away with tiny sticky labels, and is reconfigurable on the fly as parts come and go. Of course, if you’re mostly storing SMD parts, you might prefer a reel based solution. Video after the break.

Continue reading “FindyBot3000 Is Listening And Ready To Help”

Windows 3.1 In My BIOS? It’s More Likely Than You Think

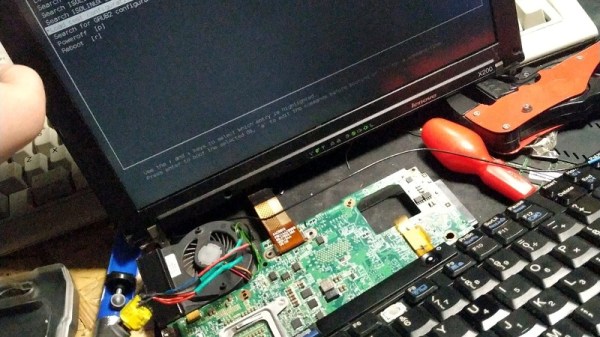
It might be difficult for modern audiences to believe, but at one point Microsoft Windows fit on floppy disks. This was a simpler time, with smaller hard drives, lower resolution displays, and no hacker blogs for you to leave pessimistic comments on. A nearly unrecognizable era, to be sure. But if you’re one of the people who looks back on these days fondly, you might wonder why we don’t see this tiny graphical operating system smashed into modern hardware. After all, SkiFree sure ain’t gonna play itself.

Well, wonder no more. A hacker by the name of [redsPL] thought that Microsoft’s latest and greatest circa 1992 might do well crammed into the free space remaining on a ThinkPad X200’s firmware EEPROM. It would take a little fiddling, plus the small matter of convincing the BIOS to see the EEPROM as a virtual floppy drive, but clearly those are all minor inconveniences for anyone mad enough to boot their hardware into a nearly 30 year old copy of Visual Basic for a laugh.

The adventure starts when [redsPL] helped a friend install libreboot and coreboot on a stack of old ThinkPads by using the Raspberry Pi as an SPI flasher, a pastime we’re no strangers to ourselves. Once the somewhat finicky software and hardware environment was up and running, it seemed a waste not to utilize it further. Especially given the fact most firmware replacements only fill a fraction of the X200’s 8 MB chip.

Of course, Windows 3.1 was not designed for modern hardware and no proper drivers exist for much of it. Just getting the display resolution up to 1024×768 (and still with only 256 colors) required patching the original video drivers with ones designed for VMWare. [redsPL] wasn’t able to get the sound hardware working, but at least the PC speaker makes the occasional buzz. The last piece of the puzzle was messing around the zip and xz commands until the disk image was small enough to sneak onto the chip.

Believe it or not, this isn’t the first time we’ve seen Windows from this era running on a (relatively) modern ThinkPad. For whatever reason, these two legends of the computing world seem destined to keep running into each other.

[Thanks to Renard for the tip.]

Interactive Demo Shows The Power Of Fourier Transforms

When it comes to mathematics, the average person can probably get through most of life well enough with just basic algebra. Some simple statistical concepts would be helpful, and a little calculus couldn’t hurt. But that leaves out a lot of interesting mathematical concepts that really do have applications in everyday life and are just plain fascinating in their own right.

Chief among these concepts is the Fourier transform, which is the key to understanding everything from how JPEGs work to how we can stream audio and video over the Internet. To help get your mind around the concept, [Jez Swanson] has this interactive Fourier transform visualizer that really drives home the important points. This is high-level stuff; it just covers the basic concepts of a Fourier transform, how they work, and what they’re good for in everyday life. There are no equations, just engaging animations that show how any function can be decomposed into a set of sine waves. One shows the approximation of a square wave with a slider to control to vary the number of component sine waves; a button lets you hear the resulting sound getting harsher as it approaches a true square wave. There’s also a great bit on epicycles and SVGs, and one of the best introductions to encoding images as JPEGs that we’ve seen. The best part: all the code behind the demos is available on GitHub.

In terms of making Fourier transform concepts accessible, we’d put [Jez]’s work right up there with such devices as the original Michelson harmonic analyzer, or even its more recent plywood reproduction. Plus the interactive demos were a lot of fun to play with.

[via the Adafruit blog]

Blacksmithing For The Uninitiated: Let’s Talk About Anvils

When you grow up with something as the constant backdrop to your life, it’s easy to forget as an adult that not everyone else shares your instinctive knowledge of the subject. My dad is a blacksmith, he’s now retired, but as I was growing up his very active forge was in a workshop next to our house. This is the second part of a series based upon that experience, exploring blacksmithing for people who have maybe always fancied a go at the anvil but have little idea where to start.

The Most Obvious Blacksmithing Tool: The Anvil

Having considered the hearth in our previous outing, it’s time to turn our attention to what is the signature piece of blacksmithing equipment: the anvil. This has the function of providing a high-mass hardened working surface against which metal can be forged, and it has a distinctive shape with various parts for particular metalworking tasks. There are many minor and major variations of anvil design depending upon where in the world your anvil hails from, but since my experience comes from the English counties, the anvil I will be describing is the pattern you’ll find in the British Isles.

Continue reading “Blacksmithing For The Uninitiated: Let’s Talk About Anvils”

Quick And Dirty Immobilizer Hack Lets You Use Cheaper Dumb Keys

Car enthusiasts can find themselves in a pickle if they’re into cars from the 80s and 90s. These vehicles are much beloved by some, but one can find themselves having to fork out immense amounts of money for repairs and out-of-production parts. Once a car passes that 15 year milestone, suddenly manufacturer support can start to dry up. Even just getting a set of keys can be a problem.

Modern cars tend to use a small chip implanted in the key as a security measure. This chip functions similarly to an RFID chip, being energised by the car’s reader when the driver turns the key in the ignition. If the chip returns the right code, the computer allows the car to start. Getting a new key cut and recoded is expensive, particularly on older cars. Naturally though, there’s a way to hack around the problem.

The trick is to perform surgery on an existing good key, to extract the working chip inside. This chip can then be permanently affixed to the immobilizer’s antenna in the steering column. This allows the driver to use any properly cut “dumb” key to start the car, as the chip will always provide the right signal at startup. It takes some finesse to avoid damaging the delicate chip inside and to know where to look – but with a little work, it’s achievable by even the novice hacker.

It’s a simple hack that can save hundreds of dollars, and is a great way to keep your modern classic on the road for cheap. You can always take things a step further though, and CNC yourself a key from scratch if you’re so inclined.