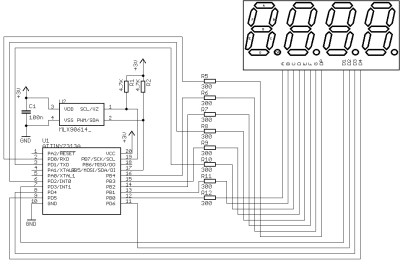
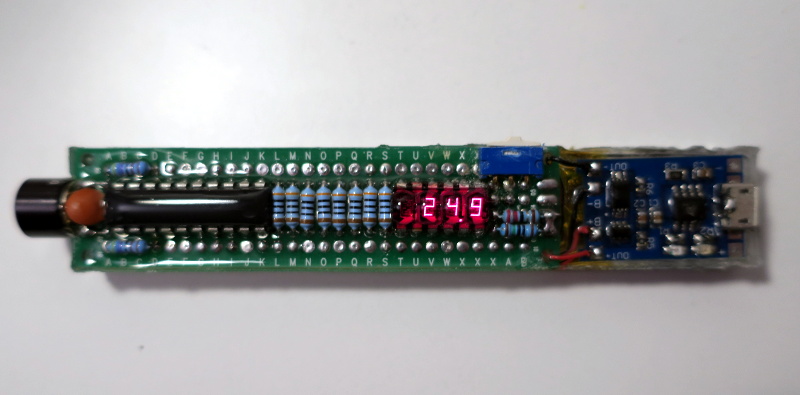
A non-contact thermometer is a pretty common tool these days, and one that most of us probably have kicking around the lab. You can grab them online for as little as $10 USD, and while they’re nowhere near as capable as a thermal camera, they certainly have their uses. But even with their increased availability, there are at least two safe assumptions we can make about owners of said gadgets: they didn’t make it themselves, and they are probably pretty ambivalent about its aesthetics.
 Which makes this project by [Ijon Tichy] particularly interesting. Not only is this a non-contact infrared thermometer that’s extremely easy to build should you be so inclined, but it’s actually quite attractive. In fact, if it wasn’t for the video of it in operation after the break, we would have assumed it was some kind of faux-retro cosplay prop. Even if you don’t have any use for an IR thermometer, you might just want to add one of these to your toolbox on principle.
The main components of the thermometer are a MLX90614 sensor, a gorgeous HP QDSP-6040 bubble display, and a ATtiny2313 microcontroller to tie it all together. The rest are passive components, with the exception of the TP4056 charging module that got tacked on to handle the 200 mAh lithium-ion battery. All of the components are arranged neatly in a line down the length of the thermometer, which is assembled on a piece of perfboard. Rather than go with a 3D printed enclosure that would cover it all up, [Ijon] decided to encapsulate everything in a clear epoxy resin. It looks fantastic, though you’re going to want to triple check all those solder joints before pouring on your “enclosure”.
[Ijon] has provided the diagrams and source code you need to build your own version of this artisanal thermometer, but we think with a custom PCB and perhaps a less liquid enclosure that still shows off the goods, this could be a very popular gadget for the discerning hacker. As we’ve seen, even the most basic of tools can benefit from a stylish makeover.


What about the laser sensors?
Heisenberg compensation is needed. The laser heats up the surface to be measured giving an erroneous reading.
Just use a second laser sensor to measure the temperature of the first laser sensor so you know what to subtract from the reading. Then point the first laser sensor back at the second to know how much to add back in. This will rip a hole in the fabric of space time itself into a dimension, that contains a third laser sensor. Then you simply…
😂😂😂
LoL, nice piece of satire (maybe), if not and for those outside core physics then a review of https://en.wikipedia.org/wiki/Radiative_transfer would be most helpful so as to augment the potential interference of information flow radiating into one’s cranium ;-)
Fwiw. Non contact thermometers a great way to teach kids about the thermal blanket effect of heat retention when at home – point at ceiling before and after adding a blanket in middle of night this confirming general issue atmospheric heat flow issue as per http://images.remss.com/msu/msu_time_series.html
Also great in the kitchen such as to check chicken dishes have been heated well enough to kill salmonella.
Ewwww, that stabilised video makes me want to throw up.
It was recorded in space, no gravity there 😂
My first thought as well. I hate that, it’s so nauseating
I am currently making a “camera” that looks at a stove top and determines if the surface is 100°F or higher. If on for more than 1 hour it beeps and requires a button push. If on for 1 hour 15. it sends me a txt. It is for an elderly person who has been leaving the cook top on. This can be integrated nicely….
I must have read this a dozen times trying to figure out what you’re getting at .
I’m more concerned with the display. Where did the builder find them?
It was available at Adafruit. Now you could find it here:
https://tronixlabs.com.au/display/led/numeric/qdsp6064-four-digit-seven-segment-bubble-led-display-module-australia/
I have two questions:
1. Which version of MLX90614 are you using (part number please)?
2. What does the inside of the black tube over the sensor in your MLX9014 part look like? Is it shiny or bare metal? Hopefully you can see the inside of the tube.
The most common sensor available is the MLX90614ESF-BAA-000-SP which is in a metal TO-39-4 can package (which does not look like your part). The MLX90614ESF-BAA-000-SP is a 3V part with a 90 degree field of view (FOV). That wide FOV would be difficult to use for any type of precise area measurements. From the picture of your sensor it looks like it might be a sensor with a 10 or 35 degree FOV. But it most certainly is not a 5 degree FOV part, the black tube over your sensor is not long enough.
There are around two dozen versions in the MLX90614 series. Telling them apart from the datasheet and/or the Melexis web site is almost impossible, neither source seems complete. But there is this product overview from Melexis you can down load:
https://www.melexis.com/en/documents/documentation/product-flyers/quick-reference-infrared-temperature-sensors
Perhaps this Digi-Key parametric table is better as it is the only place I have found that shows pictures of all the different versions. But the table does not include all the parameters, especially the FOV:
https://www.digikey.com/products/en/sensors-transducers/temperature-sensors-analog-and-digital-output/518?FV=ffe84f81&quantity=0&ColumnSort=0&page=1&pageSize=50
The versions with the narrower FOVs seem to be the standard TO-39-4 part with an added black colored tube stuck over the end. The narrower the FOV, the longer the tube. But the tube is probably not as simple as it looks. If I am not mistaken I think the inside of the tube has a low emissivity mirror-like coating (maybe a physically or chemically vapor-deposited aluminum-based compound). If the inside of the tube did not have a low emissivity coating, the normally wide FOV of the sensor would be mostly measuring the temperature of the tube itself, not the target.
+n, a suitable non zero positive integer not directly correlated with your ego and not (yet) in the complex plane ;-)
Good review on detail exploration well done, in some circles worth paying for too :-)
Hi
where do i find the source code for Attiny 2313?