A Physical Knob For Browser Tabs

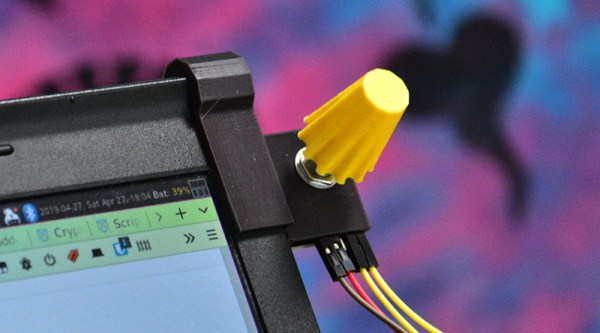
If you’re like most of us, you have about twenty browser tabs open right now. What if there were a way to move through those tabs with a physical interface? That’s what [Zoe] did, and it’s happening with the best laptop ever made.

The hardware for this build is simply an Arduino and a rotary encoder, no problem there. The firmware on the Arduino simply reads the encoder and sends a bit or two of data over the serial port. This build gets interesting when you connect it to a Firefox extension that allows you to get data from a USB or serial port, and there’s a nice API to access tabs. Put all of this together, and you have a knob that will scroll through all your open tabs.

This build gets really good when you consider there’s also a 3D printed mount, meant to attach to a Thinkpad X220, the greatest laptop ever made. At the flick of a knob, you can scroll through all your tabs. It’s handy if you’re reading three or four or five documents simultaneously, or if you’re just editing video and trying to go through your notes at the same time. A great invention, and we’re waiting for this to become a standard device on keyboards and mice. Check out the video below.

Continue reading “A Physical Knob For Browser Tabs”

MIT Cryptographers Are No Match For A Determined Belgian

Twenty years ago, a cryptographic puzzle was included in the construction of a building on the MIT campus. The structure that houses what is now MIT’s Computer Science and Artificial Intelligence Laboratory (CSAIL) includes a time capsule designed by the building’s architect, [Frank Gehry]. It contains artifacts related to the history of computing, and was meant to be opened whenever someone solved a cryptographic puzzle, or after 35 years had elapsed.

The puzzle was not expected to be solved early, but [Bernard Fabrot], a developer in Belgium, has managed it using not a supercomputer but a run-of-the-mill Intel i7 processor. The capsule will be opened later in May.

The famous cryptographer, [Ronald Rivest], put together what we now know is a deceptively simple challenge. It involves a successive squaring operation, and since it is inherently sequential there is no possibility of using parallel computing techniques to take any shortcuts. [Fabrot] used the GNU Multiple Precision Arithmetic Library in his code, and took over 3 years of computing time to solve it. Meanwhile another team is using an FPGA and are expecting a solution in months, though have been pipped to the post by the Belgian.

The original specification document is a fascinating read, for both the details of the puzzle itself and for [Rivest]’s predictions as to the then future direction of computing power. He expected the puzzle would take the full 35 years to solve and that there would be 10Ghz processors by 2012 when Moore’s Law would begin to tail off, but he is reported as saying that he underestimated the corresponding advances in software.

Header image: Ray and Maria Stata Center, Tafyrn (CC BY 3.0)

3D Printing A Water Jet Drive

[Ivan Miranda] is always experimenting with 3D printing, and recently has been taking his work on the water. His latest creation is a racing paddle boat, but its performance left [Ivan] with a need for speed. Cue the development of the 3D printed water jet engine (YouTube link, embedded below).

The basic principle of operation is simple. Water is sucked through an inlet, where it is accelerated by a turbine driven by a brushless motor. This turbine, in combination with stator fins, forces the water through the outlet, propelling the boat forwards in the process.

The first prototype is printed in PLA. Tolerances are good, thanks largely to [Ivan]’s experience and well-calibrated printers. After assembly, the engine is fired up, to great results. After sourcing a series of larger tubs in which to test the device, the engine is finally run up to full throttle and appears more than capable of shifting a serious amount of water.

We’d love to see a proper instrumented thrust test, particularly one that compares the device to other water jet drives on the market. Brushless motors make a great drive solution for RC boats, so we’re sure [Ivan] will be tearing up the lake real soon. Video after the break.

Continue reading “3D Printing A Water Jet Drive”

Camera Sees Electromagnetic Interference Using An SDR And Machine Vision

It’s one thing to know that your device is leaking electromagnetic interference (EMI), but if you really want to solve the problem, it might be helpful to know where the emissions are coming from. This heat-mapping EMI probe will answer that question, with style. It uses a webcam to record an EMI probe and the overlay a heat map of the interference on the image itself.

Regular readers will note that the hardware end of [Charles Grassin]’s EMI mapper bears a strong resemblance to the EMC probe made from semi-rigid coax we featured recently. Built as a cheap DIY substitute for an expensive off-the-shelf probe set for electromagnetic testing, the probe was super simple: just a semi-rigid coax jumper with one SMA plug lopped off and the raw end looped back and soldered. Connected to an SDR dongle, the probe proved useful for tracking down noisy circuits.

[Charles]’ project takes that a step further by adding a camera that looks down upon the device under test. OpenCV is used to track the probe, which is moved over the DUT manually with the help of an augmented reality display that helps track coverage, with a Python script recording its position and the RF power measurements. The video below shows the capture process and what the data looks like when reassembled as an overlay on top of the device.

Even if EMC testing isn’t your thing, this one seems like a lot of fun for the curious. [Charles] has kindly made the sources available on GitHub, so this is a great project to just knock out quickly and start mapping.

Continue reading “Camera Sees Electromagnetic Interference Using An SDR And Machine Vision”

A Stylish Low Part Count Non-Contact Thermometer

A non-contact thermometer is a pretty common tool these days, and one that most of us probably have kicking around the lab. You can grab them online for as little as $10 USD, and while they’re nowhere near as capable as a thermal camera, they certainly have their uses. But even with their increased availability, there are at least two safe assumptions we can make about owners of said gadgets: they didn’t make it themselves, and they are probably pretty ambivalent about its aesthetics.

Which makes this project by [Ijon Tichy] particularly interesting. Not only is this a non-contact infrared thermometer that’s extremely easy to build should you be so inclined, but it’s actually quite attractive. In fact, if it wasn’t for the video of it in operation after the break, we would have assumed it was some kind of faux-retro cosplay prop. Even if you don’t have any use for an IR thermometer, you might just want to add one of these to your toolbox on principle.

The main components of the thermometer are a MLX90614 sensor, a gorgeous HP QDSP-6040 bubble display, and a ATtiny2313 microcontroller to tie it all together. The rest are passive components, with the exception of the TP4056 charging module that got tacked on to handle the 200 mAh lithium-ion battery. All of the components are arranged neatly in a line down the length of the thermometer, which is assembled on a piece of perfboard. Rather than go with a 3D printed enclosure that would cover it all up, [Ijon] decided to encapsulate everything in a clear epoxy resin. It looks fantastic, though you’re going to want to triple check all those solder joints before pouring on your “enclosure”.

[Ijon] has provided the diagrams and source code you need to build your own version of this artisanal thermometer, but we think with a custom PCB and perhaps a less liquid enclosure that still shows off the goods, this could be a very popular gadget for the discerning hacker. As we’ve seen, even the most basic of tools can benefit from a stylish makeover.

Continue reading “A Stylish Low Part Count Non-Contact Thermometer”

KiCad Community Shines At First Ever KiCon

Last weekend was KiCon, a gathering of hardware developers from all over the world who use KiCad open source EDA software. This included many of the software engineers who drive development, people who use KiCad in their business, and those who simply love it for being a professional quality tool available for anyone to use.

From hardware show-and-tell, to the lineup of talks, and the social events each evening, there was so much packed into two (plus) days. Join me after the break for a whirlwind tour of the people and the hardware found at 2019 KiCon.

Continue reading “KiCad Community Shines At First Ever KiCon”

OpenGL Shaders And An LED Cube

Back in February at the Hacker Hotel camp in the Netherlands, among the many pieces of work around the venue was a rather attractive LED cube. Very pretty, but LED cubes have been done many times before.

If a casual attendee had taken the time to ask though, they might have found something a little more interesting, for while the cube in question might have had the same hardware as the others it certainy didn’t have the same software. [Polyfloyd] had equipped his LED cube with OpenGL shaders to map arbitrary images to the cube’s pixels in 3D space.

Hardware-wise it’s the same collection of AliExpress LED panels and Raspberry Pi driver board that the other cubes use, in this case mounted on a custom laser-cut frame. Driver software comes from an open-source library round which he’s put a wrapper allowing input through a UNIX pipe. This can take the RGB output of an OpenGL shader, of which he has created both 2D to 3D and spherical projection versions. The must-see demo is a global map of light pollution, and the result is a rather impressive piece of work.

If LED cubes are your thing, don’t forget this recent Hackaday Prize entry.