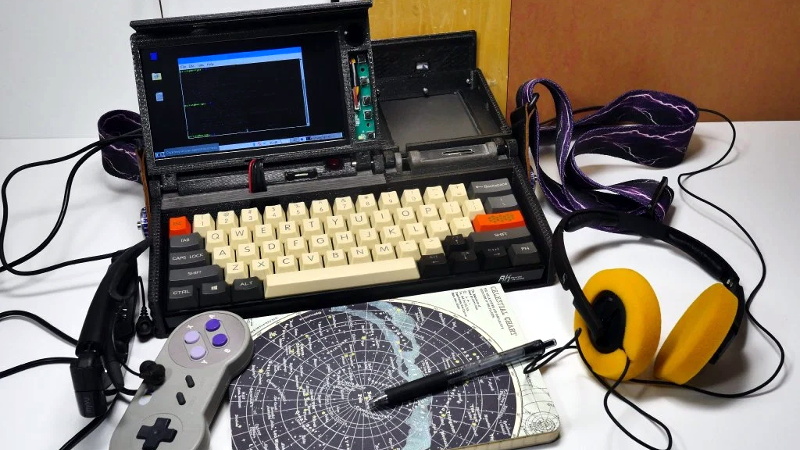
William Gibson might have come up with the idea for the cyberdeck in 1984, but it’s only recently that technology like desktop 3D printing and powerful single board computers have enabled hackers and makers to assemble their own functional versions of these classic cyberpunk devices. Often the final product is little more than a cosplay prop, but when [Joe D] (better known on the tubes as [bootdsc]) started designing his VirtuScope, he wanted to create something that was actually practical enough to use. So far, it looks like he’s managed to pull it off.
Many of the cyberdeck builds we see are based around the carcass of a era-appropriate vintage computer, which looks great and really helps sell the whole retro-future vibe. Unfortunately, this can make the projects difficult and expensive to replicate. Plus there’s plenty of people who take offense to gutting a 30+ year old piece of hardware just so you can wear it around your neck at DEF CON.
 [bootdsc] deftly avoided this common pitfall by 3D printing the entire enclosure for the VirtuScope, and since he’s shared all of the STLs, he’s even made it so anyone can run off their own copy. The majority of the parts can be done on any FDM printer with a 20 x 20 x 10cm build area, though there are a few detail pieces that need the resolution of an SLA machine.
Under the hood the VirtuScope is using the Raspberry Pi 4, which [bootdsc] says is key to the build’s usability as the latest version of the diminutive Linux SBC finally has enough computational muscle to make it a viable for daily computing. Granted the seven inch LCD might be a tad small for marathon hacking sessions, but you could always plug in an external display when you don’t need to be mobile. For your wireless hacking needs, the VirtuScope features an internal NooElec SDR (with HF upconverter) and a AWUS036AC long-range WiFi adapter; though there’s plenty of room to outfit it with whatever kind of payload you’d find useful while on the go.
Documentation for this project is still in the early stages, but [bootdsc] has already provided more than enough to get you started. He tells us that there are at least two more posts coming that will not only flesh out how he built the VirtuScope, but explain why it’s now become his portable SDR rig of choice. We’re excited to see more details about this build, and hope somebody out there is willing to take on the challenge of building their own variant.
In the past we’ve seen partially 3D printed cyberdecks, and at least one that also went the fully-printed route, but none of them have been quite as accessible as the VirtuScope. By keeping the geometry of the printed parts simple and utilizing commonly available components, [bootdsc] may well have laid the groundwork for hackerdom’s first “mass produced” cyberdeck.


Very very nice i wish i could afford the parts for a 3d printer
3D printers can be purchased very cheaply nowadays
But be prepared to spend the same amount again to get it making decent reliable prints.
You can buy an Ender-3 for less than $200.
or an anet a8 kit for $100ish. not the best but you can upgrade it as you go and learn.
What is a virtuscope? Is this from a book?
It’s a piece of test equipment for running diagnostics on a malfunctioning VR while the persons brain is still jacked in. Haha but yeah just purely from imagination.
it’s from the neuromancer
Now this is seriously cool. It’s a bit hard to tell from the video but is that LCD readable?
It’s probably OK. It’s a 1024×600 IPS panel so it should be reasonably clear. I’ve got a similar non-IPS panel and console messages are crisp when you pick the right font size. The desktop works OK but the small real estate gets eaten by window decorations. Instead, I went with stuff like tmux, vim, and ranger on the console to fake a desktop. I can still view images using the framebuffer drivers from within ranger, which is actually pretty cool.
That sounds like a winning combo, I might switch over to i3 or fluxbox wm. Using autohide for the main menu works well enough for rasbian. Text is very readable and the viewing angles are pretty decent. Best part of building something like this is you can always change anything you want like using a 8.9″ 2k LCD instead.
Somewhat reminds me the alkaline-battery powered Amstrad PPC640 https://upload.wikimedia.org/wikipedia/commons/d/d6/AmstradPPC640.jpg
Damn, Amstrad could sue, if they still existed.
Wow, that is pretty close
I want this form factor, but with exposed power, gpio pins, and a breadboarding area as a benchtop development station. Someone makes that and we’re in shut up and take my money territory.
The pi-top comes close but is inly available for the pi3. If they update it (not that stupid box they have just released) to suit the pi4 I will throw money at them.
This thing is begging to be built around a nintendo switch with L4T Ubuntu on it. You’d get better battery and power management, a better screen, a touch screen, solid performances, etc etc for a comparable price ~ do want, naow plz.
What is he using for the LCD hinges? Are they laptop ones (have some resistance so the LCD can be positioned) or does the LCD open and rest on a back support (one set position)?
Looks like it’s just a rod stuck into the 3D printed parts, so yeah, I would assume it simply leans back and rests on the rectangular section behind it.
It’s both. Can be tightened to give resistance against the rubber washers but also it rests against the back.
Are there any videos/images of this? I wanted to see how the washers are mounted to adjust resistance.
Not yet but I’ll make sure to include that with part two or three of the build instructions. It’s very simple tho the LCD mount portion of the hinge is threaded and the m4 bolt slides through the frame portion of the hinge then through a rubber washer and on into the threaded side. Idk how long it’ll keep it’s tension I just haven’t opened and closed it all that much.
Or you can burn your house down and die!
Don’t buy an Anet A8. They’re fire traps, and there’s absolutely no reason to buy one with all the other cheap printers on the market.