Over the years we’ve covered quite a few Raspberry Pi based arcade cabinets, and admittedly many of them have been fairly similar. After all, there’s only so much variation you can make before it stops looking like a traditional arcade machine. But even still, we never tire of seeing a well executed build like the one [Dawid Zittrich] recently shared with us.
 These days you can order a kit that has pre-cut panels to build your cabinet with, but looking for a completely custom build, [Dawid] decided to first model his design in SketchUp and then cut out the panels himself with a jigsaw. This obviously is quite a bit more work, and assumes you’ve got sufficient woodworking tools, but we think the final result looks great. Not to mention the fact that it’s going to be a lot stronger than something made out of MDF.
He also created the side artwork himself, taking the logos and names from his favorite arcade and Amiga games and putting them on a retro-looking gradient pattern. The marquee on the top has an acrylic front and is illuminated from behind with strips of LEDs. It’s mounted on a hinge so that it can be lifted up and a new piece of art slid in without taking apart the whole cabinet. While it might be a little more labor intensive to switch out than some of the electronic marquees we’ve seen, we do like that you still have the ability to change the artwork on a whim.
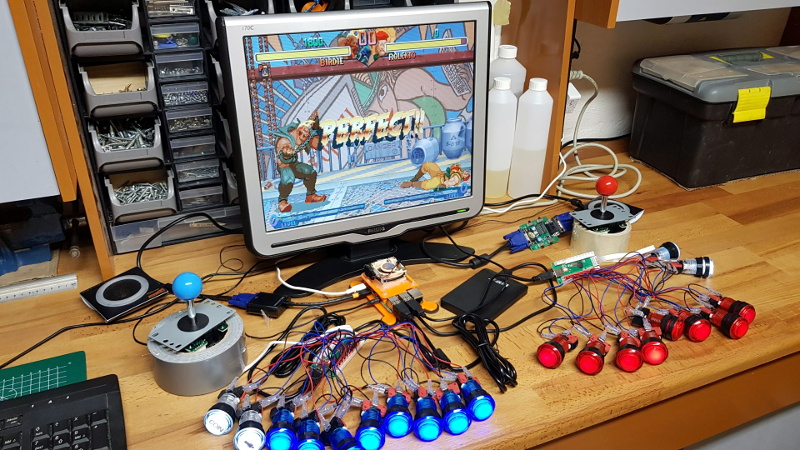
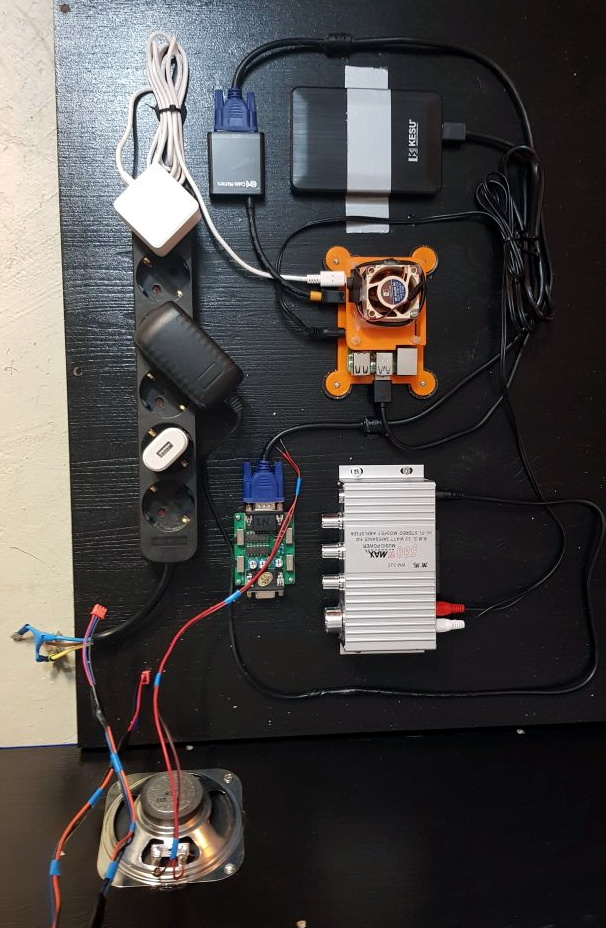
With the cabinet itself completed, [Dawid] turned his attention to the electronics. Inside you’ve got the aforementioned Raspberry Pi 4 (with a Noctua fan to keep it cool), an external hard drive, a HDMI to VGA converter with scanline generator to drive the 4:3 ratio Eizo Flex Scan S2100 monitor, and a rather beefy amplifier hanging off the Pi’s 3.5 mm analog audio output. All of which is easily accessible via a maintenance hatch built into the cabinet so [Dawid] doesn’t need to tear everything down when he wants to tweak something.
If you’d like to have that arcade cabinet feel but don’t have the space and equipment to put something like this together, you could always stick a Raspberry Pi into an iCade and call it a day.


https://cdn.hackaday.io/images/2617971417169330937.jpg
I did things differently.
Any cabinet that doesn’t have a second use will hog space when not being used.
I made a coffee table with old games.
I enjoyed the woodwork even though that’s not a skill of mine.
In hind sight I should have made it so the controls fold or slide out of sight.
It’s here ..
https://hackaday.io/project/3479-arcade-game-table
That’s gorgeous but I would have had a bigger screen and it oculd have doubled as some sort of display. News articles etc.
19″ 4:3 monitors are about as big as it’s easy to find. If you wanna spend days on the hunt and a lot more cash, go bigger.
Oh boy are you in for a treat. Have you heard of pillar boxing? (and letter boxing) it’ll blow your mind!
Basically and this might be hard to imagine but maybe you’ve benefitted from it yourself!
Sometimes the “content” (that’s what you’re going to display on the screen) was made or is intended to be displayed at a particular ratio like 4:3 which you might now from “old timey” movies.
Those black bars are actually there because “monitors” or “TVs” sometimes have a different shape. Like 16:9 or even 21:9 (WOW!).
But by adding black bars or borders around the image we can show them in all their glory! And if we want to use the whole screen we can!
I know! What will science give us next?
You sound like one of those geniuses that will replace a 19″ 4:3 with a 21″ 16:9 and think he’s got a bigger picture.
So do you let the unused screen space hang out the sides of the cabinet like wings or do you make the cabinet wider so you have a big cabinet with a small picture. .
Either way the aesthetics would be terrible.
Why be sarcastic? Do you think you are funny? You are not, you are just rude.
Imagine what you could’ve done with all that energy if you’d channeled it into something positive.
LCD TVs are larger and still available in 4:3 aspect ration. They just about always have HDMI and often even VGA. I use one (37″) as a computer monitor.
It llooks like to me it could comfortable accomodate a screen up to this big https://imgur.com/a/fime43H
Is it really so unreasonable to suggest more of the glass panel could be capable of displaying things? Even if you don’t put a 50″ screen in. A dirt cheap 32″ would be more capable (refresh, resolution, input compatibility) than your average 19″ screen.
Forgetting about boring stuff like a TV
* It could be a kick ass dynamic map in DnD games
* It could show some scrolling info, article headlines + weather
* It could allow people to play more modern game maybe via a bluetooth controller.
* It would look amazing showing maps
* It could show gameboards – monopoly, pandemic etc and people could sit around the desk with easy access rather than be cramped in the middle.
Like I said your project is gorgeous and really well put together but that’s a lotta table for so little LCD.
I could have put a larger LCD in but I was just using what I had lying around.
The screen size limitation for this orientation is horizontal view angle.
Making the table lower like coffee table helps.
To use a bigger screen you need to buy something that has a wide view angle or else the distant part of the screen won’t look right.
wow now this is something new and original
Yeah, this sarcastic comment has never been made before! Refreshing
I’ve found that arcade games lose their challenge when I don’t have a quarter on the line. If you can just press a button to play again, where’s the thrill?
Built it to require inserting a quarter. Funnel that quarter directly into a smelter so that you have really lost the money forever.
You could add a coin slot.
You could make a solenoid activated cigar cutter that you have to insert a toe into for the game to work…
A toe? I can think of a higher stake body part. (c:
The past 20 years I have made over 44 MAME arcade machines for multiple charities. Before I used full size PC’s and over time I replace the PC with the Raspberry Pi’s. Yet I don’t play video games….that’s weird.
The planning and build are always the most fun.
If you want to easily improve the audio with very little effort, I’d plug that 1/8″ jack into the audio port of that HMDI-VGA converter if it has one. Lots do, since they’re converting to old video-only signals. The sound card in there is not going to be state of the art, but it’ll be a lot better than the pi’s awful audio and linux’s dark shameful sound shortcomings. But the HDMI gets decent sound out somehow.
How can that be, that’s digital>analog>digital>analog isn’t it, not only using the same sound chip as on the Pi but adding conversion noise 2 more times.
No, he means running digital audio out through the hdmi out from the pi along with video, then converting the D-A at the HDMI-VGA converter (if said converter has a D/A audio converter built-in). Just one conversion, and a much higher quality one than the Pi’s analog audio out.
Apropos of nothing, I’m looking forward to seeing people emulate a Raspberry Pi on the latest and greatest micro-wafer, 4Tb, 60 googleflop, monofilament lead hobby board.
Really impressive! Great job on the cabinet graphics and fit/finish!
Can you post more pictures? Hard to tell what it looks like.
Too bad there isn’t any decent software to run on it …… By the time Retropie is ready the Raspberry Pi 5 will be out …..
The author says he manually installed retropie on this very system.
I love that beautiful grey duct-tape hard-drive mount. :-)