Over the years we’ve covered quite a few Raspberry Pi based arcade cabinets, and admittedly many of them have been fairly similar. After all, there’s only so much variation you can make before it stops looking like a traditional arcade machine. But even still, we never tire of seeing a well executed build like the one [Dawid Zittrich] recently shared with us.
 These days you can order a kit that has pre-cut panels to build your cabinet with, but looking for a completely custom build, [Dawid] decided to first model his design in SketchUp and then cut out the panels himself with a jigsaw. This obviously is quite a bit more work, and assumes you’ve got sufficient woodworking tools, but we think the final result looks great. Not to mention the fact that it’s going to be a lot stronger than something made out of MDF.
He also created the side artwork himself, taking the logos and names from his favorite arcade and Amiga games and putting them on a retro-looking gradient pattern. The marquee on the top has an acrylic front and is illuminated from behind with strips of LEDs. It’s mounted on a hinge so that it can be lifted up and a new piece of art slid in without taking apart the whole cabinet. While it might be a little more labor intensive to switch out than some of the electronic marquees we’ve seen, we do like that you still have the ability to change the artwork on a whim.
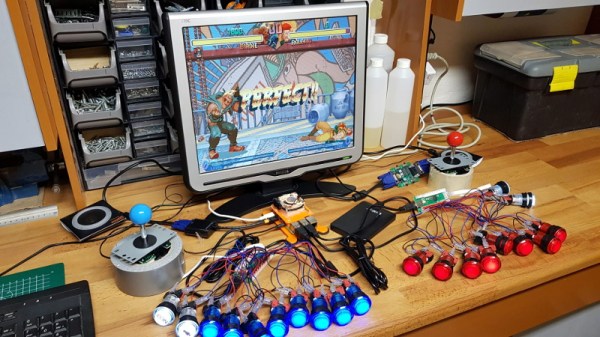
With the cabinet itself completed, [Dawid] turned his attention to the electronics. Inside you’ve got the aforementioned Raspberry Pi 4 (with a Noctua fan to keep it cool), an external hard drive, a HDMI to VGA converter with scanline generator to drive the 4:3 ratio Eizo Flex Scan S2100 monitor, and a rather beefy amplifier hanging off the Pi’s 3.5 mm analog audio output. All of which is easily accessible via a maintenance hatch built into the cabinet so [Dawid] doesn’t need to tear everything down when he wants to tweak something.
If you’d like to have that arcade cabinet feel but don’t have the space and equipment to put something like this together, you could always stick a Raspberry Pi into an iCade and call it a day.