Tracking Cancer Treatment With An ESP8266-Based Radiation Sensor

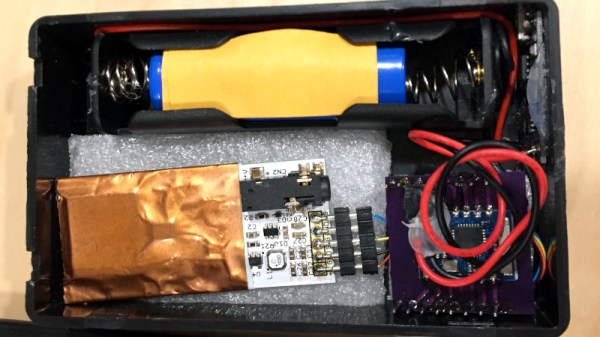
Those of us who have not been in that position can only imagine the anguish of learning that your teenager has cancer. This happened to [Rob], whose child was diagnosed with papillary thyroid cancer. It’s a condition that can be treated with surgery followed by a course of radioactive iodine to kill any remaining cancer cells. During iodine treatment, the patient is radioactive enough that other people must maintain a distance of 3m from them, and as a learning exercise for both father and teen he created and refined the design of a portable wireless radioactivity monitor.

There are a variety of sensors for radiation monitoring including the well-known Geiger–Müller tube, but he settled on a PIN photodiode based sensor supplied by radiation-watch.org. This sensor is not at its most sensitive at the energy levels emitted by the iodine isotope used in the treatment, but the relatively high intensity of the radiation meant that enough would register for a useful reading to be taken. The sensor board he was mated to an ESP8266 module. [Rob] went through three iterations of the balance of the hardware before settling on a lithium-ion battery and a plastic case.

On the software side, the ESP connects to an MQTT server, from which a CSV file of data is derived. On a computer, the CSV data is collected and plotted to a graph. The data take during treatment clearly shows the reduction in radiation following the isotope’s half-life. The graph isn’t perfect though, there is a gap due to the second prototype’s batteries running flat

From his epilogue it appears that his son has recovered, and we wish them further good health. The details have been published in the hope that other young people facing the same trial might benefit from building their own radiation monitor.

A Custom Raspberry Pi 4 Arcade Cabinet

Over the years we’ve covered quite a few Raspberry Pi based arcade cabinets, and admittedly many of them have been fairly similar. After all, there’s only so much variation you can make before it stops looking like a traditional arcade machine. But even still, we never tire of seeing a well executed build like the one [Dawid Zittrich] recently shared with us.

These days you can order a kit that has pre-cut panels to build your cabinet with, but looking for a completely custom build, [Dawid] decided to first model his design in SketchUp and then cut out the panels himself with a jigsaw. This obviously is quite a bit more work, and assumes you’ve got sufficient woodworking tools, but we think the final result looks great. Not to mention the fact that it’s going to be a lot stronger than something made out of MDF.

He also created the side artwork himself, taking the logos and names from his favorite arcade and Amiga games and putting them on a retro-looking gradient pattern.  The marquee on the top has an acrylic front and is illuminated from behind with strips of LEDs. It’s mounted on a hinge so that it can be lifted up and a new piece of art slid in without taking apart the whole cabinet. While it might be a little more labor intensive to switch out than some of the electronic marquees we’ve seen, we do like that you still have the ability to change the artwork on a whim.

With the cabinet itself completed, [Dawid] turned his attention to the electronics. Inside you’ve got the aforementioned Raspberry Pi 4 (with a Noctua fan to keep it cool), an external hard drive, a HDMI to VGA converter with scanline generator to drive the 4:3 ratio Eizo Flex Scan S2100 monitor, and a rather beefy amplifier hanging off the Pi’s 3.5 mm analog audio output. All of which is easily accessible via a maintenance hatch built into the cabinet so [Dawid] doesn’t need to tear everything down when he wants to tweak something.

If you’d like to have that arcade cabinet feel but don’t have the space and equipment to put something like this together, you could always stick a Raspberry Pi into an iCade and call it a day.

Porting Quake To An IPod Classic Is No Easy Task

We didn’t think we’d see another hack involving the aging iPod Classic here on Hackaday again, yet [Franklin Wei] surprises us with a brand new port of Quake for the sixth-generation iPod released some thirteen years ago. Is Quake the new 90s FPS that’ll get put into every device hackers can get their hands on?

The port works on top of RockBox, a custom firmware for the iPod and other portable media players. This isn’t the first game on the device. A source port of Doom has been available for years. [Franklin] decided to use Simple DirectMedia Layer (SDL) to make his job easier. That doesn’t mean this was an easy task though, as [Franklin] describes very interesting bugs that kept him from finishing his work for about two years.

The first problem was that the GCC compiler he was using was apparently not optimizing time-critical sound mixing routines. [Franklin] decided enough was enough and dug into ARM assembly to re-write those parts of the code by hand. He managed to squeeze out a speed increase of about 60%. Even better, he ran into a prime example of a bug that would get triggered by a very specific sound sample length running through his code. Thankfully, with all of that sorted, the port is now released and we can all enjoy cramping our hands around tiny screens to frag some low-poly monsters.

If you need to repair your sixth-generation iPod before you can do that though, no need to worry since they seem to not be so hard to service by yourself. And if the battery life and disk space aren’t quite what they used to be, there’s also the option to bulk it up for winter. Check out the Quake port in action after the break.

Continue reading “Porting Quake To An IPod Classic Is No Easy Task”

Mr. Carlson Gets Zapped By Snow

As a Canadian, [Mr. Carlson] knows a thing or two about extreme winter weather. Chances are good, though, that he never thought he’d get zapped with high voltage generated by falling snow.

[Mr. Carlson]’s shocking tale began with a quiet evening in his jam-packed lab as a snowstorm raged outside. He heard a rhythmic clicking coming from the speakers of his computer, even with the power off. Other speakers in the lab were getting into the act, as was an old radio receiver he had on the bench. The radio, which was connected to an outdoor antenna by a piece of coax, was arcing from a coil to the chassis in the front end of the radio. The voltage was enough to create arcs a couple of millimeters long and bright blue-white, with enough current to give [Mr. Carlson] a good bite when he touched the coax. The discharges were also sufficient to destroy an LED light bulb in a lamp that was powered off but whose power cord was unlucky enough to cross the antenna feedline.

Strangely, the coil from which the arc sprang formed a 36-ohm shunt to the radio’s chassis, giving the current an apparently easy path to ground. But it somehow found a way around that, and still managed to do no damage to the sturdy old radio in the process. [Mr. Carlson] doesn’t offer much speculation as to the cause of the phenomenon, but the triboelectric effect seems a likely suspect. Whatever it is, he has set a trap for it, to capture better footage and take measurements should it happen again. And since it’s the Great White North, chances are good we’ll see a follow-up sometime soon.

Continue reading “Mr. Carlson Gets Zapped By Snow”

Failed: Air Umbrella

About five years ago, a Kickstarter popped up for the air umbrella. It wasn’t long before the project fell apart and the company made at least some refunds. Old news, we know. But [The Action Lab] recently explored the physics behind the air umbrella and why it wouldn’t be very practical. (Video, embedded below.)

Notice we said not very practical, not unworkable. It is possible to shoot rain away from you by using pressurized air. The problem is you need a lot of air pressure. That means you also need a lot of battery. In particular, [The Action Lab] used a leaf blower and even with that velocity, there was only minimal water deflection. In other words, you are still going to get wet.

Continue reading “Failed: Air Umbrella”

Advanced Timber Architecture Gives New Life To Wooden Structures

When it comes to building materials, wood doesn’t always draw the most attention as the strongest in the bunch. That honor usually goes to concrete and steel – steel embedded in concrete provides support and a foundation for tall buildings, while concrete increases tensile strength and can be formed into a variety of shapes with the help of rebar. Wood, on the other hand, decays and is vulnerable to moisture damage and fire.

That’s not necessarily the case anymore, thanks to the development of advanced timber. New materials like glulam, or sheets of timber bonded with moisture-resistant structural adhesives, can be produced using two to three times less energy than steel, making them environmentally-friendly alternatives to other building materials. Granted, this requires the beams to be burned at the end of their lifespan, but glulam still has an equivalent or better environmental profile compared to steel, not to mention a lower cost.

Among engineered wood, there are some varieties more commonly used among hobbyists – MDF, plywood, or particle board for instance. Others, like Cross-Laminated Timber (CLT) are more common among building materials. While CLT buildings have existed for decades, recently major cities like Stockholm and Vancouver have seen a resurgence of timber construction. Since wood can theoretically store carbon for the entire length of its lifespan, up to 0.8 tons in a cubic meter of spruce, some architecture firms like Oslotre are building houses with a negative carbon footprint.

Projects like Sidewalk Labs and Masthamnen are proposing entire neighborhoods and skyscrapers built from advanced timber. Compared to International Style architecture, characterized by gray concrete, shiny metal, and glass, this movement could be a step towards returning to natural architectural forms. Given the stress reducing effects of green spaces in cities, engineered wood buildings could bridge the gap between modern architectural styles and natural woodlands.


THAT Preamp

It is easy to cobble together projects these days. ICs make it simple and microcontrollers even easier. However, we always respect a project that really goes from concept to finished product and that’s what we liked about [Curt Yengst’s] “THAT” Thing microphone preamp.

In part 1 of his post about it, he talks about the basic ideas including the chips from THAT — a small but high-end audio chipmaker — he uses. The first chip is a low-noise audio preamp and the other is a balanced line driver.

In part 2, we get to see [Curt] go from breadboard testing to PCB fabrication all the way to the finished rack-mounted device with a good looking front panel. It worked, but like all designers, [Curt] was already thinking about the next version.

Continue reading “THAT Preamp”