
We’ve often said that one of the best applications of desktop 3D printing is the production of custom enclosures. A bespoke case adds a touch of professionalism to any project, and considering the materials needed to print one will cost less than even the cheapest generic project box, it’s a no-brainer. There’s only one problem: it can take hours to print even a simple case.
To try and speed things up, [Electrobob] has been experimenting with running off enclosures using spiral or “vase” mode on his 3D printer. Unlike the normal layer-by-layer approach, in this mode, the printer’s hotend continually rises at a steady rate during the entire print. Think of it as akin to printing out a Slinky and you should get the idea.
As you might expect, there are some trade-offs here. For one, the walls of the box can’t be very thick since the printer is only making one pass. The nozzle on most printers is 0.4 mm, but in his experiments, [Electrobob] has found he’s able to reliably double that to a wall thickness of 0.8 mm by adjusting the extrusion rate.
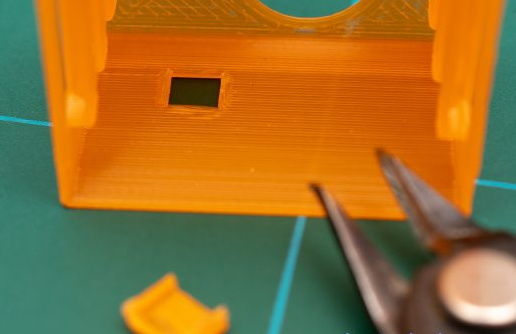
You also need to approach the design a bit differently during the CAD phase. Printing holes in the side of the enclosure, which would be easy enough to do normally, doesn’t really work when running in spiral mode. For those situations, [Electrobob] recommends designing a “pocket” into the side that you can come back and cut out with a knife. It will add a little time to the post-processing stage, but the time saved during the print will more than make up for it.
So how much faster are we talking about? In the example [Electrobob] shows in his write-up, the print time went from nearly two hours to just 18 minutes. The resulting enclosure obviously looks a bit different than the traditionally printed version, and isn’t as strong, but the concept still clearly holds promise for some applications. If you’re building a sensor network that needs a bunch of enclosures, those time savings will really add up.


I’m pretty sure 2-perimeter vase mode is a thing people do, and it could probably go higher.
Then it wouldn’t be vase mode, which by definition is just 1 perimeter thick printed in a spiral.
Set your slicer to zero walls, 100% infill, concentric and you get all the benefits without any other drawbacks here.
Yep. However, there’s no enclosure need I’ve ever had, where .4 mm would be thick enough to be useful, so I wouldn’t even use the zero walls trick. Infill patterns are the biggest time-waster in filament printing.
Get yourself a slightly thicker nozzle. .6mm seems like the sweet spot for me for fast prints while maintaining detail. I can print vase mode with 1.2mm walls without any problems. For Arduino/RPi sized enclosures, this is pretty strong.
Yeah, I’ve been considering that anyway.
You can print wider than your nozzle diameter. I was explaining in the article: for my 0.4mm i could print up to 0.8mm without much degradation, but 1.0 mm is looking a bit bad.
It is true, that PLA is still quite bendy at 0.8..1mm walls when avoiding other structural reinforcement. But it is doable for prototypes and fast results.
It sounds like icing a cake, can you get those star nozzles to make little rosettes? :-D
I frequently do something like this to validate my geometry before I commit to a full print. Vase-mode doesn’t work for everything but saves a lot of time when it does.
You could electroform copper onto the finished print to make it stronger and to act as shielding, then dip that in epoxy containing titanium dioxide pigment for a long lasting result that stays cool in the sun.
> Unlike the normal layer-by-layer approach, in this mode, the printer’s hotend continually rises at a steady rate during the entire print.
You can’t be serious? This would make objects that vary in size over their height impractical. Please tell me this is not how vase/spiral mode works!
The wording of that is misleading; spiral vase mode rises continuously, but keeps layer thickness constant. It’s only a ‘constant rate’ if that term is meant in terms of a percentage of the layer’s loop. Aka, at 50% through the layer (arround the loop), it has rissen 50% of the layer thickness.
Even THAT is inaccurate/misleading. It’s not the distance through the loop; it’s the angle around the Z axis, measured from the starting point to each point. Otherwise the layer height wouldn’t be uniform if one side was much more complex than the other.
In vase mode, my printer definitely stays at the same height for the whole layer then moves up one layer height in one movement before starting the next layer. I’ve watched it do it. It’s really fast when it does it, definitely doesn’t stop moving, but definitely only moves up when the layer is done. Still get a single width wall that “spirals” all the way up.
It depends on part and slicer. The first layers (the base) are always printed normally, in steps. But what happens later depends on slice and how it interprets the part, so both are possible.
For these boxes, the slow increase of Z was the case.
A good idea especially if you change how you think of the case towards it being a cosmetic skin.
Cutting & glueing a bit of PCB or ply inside a case skin might be a lot faster and cheaper than making the 3D print stronger
For small sensors: just pot the contents.
I use paraffin wax as its super easy to remove , and super cheap (I can’t stop my wife collecting those ugly square candle things from the salvation army shop). Now if I work out how to shred polyethylene milk bottles, I could pad the wax out even further.
Shipping container style corrugation might be practical to make parts stronger.
Nylon is way tougher than pla/abs, so perhaps a thin nylon corrugated case might be strong?
Corrugation is an excellent idea. So is potting the internals if you don’t need to remove them later.
While i say potting is an unusual suggestion, i would not do it. Many sensors would need to interface to the air/light etc and sometimes you might want to fix something.
But indeed, using nylon or something tougher is an interesting suggestion.
Video of this would have answered a lot of questions.
Spiral mode can be tricked into making a large variety of useful things that one wouldn’t immediatly think of. So far my best result is a rather attractive AA battery holder.
https://www.thingiverse.com/thing:2209440
How that battery holder has anything to do with spiral mode?
How about nesting one vase-mode print inside another slightly larger print? (After printing them both, not printing them that way.) Perhaps with hot glue in between as reinforcement.
You could use the initial print as a mold…
“continuously” being used to describe the motion of a stepper motor that normally moves four steps per layer.