Quieting Down A Bandoneon Accordion With MIDI

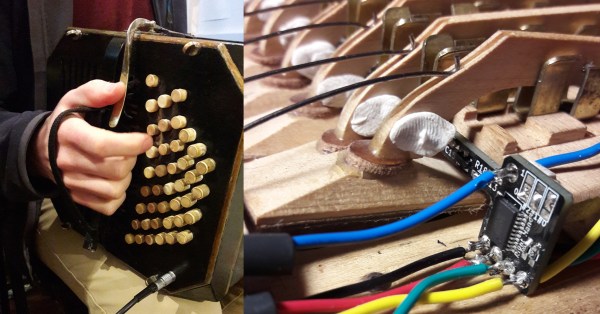
The bandoneon, known as the tango accordion, is quite a loud instrument to practice within the confines of an apartment, and could possibly lead to some neighborly disputes. [HLB] enjoyed playing his but wanted a way to turn down the volume a bit without, in consideration to his neighbors. Instead of building a whole soundproof room, he decided to throw Arduino’s and MIDI at the problem.

Bandoneons, like all accordions, are operated by pushing air from manually pumped bellows through a series of reeds, which are each opened and closed by a valve mechanism. [HLT] turned each valve lever into a simple on/off switch by attaching a magnet, with hall-effect sensors on long custom PCBs next to each row of valves. The hall effect sensors are connected to I2C I/O expander ICs which connect to an Arduino Nano, one for each side of the instrument, which sends out MIDI messages via serial. Everything is mounted inside what looks like quite an old instrument with Blu Tack to avoid having to make a lot of permanent modifications.

The bandoneon still functions normally with no permanent modifications, so to play with MIDI-only the bellow is simply not pumped. This means [HLB] can’t modulate the MIDI velocity (loudness) while playing, which he admits is a limitation but better than not playing at all. He does, however, note that he could add a pressure sensor inside the bellow if we wanted to add velocity to the midi output when neighbourliness isn’t a consideration. On the audio output side [HLB] built a small stand-alone synthesizer with an Odroid SBC running FluidSynth and a HiFi shield.

Continue reading “Quieting Down A Bandoneon Accordion With MIDI”

Simple Demo Shows The Potential Of Magnetic Gears

We’ve probably all used gears in our projects at one time or another, and even if we’re not familiar with the engineering details, the principles of transmitting torque through meshed teeth are pretty easy to understand. Magnetic gears, though, are a little less intuitive, which is why we appreciated stumbling upon this magnetic gear drivetrain demonstration project.

[William Fraser]’s demo may be simple, but it’s a great introduction to magnetic gearing. The stator is a block of wood with twelve bolts to act as pole pieces, closely spaced in a circle around a shaft. Both ends of the shaft have rotors, one with eleven pairs of neodymium magnets arranged in a circle with alternating polarity, and a pinion on the other side of the stator with a single pair of magnets. When the pinion is spun, the magnetic flux across the pole pieces forces the rotor to revolve in the opposite direction at a 12:1 ratio.

Watching the video below, it would be easy to assume such an arrangement would only work for low torque applications, but [William] demonstrated that the system could take a significant load before clutching out. That could even be a feature for some applications. We’ve got an “Ask Hackaday” article on magnetic gears if you want to dive a little deeper and see what these interesting mechanisms are good for.

Continue reading “Simple Demo Shows The Potential Of Magnetic Gears”

John Horton Conway, Creator Of Conway’s Game Of Life, Has Died

Programmers everywhere are familiar with Conway’s Game of Life: whether they’ve written a version themselves or simply seen the mesmerizing action resulting from the cellular automata, it’s a household name in all homes where code is spoken. On Saturday April 11th, 2020 its inventor and namesake, John Horton Conway passed away from COVID-19 at the age of 82.

Born in Liverpool, Conway received his PhD in mathematics in 1964 from Gonville and Caius College, Cambridge. He accepted a position at Sidney Sussex College, Cambridge which he held until joining the faculty of Princeton University in 1987. A brilliant mathematician, he received numerous awards and was well known for his work in combinatorial game theory, group theory, and theoretical physics.

Many readers will be familiar with his Doomsday algorithm which can be used to deduce the day of the week for any given date in your head. But by far the rockstar mathematics moment of developing Conway’s Game of Life in 1970 cements him a perpetual place of legend in computing lore. His original work on the concept used pencil and paper as the computing revolution had yet to make digital resources easily available, even to mathematics researchers like Conway.

The game uses an infinite grid of squares where all of the edges of the grid wrap around. Four simple rules (which can be boiled down to three if you’re clever) determine which cells live and which cells die during each frame of the “game”. The only parameters that are needed are the number and position of living cells at the start of the game, and the delay between each game frame. But the effect of this simplicity is not to be understated. The game can be coded by a novice — and it’s become a common challenge in University course work. Small errors, or intentional tweaks, in the implementation have profound effects on behavior of the game. And the effect on the person programming it for the first time can be long lasting. You could call it a mathematics gateway drug, grabbing the curiosity of the unsuspecting mind and pulling it down the rabbit hole of advanced mathematics discovery.

We’d love to celebrate his life by hearing your own stories of programming the Game of Life in the comments below. If you haven’t yet had the pleasure, now’s a great time to take on the challenge.

[Game of Life example shown in this article is John Conway’s Game of Life – 1.0 written in Python by Nick Jarvis and Nick Wayne]

Using Spiral Mode To Rapidly Print Enclosures

We’ve often said that one of the best applications of desktop 3D printing is the production of custom enclosures. A bespoke case adds a touch of professionalism to any project, and considering the materials needed to print one will cost less than even the cheapest generic project box, it’s a no-brainer. There’s only one problem: it can take hours to print even a simple case.

To try and speed things up, [Electrobob] has been experimenting with running off enclosures using spiral or “vase” mode on his 3D printer. Unlike the normal layer-by-layer approach, in this mode, the printer’s hotend continually rises at a steady rate during the entire print. Think of it as akin to printing out a Slinky and you should get the idea.

Spiral printed boxes may need manual retouching

As you might expect, there are some trade-offs here. For one, the walls of the box can’t be very thick since the printer is only making one pass. The nozzle on most printers is 0.4 mm, but in his experiments, [Electrobob] has found he’s able to reliably double that to a wall thickness of 0.8 mm by adjusting the extrusion rate.

You also need to approach the design a bit differently during the CAD phase. Printing holes in the side of the enclosure, which would be easy enough to do normally, doesn’t really work when running in spiral mode. For those situations, [Electrobob] recommends designing a “pocket” into the side that you can come back and cut out with a knife. It will add a little time to the post-processing stage, but the time saved during the print will more than make up for it.

So how much faster are we talking about? In the example [Electrobob] shows in his write-up, the print time went from nearly two hours to just 18 minutes. The resulting enclosure obviously looks a bit different than the traditionally printed version, and isn’t as strong, but the concept still clearly holds promise for some applications. If you’re building a sensor network that needs a bunch of enclosures, those time savings will really add up.

A Tidy Little OBD Display For Your Car

It’s likely that many readers will have an OBD dongle through which they can peer into the inner workings of their car, but the chances are that most of us will have restricted our curiosity to the Bluetooth or USB interface it was supplied with. Not [Frederico Souza Sant’ana] though, because he’s modified his OBD dongle to expose the serial lines between its ELM327 OBD chip and its Bluetooth chip. These go to an Arduino, which powers a small information display to supplement the car’s dashboard. This can display a range of readings as can be seen in the video below the break, he has it monitoring the battery, the various temperatures in the engine bay, and the ignition parameters.

All the software and hardware details can be found in a GitHub repository. In hardware terms it’s a surprisingly simple unit, but it serves to remind us that OBD sniffer dongles are more versatile than we might at first imagine, and good for a bit more than hooking up our smartphones via Bluetooth. If OBD is something you’d like to visit in more depth, in the past we’ve featured an open-source OBD interface, and a retrospective look at the protocol.

Continue reading “A Tidy Little OBD Display For Your Car”

Yeast Is A Hot Commodity; Brewing And Breadmaking During Lockdown

In the recent frenzy of stocking up with provisions as the populace prepare for their COVID-19 lockdown, there have been some widely-publicised examples of products that have become scarce commodities. Toilet paper, pasta, rice, tinned vegetables, and long-life milk are the ones that come to mind, but there’s another one that’s a little unexpected.

As everyone dusts off the breadmaker that’s lain unused for years since that time a loaf came out like a housebrick, or contemplates three months without beer and rediscovers their inner home brewer, it seems yeast can’t be had for love nor money. No matter, because the world is full of yeasts and thus social media is full of guides for capturing your own from dried fruit, or from the natural environment. A few days tending a pot of flour and water, taking away bacterial cultures and nurturing the one you want, and you can defy the shortage and have as much yeast as you need.

Continue reading “Yeast Is A Hot Commodity; Brewing And Breadmaking During Lockdown”

Don’t Let Your PLA Filament Hang Loose With This 3D-Printed Surfboard

People always tend to push the boundaries of what is doable with a 3D printer.  This is also true for [AndrewW1977] when he decided to 3D print a full-sized functional surfboard.

With just over nine full days of printing time, 95 individual pieces, and using 3.1 kg of PLA (not counting all the test prints), this is certainly a monumental project. One of the bigger issues [AndrewW1977] had to solve was avoiding air pockets inside the board. Ideally, you would want to end up with only one continuous hollow chamber in order to easily vent all the air inside the board when it heats up. [AndrewW1977] chose to overcome this problem by using zero infill for each individual piece. The pieces were then connected with the help of alignment pins that have a central hole thereby connecting all hollow chambers.

By using a triangular shape, he managed to print all pieces without using supports. After gluing them together the whole board was covered with fiberglass and epoxy resin similar to traditional surfboard building. Unfortunately, due to the current situation with Covid19 [AndrewW1977] remains short of showing us the board in action. In case you have a 3D printer at home and lots of spare time during lockdown, [AndrewW1977] has published all files for his surfboard on Thingiverse.

As [AndrewW1977] points out in the video embedded below other people have already done similar projects. From jet boats to electric hydrofoils it seems that water sports and 3D printing are a perfect match.

Continue reading “Don’t Let Your PLA Filament Hang Loose With This 3D-Printed Surfboard”