For some of us, our workbench is where organization goes to die. Getting ready to tackle a new project means sweeping away a pile of old projects, exposing exactly as much bench space needed to plop down the new parts. On the other end of the spectrum lie those for whom organization isn’t a means to an end, but an end itself. Their benches are spotless, ready to take on a new project at a moment’s notice.
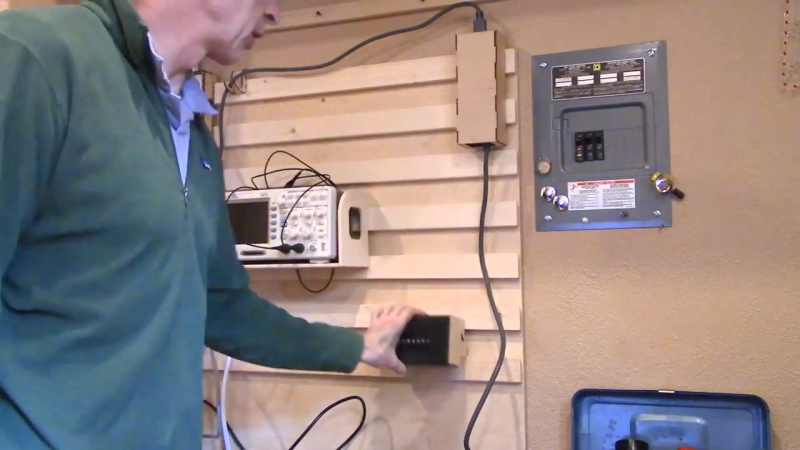
[Eric Gunnerson]’s new French-cleat electronics bench is somewhere in between those two extremes, although nowhere near as over-organized as the woodworking organizer that inspired it. If you’ve never heard of a French cleat, Google around a bit and you’ll see some amazing shops where the system of wall-mounted, mitered cleats with mating parts on everything from shelves to cabinets are put to great use. A properly built French cleat can support tremendous loads; [Eric]’s system is scaled down a bit in deference to the lighter loads typically found in the electronics shop. His cleats are 2″ x 3″ pieces of pine, attached to a sheet of plywood that was then screwed to the wall. His first pass at fixtures for the cleats used a Shaper Origin CNC router, but when that proved to be slow he turned to laser-cut plywood. The summary video below shows a few of the fixtures he’s come up with so far; we particularly like the oscilloscope caddy, and the cable hangers are a neat trick too.
What we like about this is the flexibility it offers, since you can change things around as workflows develop or new instruments get added. Chalk one up for [Eric] for organization without overcomplication.


Love it! Though I think I have a few too many 80 lb, 2 foot deep oscilloscopes for this approach.
Lots of kitchen cabinets, full of 100s of pounds of plates and glasses, are attached to the wall with French cleats. The sheer strength of a 1×4 when well-supported by its backing is pretty high.
Right now I’m using an HP 8753B network analyzer as a workbench. Nice and solid, and no other place to put it anyhow.
Heh, I end up like that sometimes, a pile of system units in front of the bench so I end up working on top of the top one.
Interesting. But taking off on another direction — I just made a hard rule with myself. Nothing gets stored on the workbench!!! The workbench is my most important tool. If I find anything on the bench that isn’t a “project currently in progress”, it gets thrown on the floor or in the trash immediately. Punish yourself, break things, learn the lesson.
I am amazed how pleasant (and productive!!) it is to have the workbench available at all times to work on things. Clean up after each task. Don’t be a slob.
THAT is SOOO hard to do. Just last week I cleaned off my work bench because my laptop kept falling off the box I’d put on top of the junk so I had a flat surface. No lying. LOL
That sounds like my work bench.
Y’all need to grab one of those fruit crates and yank the panels off one side, then you’ve got your platform on stilts, only need to poke 4 holes for it to stand on and still reach stuff under it.
Also though, I was doodling a concept for a low bench space mount for a SFF desktop machine that has full ser/par ports, puts them where they’re easy to get at, and also you can stick a special card or two in, unlike laptops or all-in-ones. It was pretty simple really, just cut two A frame type bits of ply and recess the box into one side, front to the right, back to the left so the ports are on the side, stringer beside the case side, between the As to keep it together, pipe hanger strip between them 100 or 120mm between centers on it so you can bolt LCD monitor on. Double step on the keyboard cutout so you can stand it up flat against monitor, hopefully not covering too much, maybe the bottom bezel and controls, or down flattish at good typing angle. Give it enough leg to stand at least 3 inches off bench, or higher if you like, but might need more spread to keep it stable if you go high.
Eh, I had a bare motherboard embedded somewhere on my bench back in the day.
Moved over to whatever laptop I’m using and USB controllers years ago; all the devices tend to hang off the network rather than my personal machine these days.
No, no no! you are doing it wrong. You just allocate a new table (take a spare table, cut the legs at current stack size (pile of stuff on table), an vola, you got a complete clean desk! you can always pop one level to recover your old work ;)
Every project I have are currently in progress. Don’t be so anally retentive.
I need a High Density Mobile Shelving system, but for workbenches.
https://youtu.be/7Or_8MFcaF8?t=2
I haven’t held an Xbox 360 p.s. while in use, but enclosing his in the plywood box makes me worry about overheating.
But, I will admit, he has some good ideas going on!
Author here. The power supply actually has a small fan and small holes at each end; the mount is set so that that those are free.
Is it the original 360 PS that’s the highest power? IIRC there were 4 different 360 power supplies, each with less output as MS reduced the power needs of the console.
I think so. The one I have does 16.7 amps IIRC
Slatwall, commonly used in retail, might be a viable alternative to building your own French cleats. Available different locations, sample: https://www.homedepot.com/b/Storage-Organization-Garage-Storage-Garage-Wall-Organization-Slatwall-Panels/N-5yc1vZccyu
Good point, although it might take some finagling to laser-cut fixtures compatible with it. Might be worth it, though – sadly, I’ll bet a lot of slatwall will be available on the cheap once the mayhem sweeping through the retail world starts closing down every brick-and-mortar store that’s not a big box. “Everything must go, including the fixtures”…
I would strongly discourage using slatwall for anything heavy. It’s MDF and it will fail under heavy load. Great stuff but not for this.
That’s why there are metal inserts that slide into the T slots. With those it’s compatible with regular metal pegboard hooks and brackets. Bare slatwall should be used with the flat metal or plastic fixtures which spread the load.
Author here. I thought about slatwall, but I didn’t think I could build anything out of wood that would be strong enough given the small size of the slots. I could have welded something up, but that would be a different project.
Use slatwall with the metal inserts. Works with standard pegboard fixtures or the wide/flat slatwall fixtures that spread the load. Could build a mini metal brake or jig to bend some decently thick sheet metal into brackets to attach to things.
I thought about that; it would have been a metal project rather than a wood project and I’m not equipped to do CNC in metal…
> our workbench is where organization goes to die. Getting ready to tackle a new project means sweeping away a pile of old projects, exposing exactly as much bench space needed to plop down the new parts.
I resemble this statement, help me Hackaday
I got a new bench power supply last week, so I dug my forearm into the debris field on my bench, swept it to the right a few inches, and had just enough room to plunk down the PS for initial check-out.
My mess is as self-healing as my cutting mat.
I’ve got a small trick to reduce workbench congestion. I’ve got a bunch of cardboard trays, l got mine from cases of cat food, the ones the wet food cans were shrink wrapped to, but you can (could pre-plague) get them at the grocery store if you asked. I do small projects on them and taking things apart for repair, or modification etc, then when you get into them and go “Damn, I need to order a frelling surface mount jack, not a through hole..” you can pile them precariously elsewhere. Leaving it half done, bits all together. Then instead of having 10 minor projects and 2 major (or larger) projects scattered all over the bench you can have 5 major projects instead. It does have the disadvantage that you’re always hunting through the darn things because your TX-6 bit or roll of fine solder ended up in one, derp.
I buy the .98 cents at the time, I think they are 1.00 and some change now. There are the plastic boxes called plastic shoe boxes. for the bigger projects I just get slightly larger plastic bins. Used to store just projects in them but lately gotten lazy and have been storing components in them as well.
Nice for storage I agree, use a few myself. However, the trays, you can work in/on, due to being shallow, and do not need to gather everything up into another container, it’s just grab and move. Stops screws and round parts rolling away. If something is hung up indefinitely due to lack of parts, or I waited so long to get back to it it’s not relevant, or I have completely lost interest, I can dump it into a tub and reclaim the tray or tip it in the random part foraging box or whatever.
Yeah I do the same – partly as I have too many styles of project and only one small workshop room and another table to work off.
One way to avoid leaving the tools in the trays is to have a secondary ‘tray’ set up to hold all the tools neatly for each type of project on whichever side is your dominant hand so it can all be put ‘away’ as you put it down effortlessly (can be the other hand or if like me are don’t really have one pick a side and try to be consistent you will get into the habbit of reaching for and dropping the tool in the right place pretty quick). For me this tends to be a toolbox with draws and a tray that drops off the front – so you have the front drop that holds the draws closed to dump the currently in use tools while working.
I don’t have that sort of toolbox tray setup for every style of project yet, in fact I could really do with a few weeks of woodworking to make them again for better tool stores and consistent sizes for better stacking of the ones not in use. But haven’t yet got the money to build one around a decent O-scope and soldering rework station (as I can’t afford a decent O-scope or more soldering equipment atm) so the electronics side is the worst mess to use.
Furniture grade 1/2-3/4″ 7 ply plywood french cleats (but no MDF) are a wonderful solution for a lot of modern gear. In the case of dinosaurs such as an HP 8510C, *no* cantilever will take the load of things marked “two person lift”. If you try that you will cry one day when it falls.
I’m building two custom benches on casters, each with 4 integral racks above bench top height, power supply via IEC cable leads shielded by 5/16″ steel flex conduit and EMT with ESD flooring on the benchtops as well as the floors. All in a fully shielded, near TEMPEST spec lab room with isolation transformer.
I’m old, so I can get away with it. It was what I dreamed of when I was younger. Just not a hot rod guy.
If money’s unlimited just use aluminum plate with milled t-slots.
I have a freestanding bench, on the back I have pegboard painted white, then the tools outlined in sharpie so it naturally irritates me to see a blank outline, which eventually forces me to clean my shit up (eventually not perfect I still get a pile going during the heat of the project … then something else comes along then back)
“then something else comes along..”
That’s what screws me up the most. All the household, car, everyday equipment emergencies and crash programs that suddenly have to be done right now, usually in half the time you’d like to have. Performing miracles is messy and exhausting, so as soon as the last screw is turned everything just gets dumped back in the work area any old how and you crash.
Looks like a poor-man’s DIN rail.
Whoever bought up the slat-wall from the closing Radio Shack stores doesn’t look so silly now.
I still have some leftover pegboard from an even earlier RadioShack decor.
Same here. I picked up the other half of that, the pegboard racks. They come in handy.