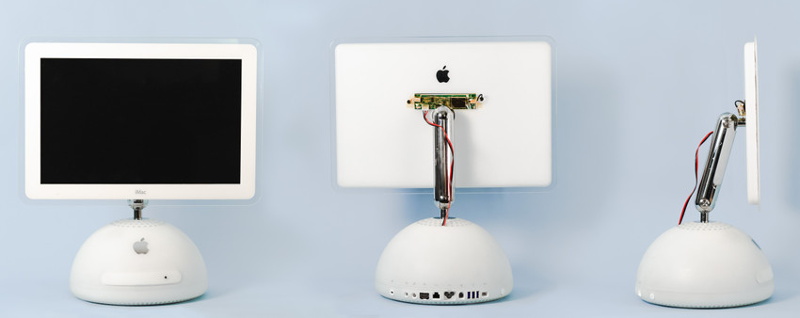
Released in 2002, Apple’s iMac G4 was certainly a unique machine. Even today, its hemispherical case and integrated “gooseneck” display is unlike anything else on the market. Whether or not that’s a good thing is rather subjective of course, but there’s no denying it’s still an attention grabber nearly 20 years after its release. Unfortunately, it’s got less processing power than a modern burner phone.
Which is why [Tom Hightower] figured it was the perfect candidate for a retrofit. Rather than being little more than a display piece, this Intel NUC powered iMac is now able to run the latest version of Mac OS. He even went as far as replacing the display with a higher resolution panel, though it sounds like it was dead to begin with so he didn’t have much choice in the matter.

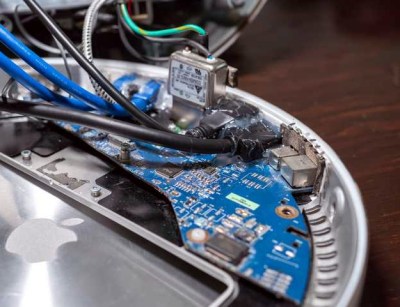
The retrofit starts off with a brief teardown, which is quite interesting in itself. [Tom] notes a number of unique design elements, chief among them the circular motherboard. The two banks of memory also use different form factors, and only one of them is easily accessible to the end user. Something to think about the next time somebody tells you that Apple’s “brave” hardware choices are only a modern phenomena.
There was plenty of room inside the iMac’s dome to fit the NUC motherboard, and some extension cables and hot glue got the computer’s rear panel suitably updated with the latest-and-greatest ports and connectors. But the conversion wasn’t a total cakewalk. That iconic “gooseneck” put up quite a fight when it was time to run the new wires up to the display. Between the proprietary screws that had to be coerced out with a Dremel to the massive spring that was determined to escape captivity, [Tom] recommends anyone else looking to perform a similar modification just leave the wires on the outside of the thing. That’s what he ended up doing with the power wires for the display inverter.
If you like the idea of reviving old Apple hardware but don’t want to anger the goose, you could start on something a little easier. Like putting an iPad inside of a Macintosh Classic shell.


Good timing and neat build. I was wondering the other day about the 360 degree cameras and the software being only Android or iOS and maybe making a VM with OSX. Though was thinking I might have a reason to use one of the eMac’s from the same era with a new purpose for life maybe? Wondering why no ones hacked the Rylo app to a Windows or other desktop OS and if has, what’s the best route to take for emulating phone/tablet apps?
Man if you took an eMac or iMac G3 and replaced the CRT with an LCD you’d have TONNES of space to build in! (if you wanted to keep the crt it might be a cool challenge though :)
Definitely let us know if you go for it!
Will do. Have three given to me for free and if you or anyone else interested are in the Lake Michigan area I’d can pass one on. I do have two LCD’s earmarked for the conversion and now you have me thinking I can maybe add a KVM switch and run more than one mobo inside. Was thinking a handgrip or slip resistant material in a grip area will be a nice improvement also. Thinking blowing more air through also to cool things down some more too and see what I can push more out of the stock gear.
Nice, I wonder how much it would have cost for OSHPark (or someone) to make a rounded interface board instead of cutting the original round motherboard in half?
Oh man that’s a great idea. That would have definitely made the I/O a lot cleaner :)
Might have to revisit this at some point…
So, now the geek kid in the comic strip “Foxtrot” (https://foxtrot.com/) can upgrade his iMac G4!
Oh, it looks like he already replaced it.
https://foxtrot.com/2019/03/24/dinner-disconnections/
I guess he didn’t have a spare Raspberry Pi on hand?
Can’t run macOS on a Pi
Yeah, my original plan was to just stick a Pi in it and be done, but as I got into it I realized there was plenty of space to put more capable hardware that could get it running macOS, which would be sick!
Unfortunately, like Ben commented, macOS can’t run on a Pi (mainly due to the lack of ARM support in macOS afaik).
Booo. Would hardly be an upgrade. I’m always glad to see NUC builds instead of yet another pi-in-a-thing. I like the NUC.
Nothing wrong with a nice Pi based build and to such a vintage device would be a fairly significant step up in useful performance just from the vidcore GPU part of a Pi.
But the NUC’s/laptop motherboard/small atx retrofit re-builds are always nice to see, hopefully better performance than a Pi and its not an arm chip so more choice in software and OS you can run.
Cool idea!
I’ve got one of those was debating what to do with it – I’d considered a Pi cluster, but this looks like a better approach.
As far as I know the screen on mine works… Anyone have thoughts about how easy/hard it would be to reuse the existing screen with a NUC? My system is in storage right now, and way down the list of projects…
Hard to say without knowing the precise kind of screen and its interface, but many NUCs have an LVDS display ribbon connector on the board. I’ve driven a flat panel directly off a NUC before, no HDMI cable/LCD controller board necessary. Which is probably good, since you’re going to have a hard time finding a controller for that old display. I’d still just measure it and put a newer laptop replacement screen in there, though; that was not a good year for LCDs.
Actually, just took a closer look at it—it’s embedded DisplayPort, not normal LVDS. So probably won’t connect to that old thing after all.
Some of the G4s had panels that would take a tmds dvi signal.
http://www.dremeljunkie.com/2011/08/guide-step-by-step-17-imac-g4-tmds-to.html
Yes! As long as the screen and inverter work this is a great option, especially since it means you don’t have to open up the neck like I did. Then you can just adapt the dvi signal to HDMI and plug into the NUC.
@Ithemick definitely let us know if you go for it, I’d love to see how you tackle it!
Great write-up! I appreciate the links to Dremel Junkie, etc. for those who might also want to take the plunge.
Definitely! There’s a bunch of great resources out there; I hope that this inspires somebody else to do it even better!
The “shorted” inverter wires doesn’t carry ‘a signal’. they carry high frequency AC and too much capacitance on these wires will make it impossible for the inverter to drive the CCFL. What makes me think, why would anyone want to put in a CCFL backlit panel in a new build? …
Good catch; I definitely messed up my wording there, but I think the point that the wire being unusable despite continuity still stands. You’re totally right about the short causing high capacitance, which can also be pretty dangerous.
My main reason for going with a CCFL backlit panel was cost. I wanted to keep this system low-cost, and I could either get the panel I got for $35 or spend more like $120+ for an LED panel (which was also harder to find in the correct aspect ratio). Additionally, I originally intended to re-use the backlight inverter, so I wanted to get a compatible panel, but I later found that the og inverter was bust :(
If you have any resources or ideas for how I could have done the display assembly differently/better, I’d love to check them out!
Ben Heck has modified smaller portable displays by replacing the CCFL with some white LEDs. If the CCFL is just along one edge (which I think is the usual setup?) that might not be too difficult.
Oh that’s a really cool idea; I’ll definitely look into it!
I would love to hack a power mac g4 “cube”
Do it! Those things look sick; if you can find one broken/for cheap that would be a great project