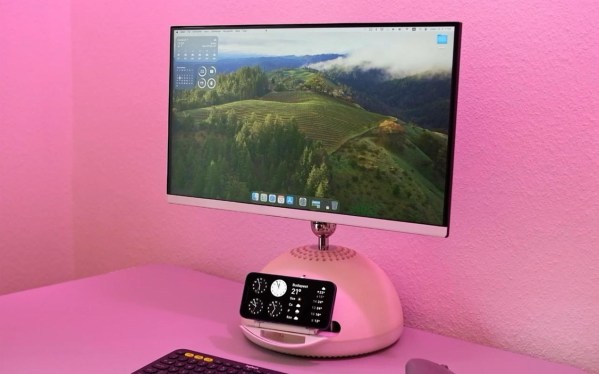
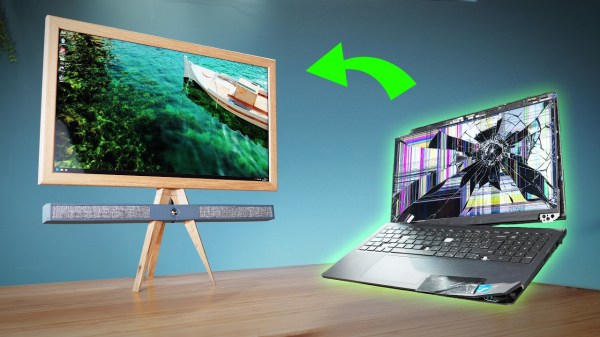
Customizing The Start-Up Chime On A 1999 G3 IMac

The start-up chime on Macs is probably as recognizable as the default Nokia ringtone in this day and age. Yet much like a ringtone, so too one might want to change the start-up chime on a Mac. This is something which [Doug Brown] has done in the past already on a Power Mac G3 in 2012, which made him instantly an expert on the topic in the eyes of a reader who wanted to know how to change the chime on a 1999 iMac. While the firmware on both these systems is written in Forth, it did take a bit of sleuthing to figure out where the chime was hiding in the firmware image, and how to change it.

The target iMac is somewhat unique in that it has a G4 PPC CPU rather than the more common G3. The firmware is similar enough that it was a snap to simply search the newer iMac’s firmware for the signature of the chime sound data. This turned out to be the identical QuickTime IMA ADPCM format-encoded data, yet what was different was how this data was integrated into the firmware image. Key is finding the area in the firmware where not only the address of the chime data’s start is defined, but also its length. Finally, the checksums in the firmware image have to be updated so that it matches the patched data.

Reverse-engineering the checksum calculation in the Forth code turned out to be fairly straightforward, but getting the new firmware on the iMac turned out to be the biggest struggle, as [Doug] didn’t want to inflict running a manual firmware update onto this reader he was doing all this work for. This led [Doug] to do some more reverse-engineering using Ghidra to enable the use of the automatic updater like a regular firmware update.

In the end it all worked out great, and now another iMac no longer has the Mac chime on start-up.

A miniature iMac clone running MacOS Monterey

Cute Little IMac Clone Runs MacOS On A Tiny Screen

Building a Hackintosh – a non-Apple computer running MacOS – has been a favorite pastime of hackers ever since Apple made the switch from PowerPC to Intel hardware. Though usually built from commodity PC parts, some have successfully installed Apple’s OS onto various kinds of Intel-based single-board computers. [iketsj] used such a board to build a cute little Hackintosh, and apparently decided that if he was going to imitate Apple’s hardware, he might as well take some clues from their industrial design. The result can be seen in the video (embedded below) where [Ike] demonstrates a tiny iMac-like device with a 5″ LCD screen.

The brains of this cute little all-in-one are a Lattepanda, which is a compact board containing an Intel CPU, a few GB of RAM and lots of I/O interfaces. [Ike] completed it with a 256 GB SSD, a WiFi/Bluetooth adapter and the aforementioned LCD, which displays 800×480 pixels and receives its image through the mainboard’s HDMI interface.

The case is a 3D-printed design that vaguely resembles a miniaturized iMac all-in-one computer. The back contains openings for a couple of USB connectors, a 3.5 mm headphone jack and even an Ethernet port for serious networking. A pair of speakers is neatly tucked away below the display, enabling stereo sound even without headphones.

The computer boots up MacOS Monterey just like a real iMac would, just with a much smaller display. [Ike] is the first to admit that it’s not the most practical thing in the world, but that he would go out and use it in a coffee shop “just for the lulz”. And we agree that’s a great reason to take your hacks outside.

[Ike] built a portable Hackintosh before, and we’ve seen some pretty impressive MacOS builds, like this Mini iMac G4, a beautiful Mac Pro replica in a trash can, and even a hackintosh built inside an actual Mac Pro case.

Continue reading “Cute Little IMac Clone Runs MacOS On A Tiny Screen”

An IMac All-In-One’s New Life

There’s a sleek form factor for desktop computers known as an “all-in-one” that enrobes a computer in a monitor. While the convenience of having all your computing in a neat package has some nice benefits, it comes with an unfortunate downside. Someday the computer inside is going to be old and outdated in comparison to newer machines. While a new OS goes a long way towards breathing life into an old machine, [Thomas] has decided to take the path less travelled and converted an old iMac all-in-one into a discrete monitor.

The iMac in question is the 20″ iMac G5 iSight (A1145) with an LG-Philips LM201W01-STB2 LCD panel. Looking back, [Thomas] would recommend just ordering an LCD driver controller kit from your favourite auction house. But for this particular modification, he decided to do things a little bit more manually and we’re quite glad he did.

Luckily for [Thomas], the panel supports TMDS (which both DVI and HDMI are compatible with). So the next step was to figure out the signalling wires and proper voltages. After some trouble caused by a mislabeled power line on the iMac PCB silk-screen (12v instead of 3.3v), he had all the wires identified and a plan starting to form. The first step was a circuit to trick the inverter into turning on with the help of a relay. The female HDMI plug with a breakout board was added and sticks out through the old firewire port. The minuscule wires in the display ribbon cable to the monitor were separated and soldered onto with the help of [Thomas’] daughter’s microscope. Resistances were checked as HDMI relies on impedance matched pairs. To finish it off, an old tactile toggle switch offers a way to turn the monitor on and off with a solid thunk.

We love seeing old hardware being repurposed for new things. This project nicely complements the iMac G4 Reborn With Intel NUC Transplant we saw earlier this year, as they both try to preserve the form factor while allowing a new computer to drive the display.

Mini IMac G4 Made With NUC And 3D Printer

Apple’s computers have been well regarded over the years for their sharp design features. Of course, something that’s great can only be cuter and cooler if it’s made even smaller. In just that vein, [Gary Olson] whipped up a 54% scale iMac G4.

The iMac G4 was the futuristic-looking flatscreen model, and the direct successor to the original CRT-based iMac. Unlike other projects that run Raspberry Pis or simply fit iPads inside, [Gary] elected to go for a Hackintosh-based build. The system runs Mac OS X on a Intel NUC kitted out with a Core i3 CPU. While it’s not a genuine PowerPC, using OS X fits the proper G4 aesthetic. The build relies on 3D printed components, with the scale size largely chosen to suit the size of [Gary’s] printer and the Intel NUC motherboard. [Gary] goes into detail explaining what was required to get the paint finish right and how to make the hinges stiff but movable.

We’re always fans of a mini retro builds, even if the fact that iMacs are now retro means we’re showing our age. If you’ve got your own cute micro PC coming together in the ‘shop, be sure to drop us a line!

Tiny Raspberry Pi Mac Nails The Apple Aesthetic

We know that some in the audience will take issue with calling a Raspberry Pi in a 3D-printed case the “World’s Smallest iMac”, but you’ve got to admit, [Michael Pick] has certainly done a good job recreating the sleek look of the real hardware. While there might not be any Cupertino wizardry under all that PLA, it does have a properly themed user interface and the general aversion to external ports and wires that you’d expect to see on an Apple desktop machine.

The clean lines of this build are made possible in large part by the LCD itself. Designed specifically for the Raspberry Pi, it offers mounting stand-offs on the rear, integrated speakers, a dedicated 5 V power connection, and a FFC in place of the traditional HDMI cable. All that allows the Pi to sit neatly on the back of the panel without the normal assortment of awkward cables and adapters going in every direction. Even if you’re not in the market for a miniature Macintosh, you may want to keep this display in mind for your future Pi hacking needs.

Well, that’s one way to do it.

Despite this clean installation, the diminutive Raspberry Pi was still a bit too thick to fit inside the 3D-printed shell [Michael] designed. So he slimmed it down in a somewhat unconventional, but admittedly expedient, way. With a rotary tool and a steady hand, he simply cut the double stacked USB ports in half. With no need for Ethernet in this build, he bisected the RJ-45 connector as well. We expect some groans in the comments about this one, but it’s hard to argue that this isn’t a hack in both the literal and figurative sense.

We really appreciate the small details on this build, from the relocated USB connectors to the vent holes that double as access to the LCDs controls. [Michael] went all out, even going so far as to print a little insert for the iconic Macintosh logo on the front of the machine. Though given the impressive work he put into his miniature “gaming PC” a couple months back, it should come as no surprise; clearly this is a man who takes his tiny computers very seriously.

Continue reading “Tiny Raspberry Pi Mac Nails The Apple Aesthetic”

IMac G4 Reborn With Intel NUC Transplant

Released in 2002, Apple’s iMac G4 was certainly a unique machine. Even today, its hemispherical case and integrated “gooseneck” display is unlike anything else on the market. Whether or not that’s a good thing is rather subjective of course, but there’s no denying it’s still an attention grabber nearly 20 years after its release. Unfortunately, it’s got less processing power than a modern burner phone.

Which is why [Tom Hightower] figured it was the perfect candidate for a retrofit. Rather than being little more than a display piece, this Intel NUC powered iMac is now able to run the latest version of Mac OS. He even went as far as replacing the display with a higher resolution panel, though it sounds like it was dead to begin with so he didn’t have much choice in the matter.

Somewhere, an early 2000s Apple engineer is screaming.

The retrofit starts off with a brief teardown, which is quite interesting in itself. [Tom] notes a number of unique design elements, chief among them the circular motherboard. The two banks of memory also use different form factors, and only one of them is easily accessible to the end user. Something to think about the next time somebody tells you that Apple’s “brave” hardware choices are only a modern phenomena.

There was plenty of room inside the iMac’s dome to fit the NUC motherboard, and some extension cables and hot glue got the computer’s rear panel suitably updated with the latest-and-greatest ports and connectors. But the conversion wasn’t a total cakewalk. That iconic “gooseneck” put up quite a fight when it was time to run the new wires up to the display. Between the proprietary screws that had to be coerced out with a Dremel to the massive spring that was determined to escape captivity, [Tom] recommends anyone else looking to perform a similar modification just leave the wires on the outside of the thing. That’s what he ended up doing with the power wires for the display inverter.

If you like the idea of reviving old Apple hardware but don’t want to anger the goose, you could start on something a little easier. Like putting an iPad inside of a Macintosh Classic shell.

New Depths For IMac Repair

There’s not much economic sense in fixing a decade-old desktop computer, especially when it’s the fancy type with the screen integrated into the body of the computer, and the screen is the thing that’s broken. Luckily for [JnsBn] aka [BEAN] the computer in question was still functional with a second monitor, so he decided to implement a cheap repair to get the screen working again by making it see-through.

The only part of the screen that was broken was the backlight, which is separate from the display unit itself. In order to view at least something on the screen without an expensive replacement part, he decided to remove the backlight altogether but leave the display unit installed. With a strip of LEDs around the edge, the screen was visible again in addition to the inner depths of the computer. After a coat of white Plasti Dip on the inside of the computer, it made for an interesting effect and made the computer’s display useful again.

While none of us, including the creator, recommend coating the inside of an iMac with Plasti Dip due to the risk of fire and/or other catastrophic failure, there’s not much to lose otherwise. Just don’t shove this one into the wall. Continue reading “New Depths For IMac Repair”