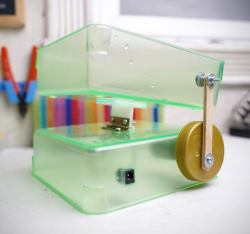
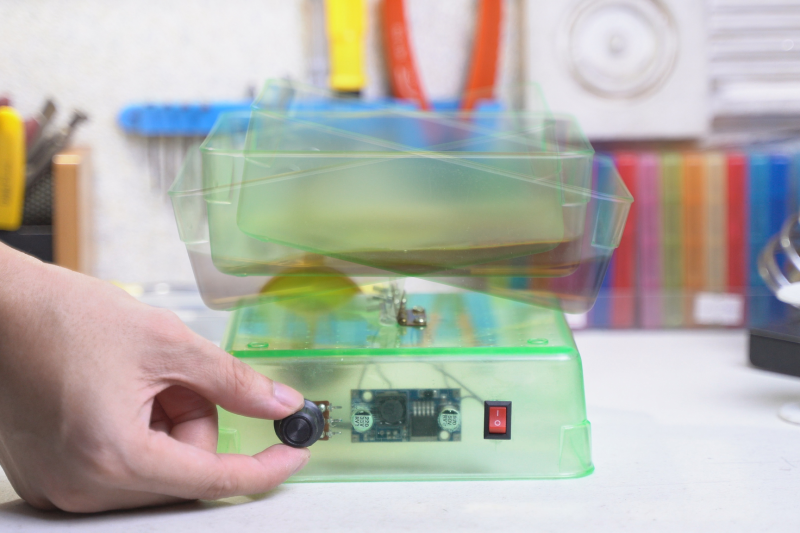
Anyone who has ever etched their own PCB knows that the waiting is the hardest part. Dissolving copper in ferric chloride takes time, much like developing a Polaroid picture. And although you really should not shake a fresh Polaroid to speed up development, the PCB etching process thrives on agitation. Why wait an hour when you can  build a simple PCB shaker and move on to drilling and/or filling in 10 minutes?
We love that [ASCAS] was probably able to build this without reaching past the the spare parts box and the recycling bin. There’s no Arduino or even a 555 — just a 12 VDC geared motor, a DC-DC buck converter, and an externalized pot to control the speed of the sloshing.
It’s hard to choose a favorite hack here between the hinge used to rock this electric seesaw and the crankshaft/armature [ASCAS] made from a sandwich spread lid and a Popsicle stick. Everything about this build is beautiful, including the build video after the break.
Did you know that unlike ferric chloride, copper chloride can be recharged and reused? Here’s a one-stop etching station that does just that.


Why??? sorry, but why? ferric chloride stains are the worst.
so, why? not use just a bubbler ? ferric chloride foam works wonder. Why ? do people always invent multi-gonal wheels ?
And this metal screw is just calling for dissolving. Has this thing even been TESTED before being “published”
Besides that, this would be perfect for growing in-vitro plant calluses, except it is very lightweight.
You don’t actually have to shake a polaroid to develop and it’s not much of a wait.
Shaking a polaroid is to dry it off, it’s sticky for a while.
I’m not down with the haters, and I’m certainly not down with the “why etch” people. But…
a) etching in an open container is asking for spills/fumes. Get a sandwich box with a tight-fitting lid.
b) the metal here is gonna rust. this is not a long-term solution. Hot-glue the pivot to the outside?
Bubblers are fine, but have their own downsides too.
Whenever a “lifehack” pops up here, it is most of the time from the same source
This does not have enough hot glue to qualify as a “lifehack”.
How about sticking a phone vibrator motor on a tray ? Or make one yourself with a simple DC motor and an eccentric weight.
That would be too easy. When you code, everything needs a microcontroller…..
That will only create some ripples in the tray
I have never made a PCB at home using ferric chloride and copper, but honestly it looks way too messy and not worth the effort versus the 2$ fee some websites offer for a PCB.
Depending on where u live though. In Canada, it’s hard to find a PCB maker for cheap. Sure, JLCPCB will sell you them for $2 plus $15 shipping but then it will take 2 months to ship from China to canada
I find it weird how every thread about diy pcbs get flooded with tons of “why would anyone do this? Just go to whatever.com and get them for cheap”, is anyone paying you to say this? I hate to be too negative but this comment sounds like an ad for “””the two dollar site””” and not a useful addition to the discussion.
Anyways if you wanted to know, this is why I (and many others) etch their own:
-cost: it’s not 2$ where I live, it’s 20
-time: 1 hour vs 1 month
-I just enjoy making stuff instead of buying. Isn’t that the whole point of doing this in the first place?
So … where are you getting your copper clad and etchants so quickly and cheaply (and without postage), now that Radio Shack is gone?
Well you buy them online once, you wait for the shipping once and then you can make X amount of pcbs until you run out, you can buy a dozen for less than 5 bucks (including postage) on whatever site you usually get stuff from (aliexpress in my case), so for the same shipping time and cost of one of these “”2″” dollar pcbs you can buy a lifetime supply of copper clad and keep them handy at all times. For the etchant I make my own by mixing h2o2 and hcl from the hardware store (about 1$ for a liter of etchant), or in the past I used to make my own ferric chloride, but you don’t have to it’s fairly cheap and readily available.
There are cases where using a professional etching service is better, but those cases are in my opinion rare, there’s definitely a middle ground where perfboard won’t cut it but the circuit is simple enough for diy etching.
Another idea: if you have a 3D printer with a moving bed, it’s easy enough to use the bed to agitate PCB etchant.
… and for sure destroy your chromed X/Y axis with spilled etchant. Brilliant idea.
But what if you put a lid.on the tapeware?
This. Always lid.
Or put it on top of the washing machine. Haha
Who in their right mind would even bother with that crap nowadays? With the PCB costs so cheap now its pointless to do it manually.
Unless you want a PCB done in 2 hours….
Just work on 3 projects at a time so you have something else to work on while you wait for the boards to return.
Just make your own PCBs so you have something else to work on while you wait for your case to 3D print.
That would qualify as pretty much everything on this site. Why build something you can easily buy? Sometimes its just better to know how to do it yourself. You can etch and have a board in less than an hour –especially if its single sided and simple. Often if you let yourself stop working on a project, its difficult to start back up on it –momentum can be the difference between completing a project and mearly starting one –or worse, buying the stuff for a project you never get around to starting.
When I was a kid, I was able to etch PCBs in 8 minutes in only Copper sulfate with salt and warm water.
I worked with my chemistry teacher and we came up with a right proportion formula. If proporion is little bit off, it may not etch at all. The result is unstable. But the right proportion will let it work.
Another trick is let the PCB float on luquid and you can actually see how the copper falls of the board.
Unfurtionatly I do not remember the proportion.
That’s a tricky one, one would assume the presumably resultant Copper Chloride would do nothing, because that’s what you’re left with when you etch with Ferric Chloride. However there are two species, and the II chloride is still hungry for copper, maybe that is what’s happening.
Since copper hydroxide can be precipitated from a CuCl solution by NaOH, it’s possible that a few drops of that would regenerate it, dropping out an insoluble copper compound, replenishing the sodium ions.
Or maybe the CuSO4 just puts the chloride into “copper grabby” mode, kicking off the whole thing, catalysing if you like, whereupon no copper is safe and it takes it off the board too.
>> Copper sulfate with salt
I don’t believe you. Perhaps you are mis-remembering the chemical.
Nice. Simple and clean.
I still use ferric chloride as I like to roll my own – sure it is cheap to have someone else do it. But it is more satisfying to do it myself.
thanks for sharing.
Or, just use copper chloride (using muriatic acid and hydrogen peroxide) and get it done in minutes.
Sodium or potassium persulfate can be used as well. A little added copper sulfate will help it start faster.
I made something like this with an old SCSi tapedrive and a pop stick. But don’t rock on an axis, lift one edge of the container then as the wheel rotates let it set back down. Mechanically much more stable.
While I etch at home much less than I used to it’s still the only way to get a PCB quickly. My business can wait 5-7 days for manufactured boards, 10 days if populated, but don’t overlook the drawbacks.
* You make a mistake? Another cycle begins..
* JLPCB makes a mistake? Watch the customer service disappear. And another cycle begins but even slower now.
* No way to earn customer credibility by delivering proof of concept in 2 days.
I don’t see anyone else mentioning this yet, but etching works best when the board is placed vertically because etch byproducts just fall down instead of buiding up and blocking access to the fresh solution. Temperature is also important, etching in cold ferric chloride is a waste of time. My best recipe: a decapped flat plastic bottle (like gin) in a water bath, some larger container with hot water in it. Super simple, no shaking, no spills, 10 minutes and you’re done.
Nah sorry, sounds too easy, I want to brag about my custom PCB jacuzzi. :-D