While hackers and makers have a tendency to focus on functionality above all else, that doesn’t mean there isn’t room for some visual flair. A device that works well and looks good will always be more impressive than the bare bones approach, but the extra time and money it usually takes to polish up the visual component of a build means it’s often overlooked. Which is exactly what [Jay Doscher] wanted to address with his Mil-Plastic project.
On the surface, the Mil-Plastic is yet another entry in the rapidly growing and often ill-defined world of cyberdecks: custom computing devices that forgo the standard laptop and desktop dichotomy and instead explore the road not taken by mainstream consumer electronics. To that end, it’s a solid build more than worthy of praise. But more than that, it’s also a lesson on how 3D printing and some clever design can create a truly impressive visual for little more than the cost of a spool of PLA.
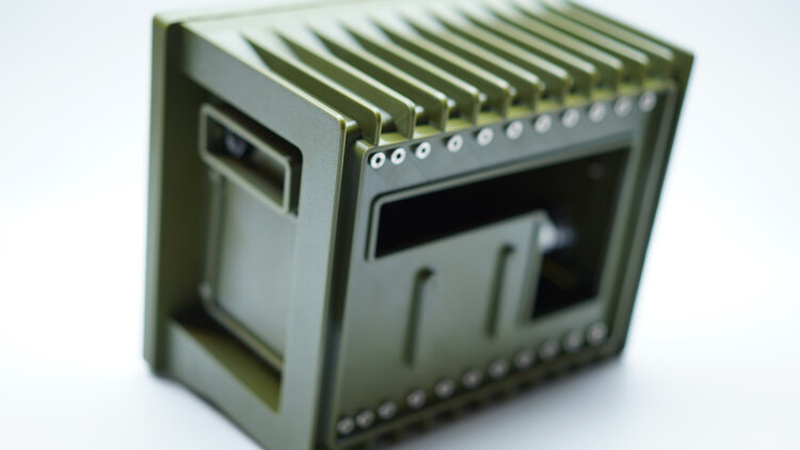
The Mil-Plastic, as the name implies, looks like it was pulled from a Humvee or an Abrams tank. While the gorgeous olive green PETG filament that [Jay] has stumbled upon certainly helps, his eye for detail and design chops aren’t to be underestimated. He’s given the case a rugged and armored look that simply screams “Your Tax Dollars At Work”, complete with faux cooling fins running along the back and a generous application of low-profile stainless steel fasteners. We’ve taken a close look at the decadence of military engineering in the past, and the Mil-Plastic could hang with the best of them.
Most importantly, [Jay] has given us all the tools and information we need to recreate the look on our own terms. You don’t have to be in the market for yet another Raspberry Pi gadget to appreciate the Mil-Plastic; the design can serve as the backbone for whatever you happen to be building. The printed case not only looks impressive, but can easily be modified and expanded as needed.
[Jay] kicked off a minor revolution late last year with his Raspberry Pi Recovery Kit, and has continued to produce well-documented designs that illustrate the incredible power of desktop 3D printing. If you can look through his portfolio and not get inspired, you may want to speak with a doctor.


Oh man look at those prints, how does he make it look like injection molded plastic?
Jay here- no supports, and SLOW. Like each speed is maxxed out at 45mm/sec.
What kind of build plate do you use?
Textured Prusa one.
I am wondering how you placed the parts in the bed, I mean which side faced the bed. I really can’t see way to place your part to bed with out supports.
Also wondering is there any way I could get in touch with you to get some help. My mutantC project I am really straggling to make the parts to print without support.
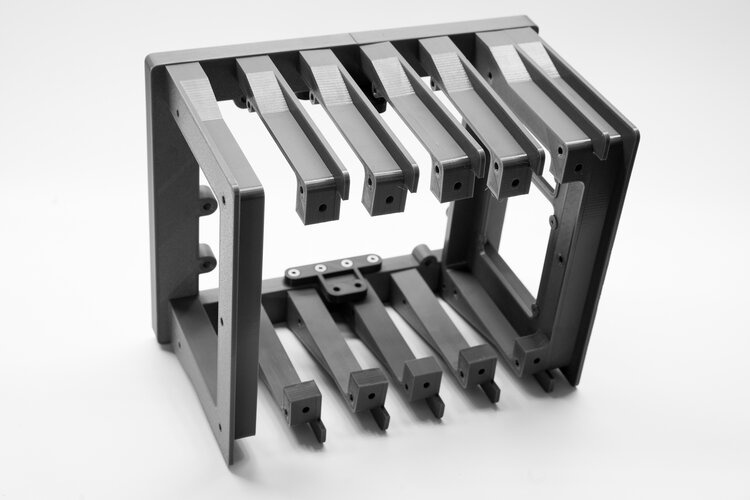
Sounds like you’re looking at the tinkercad model… Jay very cleverly sliced up the frame to make individual components that print perfectly on their side without support, and then sandwich together to give it that mil-spec aesthetic. Simply arrange the components with the face-down orientation as provided on thingiverse. I had to rotate some of them to 1) fit my bed, and 2) maximize the number of things printed… But always keep the faced-down side down. The faced down side then receives the benefit of a nice matte texture. (Prusa i3 MK3s w/textured plate.)
Wow the prints do look amazing. I wish my printer was that tuned. He says he has a Prusa i3 MK3S.
Amusingly a FAQ on the article:
“How do you get your prints to look like that? One simple answer- slow prints (no faster than 45mm/sec), a clean build plate, and no supports.”
They do look amazing!
I don’t know if it is intentional, but there not a single picture which actually shows the whole unit clearly. It is like we are looking a the the project through a microscope with a 1/4″ deep depth of field.
The parts he decided to focus on are very pretty though! I like the strategy of printing the fins as a stack that is post assembled to get them to print better. Kind of the opposite of the usual trend of trying to print everything as a single piece with integral hinges and whatnot.
Take a look at the Tinkercad assembled version- stuff with a ton of detail is really hard to get right, especially smaller subjects. The 3D render of the assembled parts should show you how it’s put together. As for the fins, you’re close- they are to hide the lines between the parts, plus cooling fins look cool.
Plastic cooling fins are a bit weird though…
Looks like you could drive a truck over it.
I’m assuming you can’t because it’s plastic. But it would be hard to fault someone for trying.