38 Years Later, The Atari 2600 Learns To Speak

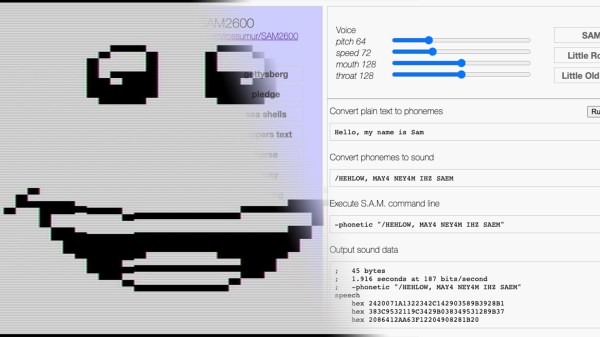
Back in the early 1980s, there was a certain fad in making your computer produce something resembling human speech. There were several hardware solutions to this, adding voices to everything from automated telephone systems to video game consoles, all the way to Steve Jobs using the gimmick to introduce Macintosh to the world in 1984. In 1982, a software-based version of this synthesis was released for the Atari 8-bit line of computers, and ever since them [rossumur] has wondered whether or not it could run on the very constrained 2600.

Fast-forward 38 years and he found out that the answer was that yes, it was indeed possible to port a semblance of the original 1982 Software Automatic Mouth (or SAM) to run entirely on the Atari 2600, without any additional hardware. To be able to fit such a seemingly complicated piece of software into the paltry 128 bytes (yes, bytes) of RAM, [rossumur] actually uses an authoring tool in order to pre-calculate the allophones, and store only those in the ROM. This way, the 2600 alone can’t convert text to phonemes, but there’s enough space left for the allophones, which are converted into sound, that about two minutes of speech can fit into one cartridge. As for why he went through the trouble, we quote the author himself: “Because creating digital swears with 1982 speech synthesis technology on a 1977 game console is exactly what we need right now.”

For this project, [rossumur] has written an incredibly interesting article on speech synthesis in order to explain the SAM engine used here. And this isn’t his first time on the website either, always cramming software where it shouldn’t fit, such as a “Netflix”-like streaming service, or 8-bit console emulators, both on nothing but an ESP32 microcontroller. Check this one out in action after the break.

Continue reading “38 Years Later, The Atari 2600 Learns To Speak”

Cold Tube Draws The Heat

If you live anywhere near the tropics, air conditioning isn’t a luxury but a necessity. The problem however is that humid climates can cause conventional air conditioners to draw more power to dehumidify the air than it requires to just cool it, which increases the power needed to run the unit. Back in 1963, there was a proposal to create a cooling system that didn’t foster condensation and couple it with different methods of removing humidity. Researchers in Singapore have now created such a system. It uses a membrane that is permeable to infrared radiation but prevents condensation around the cooling unit.

You can see a video of the apparatus in a pavilion in the Singapore heat in the video below. Chilled water runs through tubes behind a membrane that passes thermal radiation. Since the tubes are not exposed to the ambient atmosphere, condensation is minimal. But heat radiates from the warmer area to the much colder area of the tubes.

Continue reading “Cold Tube Draws The Heat”

Hands-On: BornHack 2020 Badge Has 9×32 Of Bling Fed By CircuitPython

Despite widespread pandemic cancellations, BornHack still happened this year and they even managed to once again bring an electronic badge to all attendees. If you missed it, I’ve already published an overview of the hacker camp itself. Today let’s dig into the 2020 BornHack badge!

Designed by Thomas Flummer and manufactured in Denmark, it takes the form of a PCB in the shape of a roughly 60 degree circular arc with most of its top side taken up by a 9 by 32 array of SMD LEDs. There is the usual 4-way button array and space for an SAO connector on the rest of the front face, while on the rear are a set of GPIO pads and a pair of AA battery holders for power. Connectivity is via USB-C and infra-red, and usefully there is also a power on/off switch.

At the heart of its hardware is a SAMD21G18A ARM Cortex M0+ microcontroller which is perhaps not the most exciting of chips, but the hardware becomes more interesting with the LED drivers. A pair of the IS31FL3731 chips (you may recognise from Brian Benchoff’s Mr. Robot badge) each drive half of the Charliplexed LED array. These versatile chips take the bother of scanning the LED matrix away from the microcontroller with their own internal frame registers fed from an I2C interface. This choice both makes the best use of the relatively meagre microcontroller in this application, and opens the way for the software choice. This badge runs Adafruit’s CircuitPython, and can thus be programmed over the USB connection in the same way as any other CircuitPython board. To test this I put aside my GNU/Linux laptop, and picked up something considerably less versatile to test its ease of use: a Chromebook.


# configure I2C
i2c = busio.I2C(board.SCL, board.SDA)

# turn on LED drivers
sdb = DigitalInOut(board.SDB)
sdb.direction = Direction.OUTPUT
sdb.value = True

# set up the two LED drivers
display = adafruit_is31fl3731.Matrix(i2c, address=0x74)
display2 = adafruit_is31fl3731.Matrix(i2c, address=0x77)

text_to_show = "BornHack 2020 - make clean"

CircuitPython devices mount as a disk drive in which can be found a Python file that can be edited with the code of your choice. The BornHack badge ships with code to display a BornHack banner text, which serves as a quick introduction to the capabilities of its display. It’s noticeable that the text scrolling performance leaves something to be desired, but this microcontroller is hardly one of the more powerful supported by the CircuitPython platform. The Chromebook was happily able to edit the code, though viewing the Python serial console necessitated diving into its Linux virtual machine.

The BornHack badge then, an attractive design that fulfils the aim of being capable and easy to program through its use of the popular CircuitPython platform, and through its decent sized LED matrix and available GPIOs with the chance of seeing a use beyond the camp as a general purpose display/experimentation platform. It may not be the most powerful of badges, but it does its job well. In particular it has achieved the feat missed by so many others, of arriving at the camp fully assembled and with working hardware and software. You can see more about it in Thomas’ badge presentation at the camp (cut from a stream, talk begins at 5:27) which we’ve placed below the break.

We look forward to seeing its influence upon other similar badges. Meanwhile if you are interested, you can compare it with the 2019 BornHack badge which we reviewed last year.

Continue reading “Hands-On: BornHack 2020 Badge Has 9×32 Of Bling Fed By CircuitPython”

Print-in-Place Engine Aims To Be The Next Benchy

While there are many in the 3D-printing community who loudly and proudly proclaim never to have stooped to printing a 3DBenchy, there are far more who have turned a new printer loose on the venerable test model, just to see what it can do. But Benchy is getting a little long in the tooth, and with 3D-printers getting better and better, perhaps a better benchmarking model is in order.

Knocking Benchy off its perch is the idea behind this print-in-place engine benchmark, at least according to [SunShine]. And we have to say that he’s come up with an impressive model. It’s a cutaway of a three-cylinder reciprocating engine, complete with crankshaft, connecting rods, pistons, and engine block. It’s designed to print all in one go, with only a little cleanup needed after printing before the model is ready to go. The print-in-place aspect seems to be the main test of a printer — if you can get this engine to actually spin, you’re probably set up pretty well. [SunShine] shares a few tips to get your printer dialed in, and shows a few examples of what can happen when things go wrong. In addition to the complexities of the print-in-place mechanism, the model has a few Easter eggs to really challenge your printer, like the tiny oil channel running the length of the crankshaft.

Whether this model supplants Benchy is up for debate, but even if it doesn’t, it’s still a cool design that would be fun to play with. Either way, as [SunShine] points out, you’ll need a really flat bed to print this one; luckily, he recently came up with a compliant mechanism dial indicator to help with that job.

Continue reading “Print-in-Place Engine Aims To Be The Next Benchy”

Simultaneous Soldering Station

Soldering irons are a personal tool. Some folks need them on the cool side, and some like it hot. Getting it right takes some practice and experience, but when you find a tip and temp that works, you stick with it. [Riccardo Pittini] landed somewhere in the middle with his open-source soldering station, Soldering RT1. When you start it up, it asks what temperature you want, and it heats up. Easy-peasy. When you are ready to get fancy, you can plug in a second iron, run off a car battery, record preset temperatures, limit your duty-cycle, and open a serial connection.

The controller has an Arduino bootloader on a 32u4 processor, so it looks like a ProMicro to your computer. The system works with the RT series of Weller tips, which have a comprehensive lineup. [Riccardo] also recreated SMD tweezers, and you can find everything at his Tindie store.

Soldering has a way of bringing out opinions from novices to masters. If we could interview our younger selves, we’d have a few nuggets of wisdom for those know-it-alls. If ergonomics are your priority, check out TS100 3D-printed cases, which is an excellent iron, in our opinion.

VR Technology Helps Bring A Galaxy Far, Far Away To Our TV

Virtual reality is usually an isolated individual experience very different from the shared group experience of a movie screen or even a living room TV. But those worlds of entertainment are more closely intertwined than most audiences are aware. Video game engines have been taking a growing role in film and television production behind the scenes, and now they’re stepping out in front of the camera in a big way for making The Mandalorian TV series.

Big in this case is a three-quarters cylindrical LED array 75 ft (23 m) in diameter and 20 ft (6 m) high. But the LEDs covering its walls and ceiling aren’t pointing outwards like some installation for Times Square. This setup, called the Volume, points inward to display background images for camera and crew working within. It’s an immersive LED backdrop and stage environment.

Incorporating projected imagery on stage is a technique going at least as far back as 1933’s King Kong, but it is very limited. Lighting and camera motion has to be very constrained in order to avoid breaking the fragile illusion. More recently, productions have favored green screens replaced with computer imagery in post production. It removed most camera motion and lighting constraints, but costs a lot of money and time. It is also more difficult for actors to perform their roles convincingly against big blank slabs of green. The Volume solves all of those problems by putting computer-generated imagery on set, rendered in real time via video game engine Unreal.

Continue reading “VR Technology Helps Bring A Galaxy Far, Far Away To Our TV”

Mil-Spec Looks Without Defense Department Budget

While hackers and makers have a tendency to focus on functionality above all else, that doesn’t mean there isn’t room for some visual flair. A device that works well and looks good will always be more impressive than the bare bones approach, but the extra time and money it usually takes to polish up the visual component of a build means it’s often overlooked. Which is exactly what [Jay Doscher] wanted to address with his Mil-Plastic project.

On the surface, the Mil-Plastic is yet another entry in the rapidly growing and often ill-defined world of cyberdecks: custom computing devices that forgo the standard laptop and desktop dichotomy and instead explore the road not taken by mainstream consumer electronics. To that end, it’s a solid build more than worthy of praise. But more than that, it’s also a lesson on how 3D printing and some clever design can create a truly impressive visual for little more than the cost of a spool of PLA.

The modular design allows parts to be printed in parallel.

The Mil-Plastic, as the name implies, looks like it was pulled from a Humvee or an Abrams tank. While the gorgeous olive green PETG filament that [Jay] has stumbled upon certainly helps, his eye for detail and design chops aren’t to be underestimated. He’s given the case a rugged and armored look that simply screams “Your Tax Dollars At Work”, complete with faux cooling fins running along the back and a generous application of low-profile stainless steel fasteners. We’ve taken a close look at the decadence of military engineering in the past, and the Mil-Plastic could hang with the best of them.

Most importantly, [Jay] has given us all the tools and information we need to recreate the look on our own terms. You don’t have to be in the market for yet another Raspberry Pi gadget to appreciate the Mil-Plastic; the design can serve as the backbone for whatever you happen to be building. The printed case not only looks impressive, but can easily be modified and expanded as needed.

[Jay] kicked off a minor revolution late last year with his Raspberry Pi Recovery Kit, and has continued to produce well-documented designs that illustrate the incredible power of desktop 3D printing. If you can look through his portfolio and not get inspired, you may want to speak with a doctor.