Any video that starts with a phase diagram has instantly earned our attention. Admittedly, we have a pretty low bar for that kind of stuff, but eye candy aside, [Robin Debreuil]’s quick outline of his technique for desoldering with the help of bismuth is worth watching.
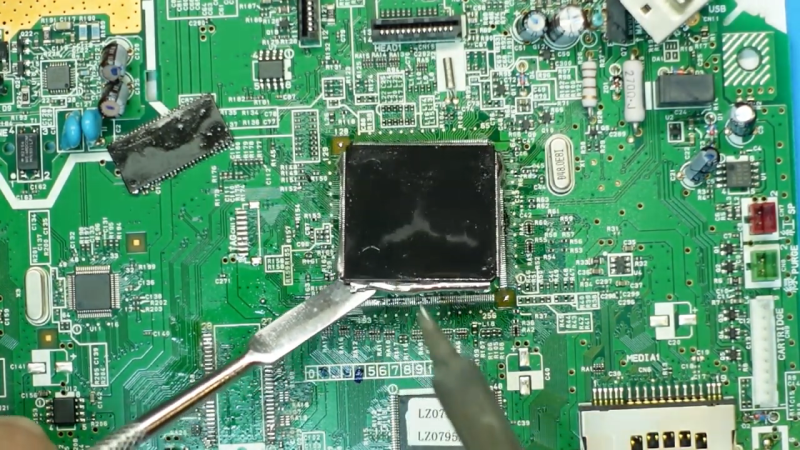
Aside from its use in those pink gloopy solutions one takes for an upset stomach, bismuth has a lot of commercial applications. For the purposes of desoldering, though, its tendency to lower the melting point of tin and tin alloys like solder is what makes it a valuable addition to the toolkit. [Robin] starts with a demonstration of just how far a little bismuth depresses the melting point of tin solder — to about 135°. That allows plenty of time to work, and freeing leads from pads becomes a snap. He demonstrates this with some large QFP chips, which practically jump off the board. He also demonstrates a neat technique for cleaning the bismuth-tin mix off the leads, using a length of desoldering braid clamped at an angle to the vertical with some helping-hands clips. The braid wicks the bismuth-tin mix away from the leads along one side of the chip, while gravity pulls it down the braid to pool safely on the bench. Pretty slick.
Lest leaded solder fans fret, [Robin] ensures us this works well for lead-tin solder too. You won’t have to worry about breaking the bank, either; bismuth is pretty cheap and easily sourced. And as a bonus, it’s pretty non-toxic, at least as far as heavy metals go. But alas — it apparently doesn’t machine very well.


One caution: it works perhaps too well for solder with lead. The melting point of a tin-lead-bismuth alloy can drop well below 100C; low enough that operating temperatures in some circuits will cause the solder to melt. If you thoroughly clean the area and remove as much solder as possible before soldering in the new component you’ll probably be OK.
That’s a really good point. The eutectic ratio is a little over 1/3 bismuth with 60/40 solder, but you will get that low melting point (94-98C!) in whatever portion of the metal mix can form that alloy. So 1% just bismuth would mean something like 3% of your joint would have that low melting point, assuming it is well mixed. I don’t have a great way of cleaning trace amounts from components, I guess probably a hot air gun would work best for that? Or maybe just dropping the chip in boiling water/hot oil – not sure if that’s a good idea though :).
It probably isn’t that bad. If you look closely at the Tin-Bismuth phase diagram or the lead bismuth phase diagram small amounts of bismuth will just go into a solid solution in the tin phase or the lead phase. For example 90% tin – 10% bismuth will not have any liquid component below 200C. It’s similar with lead-bismuth. The ternary phase diagrams I can find are all liquidus projection, so that doesn’t help much.
It isn’t as bad as that. If you look at the tin-bismuth phase diagram or the lead-bismuth phase diagram a modest amount of bismuth can be absorbed into the tin phase or the lead phase as a solid solution.
https://d2vlcm61l7u1fs.cloudfront.net/media%2Fc79%2Fc79868a9-69c0-4453-9c91-c56eedc7bd0b%2FphpHXhMl6.png
Similarly with lead and bismuth:
http://www.himikatus.ru/art/phase-diagr1/Bi-Pb.gif
Even 10% bismuth won’t have a big impact on the melting point, and is unlikely to give you a liquid phase until you are almost at soldering temperatures.
Ah right, I was forgetting about the solid triangles to the far left and right, thanks for the correction. So even a few percent won’t matter for the soldering temp in this case.
Recommended way of cleaning for a similar alloy (ChipQuick) is with cotton años flux, as suggested in this video https://youtu.be/FTQqjggeklo
Nice, thanks for the tip :).
If I would use this for serious repair, then I would probably clean it twice.
Firs wick off most of the bismuth, then add a lot of regular solder (this can be cheap “plumber style” rods or whatever), to change the alloy of what is left to a very low bismuth content and wick that off too.
Another thing that needs some thought is what happens in the phase diagram when either the tin or bismuth content is very low (0 to 2 %). Phase diagrams often have these triangles at their extremes and these are usually glossed over, but can be very important. I’ve read somewhere that if lead-free solder gets contaminated by a few percent of lead, it can reduce mechanical strength by as much as 80%.
@Victor said: “Recommended way of cleaning for a similar alloy (ChipQuick) is with cotton años flux…”
What is “cotton años flux” ? Or did you mean Q-Tip or Cotton Bud, like for cleaning your ears?
Hmm, seems to work just like ChipQuik. Much cheaper, too. Any disadvantages?
I believe Roto136 [1] on the rotometals site is the same formula as ChipQuik (at least both have a melting point of 58C and contain bismuth and indium). I have used both of those and they also work really well, but I generally use bismuth+solder anyway.
I’m not sure if it is strictly necessary, but I always heat the puddle up past the melting point of the original solder, allowing it to mix in. The roto136 has a much lower melting point than BiSn, but the indium in there has higher thermal conductivity than bismuth, so I’m not sure the lower temp gives you a lot more time (haven’t tested, just my feeling using it). Certainly using *more* of either alloy gives you more time, but there is already lots of time with just bismuth.
As Shirley mentions above, one downside is you want to make sure to clean it off well for a high temperature board (though that is doubly true for a lower melt alloy like ChipQuik or Roto136).
[1] https://www.rotometals.com/roto136f-low-melt-fusible-bismuth-based-ingot-alloy-ingot-1-2-pound-per-ingot/
Wow! This is a cool tip. I have a bunch of chunks of bismuth lying around from a project I long abandoned. I will definitely give this a try next time I need to desolder something painful.
now we just need Indium.
Gee I don’t know if this is a good idea, bismuth is radioactive, that’s pretty scary!
Not enough to matter.
So are bananas…
You will probably only get cancer from it if you live in California.
LOL!
“Warning the State of California can expose you to stuff, which is known to the State of California to cause cancer.”
This method works really well for repairing SMD boards – but – be sure to clean the pads REALLY, REALLY well with flux and a good wicking braid.
REALLY well.
Try to get every bit of your new alloy back off the board.
You want to solder new parts down on a clean pad with fresh solder, not the leftover bismuth-solder mix, that will lead to poor performance in the finished joint, similar to a cold-solder joint.
During my work at POLAM and later at Mera-tronik in early 1980s we used to used mercury for desoldering, kinda crazy but it’s harmless if it stays in a tub.
Boiling point of mercury is around 360C so hopefully you did not do any heavy handed warming on the solders. Mercury in its gaseous form is lethal.
Since it is mercury, one doesn´t need to heat it. And most metals in gaseous form would be lethal if inaled , due to the temperatures .
The idea is to heat the mercury bath above the melting point of solder, and immerse the assembly you want to desolder in it to melt the solder and pull out the components.
re. your second point, you want to avoid ingesting/inhaling the mercury and its compounds. Unfortunately once the heavy metal is in gas phase, it can stay up and spread even though the vapor cools down. The vapors actually exist at all temperatures—boiling just provides a lot of material.
THink what happens when you’re standing over a boiling pot of water—you will be breathing in a lot of water vapor even if you’re standing far enough so it doesn’t burn you.
I had a thought last night, would a lower temp. solder allow you to more safely solder Lithium batteries at home?
I’m kind of surprised they even solder those anymore as conductive chemical bonding materials are available.
And just for fun – in-between desoldering sessions…
* How to Make Bismuth Crystals At Home
https://www.youtube.com/watch?v=iQRifFluXHI
* Making metal crystals from Pepto-Bismol
https://www.youtube.com/watch?v=-_qpzFlpgpo
NileRed is the best :)
Be careful. When you’re using lead solder in your re-work it’s very easy to end up with an alloy that becomes liquid at normal circuit temperatures.
….which of course I learned the hard way.
All this desoldeting of ICs doesn’t mention those with soldered exposed pads underneath! Just have to heat the hell out of them. Although a drop or two of mercury left overnite might work? A question is do copper pcb traces “dissolve” in mercury like gold does?