In case you’ve been living under a rock that doesn’t have internet access, the Raspberry Pi Foundation got into the silicon sales and microcontroller game all at once this year with the Raspberry Pi Pico. It’s small, it’s capable, and it costs a measly $4. Surely you have one or two of them by now, right? But how much do you know about what it can do?
Or maybe you don’t have one yet, but it’s on your list. In either case, you can get started learning about them right away because [Uri Shaked]’s Raspberry Pi Pico and RP2040 Deep Dive course has recently been freed from the hallowed halls of HackadayU. He even built an emulator to go with it. [Uri] is a great instructor, and we’re sure that goes double if you ever need a salsa dance teacher, which he has also mastered.
This class was held for five weeks beginning in May 2021, with each session being roughly an hour long. The only prerequisite is a basic understanding of bitwise math, but there are resources for that on the class IO page linked above.
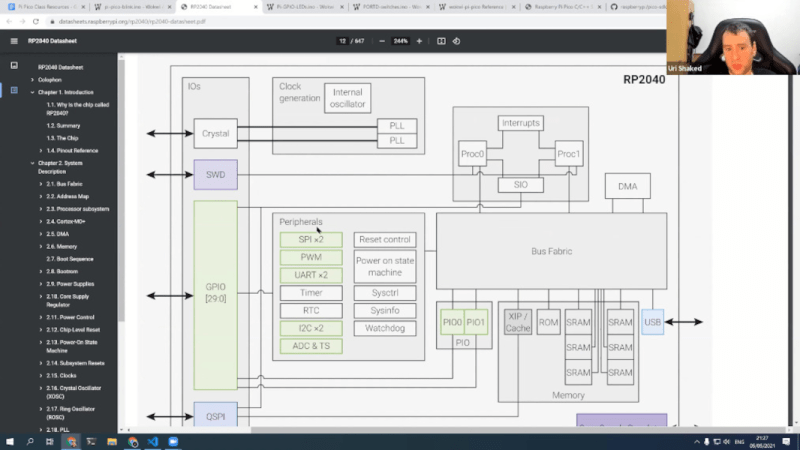
Each class is incredibly well-organized and informative. In the first class, [Uri] begins building a living document that includes the class agenda, links to all resources used and mentioned, code examples, and assembly instructions where applicable. It’s basically a syllabus plus a whole lot more. [Uri] also spends a lot of time in the incredibly thorough 649-page data sheet for the RP2040, and a little bit of time in the much shorter Getting Started guide. If you think the data sheet is inaccessible, you’ll likely change your tune by the end of the first class after you’ve seen [Uri] use and peruse it.
Class one starts out as sort of a big-picture high-level intro, but [Uri] quickly gets into nitty gritty stuff using the Pico emulator — like how to blink multiple LEDs without a lot of code by writing directly to the memory register of the output pins. By the same token, you can read in from multiple inputs. I learned a lot from just watching the first course, including an easy way to address the I/O pins and a really neat GitHub trick I’d never seen before.
As the classes go along, you’ll dive deep into the RP2040 and immerse yourself in the system architecture, the hardware registers, and the basics of the ARM assembly language. By the end, you’ll be swimming in knowledge of the Programmable Input/Output (PIO) — a unique and exciting feature of the RP2040 chip that lets you create additional hardware interfaces.
The 2021 session of HackadayU may be out for summer, but don’t sweat it. In the meantime, go check out the back catalog over on Hackaday.io and find something to help fill the hours productively until then.


I read all the literature, then passed on the Pico, before I could actually get my hands on one.
Perhaps you can also update us on what you had for lunch, maybe include a picture. Also please post some pictures of your cat.
The cats payload didn’t help.the black flag
Also: Did that ointment work on your rash? Asking for a friend.
I’ve got five of them, and haven’t used a single one yet. It’s not a terrible chip, but without wifi and/or bluetooth– esp32’s getting all my business at the moment. (As well as the esp8266). Pricewise, they’re not that different, and the esp8266 can be had for less than $2 bucks if you’re willing to shop overseas. IMO, the rpi pico is too little, too late. There are other devices that outshine them in the marketplace.
Not all projects require wireless connectivity.
This is true, but the ESP32 can be had for as little as $3.00. So even if you dont need Wi-FI or BT, you dont have to learn a new IC, compiler, and so on. All your libraries that you developed on the ESP32 you can just keep reusing them. Not to mention the ESP32 has much more to offer in ram, flash and CPU speed.
On the other hand, not many can’t be improved by wireless. I’d love it if my keychain flashlight was also a tracker. Or if my USB charger could report power consumption. Even if you use it very rarely, when the chips are so cheap there’s not much reason to leave it out unless you’re a simplicity fan.
Isn’t wifi quite power-hungry? I can see how you might want to leave it off anything small and battery-powered that doesn’t need it.
I have three Pico boards and none are in a project either. I do have plans for one to replace a larger Metro Express board that I was using to talk to an RPI-4 for a lunchbox project I am working on. The small size is attractive here and will talk locally over the USB port to the RPI (just like the Metro board does) as well as being powered by the RPI. The Pico seems to be a good supplement for the RPI4 (3 or zero) to handle ‘real-time’ tasks you may have in a project, Having some analog inputs is nice to have on-board as well. Meanwhile let the RPI4 handle the wifi/ethernet comm to other systems, do display work, number crunching, storage of data, etc. I also picked up a a couple Adafruit boards Itsy-Bitsy rp2040 and the QT PI as well for fun.
Obviously pick the board that works for you needs. Glad we have another ‘choice’ to pick from with the Pico!
Forgot to say thanks for the article! Will watch the deep dive videos when I get a chance. Always willing to learn a little bit more about a board that I am interested in.
I have wondered whether the Rpi Foundation (or some other enterprising group) would come out with a Pico board (hat) to use with the Rpi. The Rpi is a very capable board (system) and I’m not knocking it in any way when I say, I wish it had more versatility in its various gpios… but I have often thought that I could be satisfied with a (originally Arduino) ESP32 or now Pico board to augment its capabilities. Sure, I know I can always glom one on, and I do that occasionally. But, IMO, it would be nice if you could just get an Rpi/Pico (or whatever) combination board to begin with. Then everything would be well-known, documented, and standardized.
Wasn’t there an Arduino hat called the Gertboard? I feel like that had an atmega328 on it…
I stupidly clicked that first Pico link thinking it would be a link to…the pico? +1 page load for HaD, -1 utility.
Love to see these in-depth presentations of a chip. Majority of people tend to forget about microcontrollers and refer directly to the development board. I was responsible of holding some embedded workshops at the local university for the company I work for. It blew my mind when all the students responded with “Arduino” when I asked what uC they used in the projects they worked on. Since we didn’t have time to start for the basics, everytime there was an opportunity, they got a crash course on how the peripherals work, what different registers do and how they’re tied to the CPU.
I know I’ll get the usual “you don’t have to know how something works, to use it” and I respect that. But a true hacker will use any loophole, design flaw or quirk, to get shi*t done. Be it in software or hardware.
Call me old fashioned, but the first time i worked with a uC, went through the datasheet at least 3 times. Since then, the first document I read when working on a new project is the datasheet of the uC & major ICs (SBC, ASICs) and sometimes the reference manual of the micros core. Thanks to those, a lot of strange and sporadic bugs have been fixed. Also functionalities that other teams didn’t want to touch were implemented.