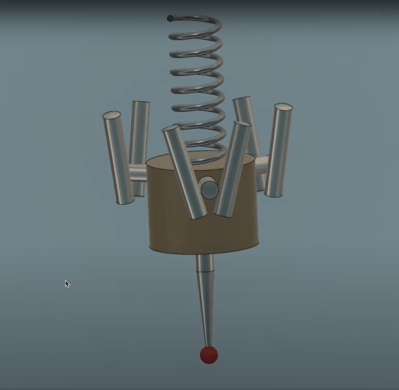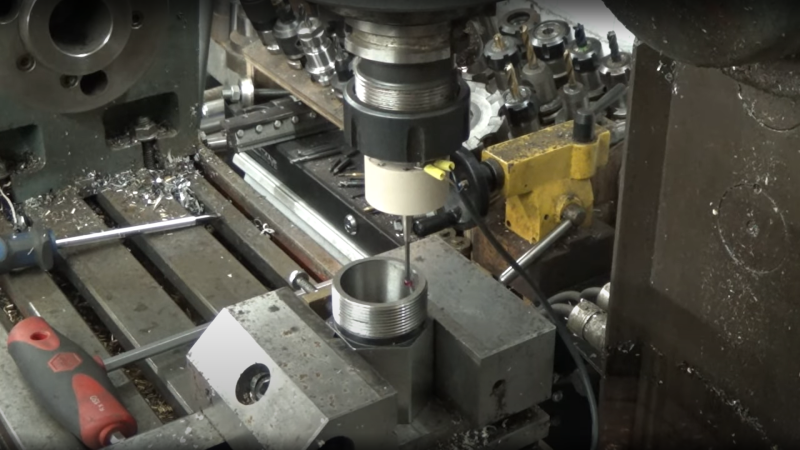
LinuxCNC contributor and machining enthusiast [Andy Pugh] is certainly not afraid to try making specialised tools to see how well they work out, and this time he’s been busy making a touch probe (video, embedded below) for checking the accuracy of machining operations and general measuring applications.
These things are not cheap, since they are essentially ‘just’ a switch with a long probe, But, as with anything specialised and machined with tight tolerances, you can understand why they cost what they do.
After inspecting and spending some time reverse-engineering such a unit, [Andy] then proceeded to grab some PEEK bar he had lying around and chuck it into the lathe (get it?). He notes Delrin would be more cost effective for those wishing to reproduce this, but as long as you have the ability to machine it and it’s non-conductive, there are many other options you could try.
Using no special tools other than a collet block (like this one) all the angled holes and slots were made with ease, with the help of a specially 3D-printed mount for the vise. A nice, simple approach, we think!
[Andy] tested the repeatability of the probe, mounted over his CNC-converted Holbrook lathe, reporting a value of 1 um, which seems rather good. Centering of the probe tip within the probe body was off a bit, as you’d expect for something made practically by hand, but that is less of a problem as it would seem, as it results in a fixed offset that can be compensated for in software. Perhaps the next version will have some adjustability to dial that out manually?
The whole assembly is formed from two plastic parts, a handful of ground-finished hardened steel pins, and a big spring. The only part remotely special is an off-the-shelf probe tip. During the electrical hookup, you may notice the use of a self-fluxing verowire pen, which was something this scribe didn’t know existed and has already placed an order for!
The reference 3D model for the design is shared from [Andy]’s Autodesk Drive for your viewing pleasure.
Of course, this isn’t the first DIY touch probe we’ve seen, here’s one for example, and over on Hackaday.IO, here’s an attempt to make one using a piezoelectric transducer.


Here’s a 3D printed one:
https://www.thingiverse.com/thing:721620
This is so elegantly simple and calibration thru software offset may be the best part of it. I tried to interest Tormach in adding this functionality to their probing routines but they didn’t grasp the quantum improvement in efficiency and reduction in human and mechanical errors associated mechanical calibration.
Do you know of anyone who has programmed a calibration offset routine?
Kudus on this design Andy.
I will also point out that you can get a pretty decent one for €100 from http://www.vers.by
This was about exploring cylinder-to-cylinder contact and how that makes assembly locations less critical by using geometry to help.
I actually have numerous probes from Renishaw and Zeiss, this was an exercise is seeing how you can make a thing more accurate than the thing you make the thing with. Lathes are the classic example of this, a lathe can make rounder parts than any of its own parts.
After a prompt from the LinuxCNC IRC, here is a design for the same probe, but fitting directly to an ER20 spindle for routers (etc) with limited Z gap.
https://a360.co/3HHQlHs
Again, no means to centre the probe on the axis, but it can be very short.
I’ll leave a plug for a hobby-grade probe that’s _really_ impressed me: the ITTP, or Impact Tolerant Touch Probe by Hallmark Design. Had one for a couple years now, and it’s astonishingly accurate for a small home-shop company (2 tenths or so, and that could definitely be my machine itself). The key point about it though is that it’s geared towards both clumsy people like myself and learning-to-home-shop-types in that you can crash it pretty hard and it’ll take it like a champ, re-set itself, and be just as accurate as before. No more broken (expensive) Haimer tips, no need to send it in for repairs, nothing broken.
From the transcript:
> 18:22 If I turn the spindle through 180 degrees we should then know how bad it is for being
> 18:39 centred. This doesn’t account for lobality, or lobularity
> 18:46 error that you get with these three-point things.
> 18:53 OK, that’s 0.3mm in X, and -0.6mm in Y. Which kind-of figures, we saw the ball wobbling.
With those numbers, this tool might be OK for some woodworking, but it is orders of magnitude worse than a proper machinist’s tool.
Thx for the interesting design though.
As the article said it’s just an offset that can be accommodated in software. The resulting accuracy and repeatability is pretty good, on the other of few microns.
I’ve been thinking about making one with a servo to extend and retract the probe automatically. Mounting the static parts permanently at the bottom of a rail and moving only the spring loaded part should provide good repeatability. Then just need a tool offset with respect to the spindle.
I think hardest part may be dust protection.
Your idea seems rather decent.
Dust protection can likely be made with a simple rubber boot, similar to how the axel joints on cars are protected from dirt and grime.
(: a respectful point of clarification here…
*vise
(cocaine is a vice)
About me: 20+ years, tool and die making
(…almost 40 if you count broom pushing)
Ugh, dumb typo fixed.
Au contraire, this is a tool in the UK, and both the Hackaday author and probe maker are British, so here it is spelt “vice”. And “spelled” is spelt “spelt”. Sometimes.
This allows for the amusing visual pun that I saw in Viz comic many years ago. A workbench has three vices (vises) all of different sizes. Clamped in the largest one are some playing cards. The caption: “My biggest vice is gambling”
A possibility for probe adjustment: since you can spin it, a screw-adjust flexture like a DTI indicator mount has, near the top of the probe tip, would allow you swing it in and out a little without affecting the rigidity.
I built something similar a while back, using a three-input AND looking at the continuity between the three contact points, but have yet to get it talking to linuxcnc because I’ve been too busy battling other projects.
Came here to sugguest this. Well done.
Professional probes from Renishaw use a a 4 point 90 degree dog screw centering scheme to center the probe sphere.
I am still waiting on a homebrew version of the Blum laser toolsetter & diameter measuring capability