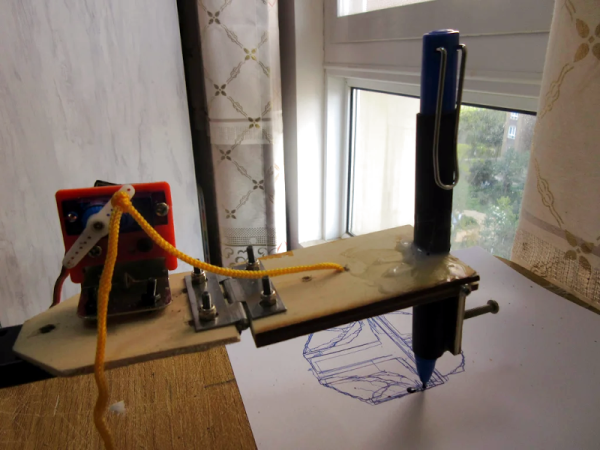
Although the widespread use of 3D printers has made things like linear bearings and leadscrews more common, you still can’t run down to your local big-box hardware store and get them. However, you can get drawer slides and any hobby shop can sell you some RC servos. That and an Arduino can make a simple and easy plotter. Just ask [JimRD]. You can also watch it do its thing in the video below.
Of course, servos aren’t usually what you use in a plotter. But the slides convert the rotation of the servo into linear motion. One servo for X and one for Y is all you need. Another microservo lifts the pen up and down using a hinge you could also get from a hardware store.
There was a time when virtual reality seemed like it would remain in the realm of science fiction at least for the foreseeable future. Then we were blessed with products like the Power Glove and Virtual Boy which seemed to make it more of a reality, if not a clunky and limited one. Now, though, virtual reality is taking more of a center stage as the technology for it improves and more and more games are released. We can see no greater proof of this than the fact that some gamers are building their own custom controllers to interact with the virtual world in more meaningful ways, like this game controller specifically built for first-person shooter games.
The controller is based on an airsoft gun but completely lacks the ability to fire a projectile, instead using the gun as a base for building the controller. In fact, the gun’s operation is effectively reversed in order to immerse the player into the game by using haptic feedback provided by pressurized air. The air is pumped in to what would be the front of the barrel and is discharged through the receiver when a trigger pull is detected in order to generate a recoil effect. The controller includes plenty of other features as well, including the ability to reload ammunition, change the firing mode, and track motion thanks to its pair of integrated Oculus controllers.
All of the parts for this controller are either 3D printed or readily available off-the-shelf, making this an ideal platform for customization and improvement. There’s also a demo game available from Unity which allows for a pretty easy setup for testing. While the controller looks like an excellent way to enjoy an FPS virtual reality experience, if you’re looking for a more general-purpose controller we are also starting to see a lot of development on that end as well.
In an interesting post on Inverse, [Sarah Wells] does a deep dive into something you probably don’t think about very often: the blinking cursor. You’d assume there wasn’t much to the story. Maybe a terminal manufacturer put a toggle flip flop on the cursor output and it caught on. But the true story is much deeper than that.
We were surprised that the father of the blinking cursor was one guy, [Charles Kiesling]. In a 1967 patent, he described the blinking cursor. An ex-Navy man, [Kiesling’s] patent names his employer at the time, Sperry Rand, where he’d worked since 1955.
LinuxCNC contributor and machining enthusiast [Andy Pugh] is certainly not afraid to try making specialised tools to see how well they work out, and this time he’s been busy making a touch probe (video, embedded below) for checking the accuracy of machining operations and general measuring applications.
These things are not cheap, since they are essentially ‘just’ a switch with a long probe, But, as with anything specialised and machined with tight tolerances, you can understand why they cost what they do.
After inspecting and spending some time reverse-engineering such a unit, [Andy] then proceeded to grab some PEEK bar he had lying around and chuck it into the lathe (get it?). He notes Delrin would be more cost effective for those wishing to reproduce this, but as long as you have the ability to machine it and it’s non-conductive, there are many other options you could try.
Using no special tools other than a collet block (like this one) all the angled holes and slots were made with ease, with the help of a specially 3D-printed mount for the vise. A nice, simple approach, we think!
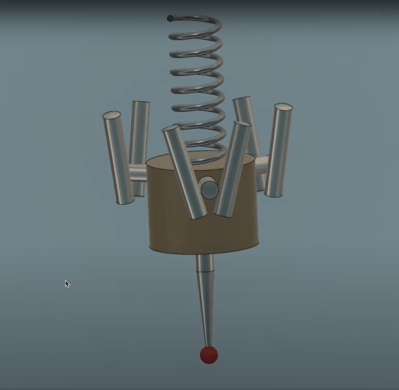
[Andy] tested the repeatability of the probe, mounted over his CNC-converted Holbrook lathe, reporting a value of 1 um, which seems rather good. Centering of the probe tip within the probe body was off a bit, as you’d expect for something made practically by hand, but that is less of a problem as it would seem, as it results in a fixed offset that can be compensated for in software. Perhaps the next version will have some adjustability to dial that out manually?
The whole assembly is formed from two plastic parts, a handful of ground-finished hardened steel pins, and a big spring. The only part remotely special is an off-the-shelf probe tip. During the electrical hookup, you may notice the use of a self-fluxing verowire pen, which was something this scribe didn’t know existed and has already placed an order for!
The reference 3D model for the design is shared from [Andy]’s Autodesk Drive for your viewing pleasure.
USB cables inevitably fail and sometimes one end is reincarnated to power our solderless breadboards. Of course, if the cable broke once, it is waiting to crap out again. Too many have flimsy conductors that cannot withstand any torque and buckle when you push them into a socket. [PROSCH] has a superior answer that only takes a couple of minutes to print and up-cycles a pair of wires with DuPont connectors. The metal tips become the leads and the plastic sheathing aligns with the rim.
The model prints with a clear plus sign on the positive terminal, so you don’t have to worry about sending the wrong polarity, and it shouldn’t be difficult to add your own features, like a hoop for pulling it out, or an indicator LED and resistor. We’d like to see one with a tiny fuse holder.
In an ideal world, your FDM 3D printer’s bed would be perfectly parallel with the print head’s plane of movement. We usually say that means the bed is “level”, but really it doesn’t matter if it is level in the traditional sense, as long as the head and the bed are the same distance apart at every point. Of course, in practice nothing is perfect.
The second best situation is when the bed is perfectly flat, but tilted relative to the print head. Even though this isn’t ideal, software can move the print head up and down in a linear fashion to compensate for the tilt. Things are significantly worse if the bed isn’t itself flat, and has irregular bumps up and down all over.
To combat that, some printer firmware supports probing the bed to determine its shape, and adjusts the print head up and down as it travels across the map. Of course, you can’t probe the bed at every possible point, so the printer will have to interpolate between the measured reference points. Marlin’s bilinear bed leveling is an example.
But if you have enough flash space and you use Marlin, you may want to try unified bed leveling (UBL). This is like bilinear leveling on steroids. Unfortunately, the documentation for this mode is not as plain as you might like. Everything is out there, but it is hard to get started and information is scattered around a few pages and videos. Let’s fix that.
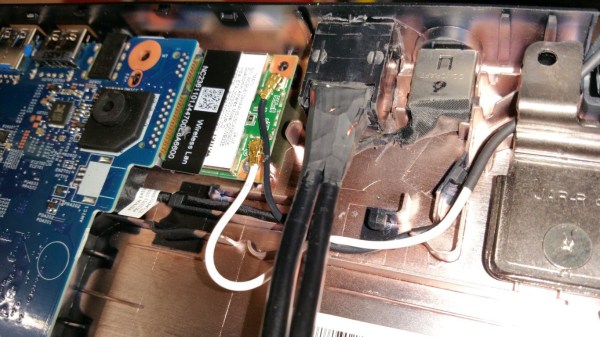
Out of all the laptop upgrade options typically available, you wouldn’t expect this specific one. [controlmypad] decided to take a part of his RS485 device programming workflow and put it inside of a spare laptop he picked up for cheap. Typically, he’d occupy some desk space and lay out an unwieldy combination of a USB-RS485 dongle, a PoE power injector, a PSU for that injector, and a few cables to join it all – being extra weight in the tool bag, cluttering the workspace when laid out, and the RS485 adapter slowly wearing out the USB ports during the work-related motions. No reason that all of this couldn’t be packed inside a laptop, however.
What helps a lot is that, in many modern cheap laptops, the motherboard is fairly small, and the DVD drive plastic placeholder can be omitted without second thought. Cutting off the plastic molding from both of the adapters turns them into a nicely reusable circuit board and a small PoE module, respectively. After laborious yet careful cutting of the laptop case with a hobby knife, the PoE injector fits right in and, essentially, adds an extra RJ45 port to the laptop. From where the Hackaday.io write-up left off, it doesn’t seem like this mod got fully completed, but most of the important details are there for us to learn from. What got left out is connecting it to an internal USB port (should help that the motherboard’s schematics are available online), as well as creating 12V-24V from the laptop’s power rails. At this point, however, this mod is a big step forward usability-wise, even if it still requires an external PSU.


![USB to Dupont adapter by [PROSCH]](https://hackaday.com/wp-content/uploads/2022/01/2022-01-01-USB-to-DuPont-adapter-feat.jpg?w=600&h=450)