Most of our projects are, to some extent, an exercise in glitch-reduction. Whether they’re self-inflicted software or hardware mistakes, or even if the glitches in question come from sources beyond our control, the whole point of the thing is to get it running smoothly and predictably.
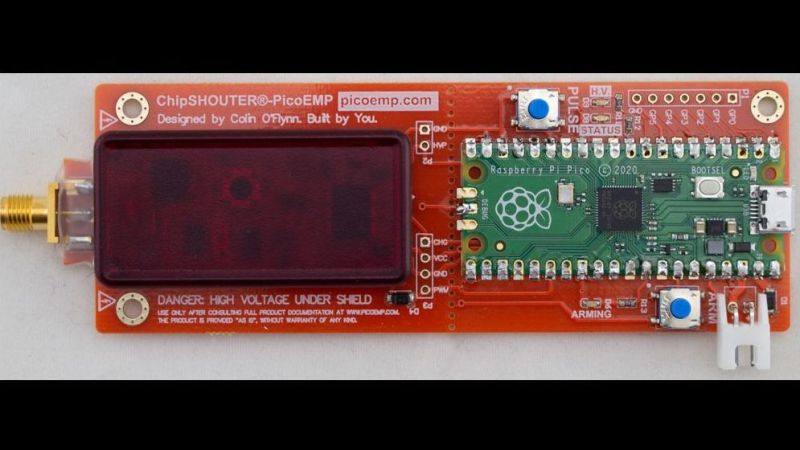
That’s not always the case, though. Sometimes inducing a glitch on purpose can be a useful tool, especially when reverse engineering something. That’s where this low-cost electromagnetic fault injection tool could come in handy. EMFI is a way to disrupt the normal flow of a program running on an embedded system; properly applied and with a fair amount of luck, it can be used to put the system into an exploitable state. The PicoEMP, as [Colin O’Flynn] dubs his EMFI tool, is a somewhat tamer version of his previous ChipSHOUTER tool. PicoEMP focuses on user safety, an important consideration given that its business end can put about 250 volts across its output. Safety features include isolation for the Raspberry Pi Pico that generates the PWM signals for the HV section, a safety enclosure over the HV components, and a switch to discharge the capacitors and prevent unpleasant surprises.
In use, the high-voltage pulse is applied across an injection tip, which is basically a ferrite-core antenna. The tip concentrates the magnetic flux in a small area, which hopefully will cause the intended glitch in the target system. The video below shows the PicoEMP being used to glitch a Bitcoin wallet, as well as some tests on the HV pulse.
If you’re interested in the PicoEMP and glitching in general, be sure to watch out for [Colin]’s 2021 Remoticon talk on the subject. Until that comes out, you might want to look into glitching attacks on a Nintendo DSi and a USB glitch on a Wacom tablet.
Hat tip goes to [leo60228] for this one. Thanks!


Slightly(?) Off-topic;
What is that one handed, dual probe holder he uses starting around 6:00 in the video?
As I don’t have a 3D printer, does anyone have a source for one?
What was it? Absolutely horrible. It’s perhaps something you would use for high voltages where the voltage insulation specification is for the probe.
I have many cheep “tweezers” type one handed dual probes that is easy to hold and perfect for in circuit testing of SMD parts or even PTH electro capacitors. They could even be used as tweezers, they’re so easy and comfortable to hold but definitely not suited to high voltage.
It comes with the Tektronix HV diff probes. The lab I work in has a bunch, no one seems to really use them.
Hmm, well done :-)
It’s often bothered me in the last 20 years or so many microprocessor firmware designers don’t take account of disturbance risk assessment from just about anything, eg one case a semi professional instrument used near a motorbike with classic magneto ignition – caused much confusion especially as the owner of the bike changed the carbs for efi but, retained the magneto – not optimum though saved time just to get it back on the road with better performance. The young “engineer” investigating a few issues scratching his head could quite work out why his custom data logger or even a cheapie multimeter worse than the comparatively well shielded EFI computer :D
In my earlier Electro Magnetic Compliance (EMC) days regarding disturbance and power surge testing with an HP6813A I learned a lot ie must build in some regard for potential disturbance factors. Around the time I was also canvassing our state government and successfully so for a grant for a local RF anechoic chamber that, within the physics, ie just fit into a moderate lab in Bassendean, Perth Western Australia. Used a novel at the time, set of plasticised absorbers, no ferrite tiles. Still going strong to this day since 2001. Probably the lowest cost yet very professional lab in Australia with a very well experienced owner/operator Roman and likely best in large part of South East Asia too… http://qdl.com.au
I expect to be in the market for an instrument of the type in the video, maybe even the same one as a backup for education and my larger toolbox, thanks for posting :-)
I’m trying to figure out what the pi does? Not trying to say “but a 555 timer!”, but… a 555 timer?
It’s not a Pi sbc, that’s the Pico which is their microcontroller board. It’s neat but among its benefits is that it’s $4 for the whole board and is available for purchase, rather than in shortage. Makes it a compelling choice even when dual Cortex-M0+ cores at around 120MHz is total overkill, because you can’t buy lesser chips. I’ll probably have one doing some fan control, where I originally planned a SAMD09…
I mean, a SAMD09 is in the same realm as an RP2040 (1/3 the clock and one-core, but still respectably fast for an MCU and 32-bit), and thus still very overkill for a fan controller. You can fit a LUT and PID on most ATtinys with ease. The cheapest I see in stock is the 202 (still >0.40c on Mouser, ye gads). There are also some much more capable (though that extra capability would be wasted on a fan controller) EOL Cypress and STM 8-bits on Digikey in the few thousands qty left for <30c! For the cheapest, you can get 250 for $13. Hmmmmmm…
I think you *could* use a 555 for manual control, but I haven’t seen a 555 with USB for automated control before.
hi, fryed back transformer old TV, solution ?
thanks,
Carlos