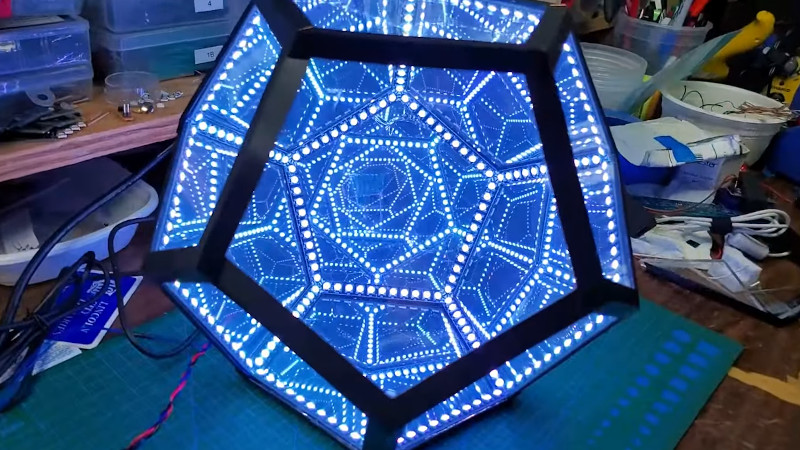
The infinity dodecahedron is one of those super eye-catching builds that many of us hardware hackers have on our ‘build one day’ project list. The very thought of actually doing it strikes a little fear into the heart of even the most intrepid maker, once you start to think about all the intricate little details and associated ways it could all go horribly wrong. Luckily for us, [Hari Wiguna] has documented his latest build as a long video build log, showing lots of neat tricks and highlighting many problems along the way. With the eventual goal of removing many of the issues that make such a build tricky, [Hari] hopes to make it practically easy. Let’s see how that turns out!

A common route for such a build relies on appropriately shaped 3D printed frame parts, with some kind of clear plastic for the 12 faces, and LED strips stuck to the inside of each of the 30 edges. Whilst this works, [Hari] thought he could do a bit better, using butt-jointed PCBs as the frame material.
The PCBs handily double up as something to solder LEDs onto (because that’s what PCBs are mostly intended for!) as well as a way to pass power and data signals around the frame in a minimally visible way. As will become obvious from the lengthy discussion in the video, a few simple tricks here and there are needed to make this strategy work. With the recent proliferation of PCB modules using castellated edges for termination, the usual Chinese PCB fab services have all started offering very good value services for this feature. Once a PCB feature that was a specialized (read that as ‘expensive’) offering, it is now quite affordable on your average maker’s budget.
One immediate practical issue was how to pass the data connection around from edge to edge, given that there are three edges per vertex. The solution [Hari] came up with was simple, just duplicate the signals on each end of the PCB, so the data out signal can be tapped from either end, as required.
Even with 3D printed jigs to hold the PCBs at just the right angles, there’s still some wiggle and a little risk of edges not quite aligning, due to accumulated errors around the frame. It did come together in the end, with the expected spectacular visuals. We’re sure many of you will be waiting for [Hari] to release the next version of the design to the community, hopefully with even more of the ease-of-build issues resolved, because we want one even more now.
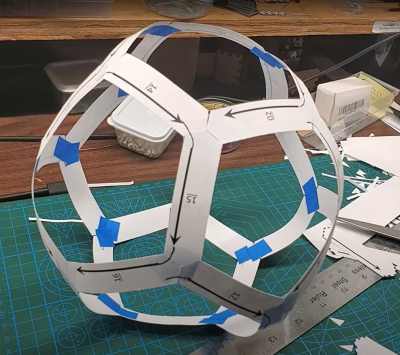
Naturally, this is by no means the first infinity platonic solid we’ve seen, here’s a smaller one for starters. If you remove the mirrors and LEDs, then you’re just left with a plain old dodecahedron, like this cool folding project.


Just wow.
take-my-money.jpg
:D
Great video of a great project!
I want one.
I don’t have words other than this is simply amazing. Thanks for posting this!!
Awesome!
Hi everyone!
This is Hari. I built this Dodecahedron.
Thank you for all the positive comments!
Special thanks to Dave Rowntree for the nice write up!
Hey Hari, Awesome results! have you considered covering the LED’s with a diffuser? I was surprised you hand soldered all of those LED’s! I would have used solder paste and re-flowed them. Are your design files available?
Thanks!
Yes, I originally had a paper half cylinder planned, but decided against it to keep things simpler.
Reflow oven would be the smart way :-)
This version still had some issues. I’m working on a better version. I plan on sharing it once I’m happy with the result. If you just want something to start with (the current PCBs won’t work unless you hack them with the utility knife like I did), email me and I could send you what I have now.
You deserve it.
Fantastic build and very good trick on that Data flow issue.
Great job, it looks amazing.
For those lucky enough to live in the south west of the UK, there’s an ‘immersive experience’ in Bristol called ‘Wake the Tiger’. This has a ‘Galaxy room’ that includes a walk-in infinity dodecahedron. We went at the weekend (my kids are 6 and 3), and it is awesome. Link to builder’s website it the best pictures I could find of it: https://www.anniechapter.com/immersive-installations
Great job Hari again and again!