Once upon a time, many radios and TVs only came with a single (mono) speaker. Then someone decided all audio hardware should have as many speakers as we have ears. That was until [Olivia] came along, and whipped up a dodecahedron speaker as an educational piece for workshops. Really, it shows us that twelve speakers should be the minimum standard going forward.
The speaker relies on a 3D-printed frame. The dodecahedron shell is assembled from 12 individual faces, each of which hosts a small individual speaker. Multichannel audio fans shouldn’t get too excited—all twelve speakers are wired to the same input in four groups of three, making this essentially an exceptionally complicated mono device. It might sound silly, but it’s actually a great way to deliver audio in many directions all at once. [Olivia] even went to the effort of running some sweep tests in anechoic and reverberation chambers to see how they performed, which is a fun bit of extra detail in the build log.
[Olivia] notes that these unique speakers are great as a beginner workshop build. They’re easy to modify in various ways to suit different ideas or levels of ability, and they can be made for less than $30 a pop. We’d love to see an advanced version that maybe packed in a lithium battery and a Bluetooth module to make them a standalone audio device. Video after the break.
Over the years archaeological digs of Roman sites have uncovered many of these strange dodecahedrons, usually made out of metal and with various holes in their faces. With no surviving records that describe how they were used, speculation has ranged from jewelry to a knitting aid. In a 2023 video by [Amy Gaines] it is this latter use which is explored, using a 3D printed dodecahedron and some wooden dowels to knit both gold wire and yarn into rather intricate patterns that are also referred to as ‘Viking Knitting’.
As we mentioned previously when yet another one of these dodecahedrons was uncovered, their use was unlikely to be of supreme relevance in military or scientific circles on account of a lack of evidence. What is quite possible is that these were both attractive shapes for jewelry (beads), and useful knitting aids for both jewelry makers (for e.g. gold wire braiding) and quite possibly yarn-related uses. The results which [Amy] demonstrates in the video for the gold wire in particular bear a striking resemblance to ancient braided gold chains on display at the Met and other museums, which leads credence to this theory.
If these items were effectively just common knitting tools, that would explain why the historical record is mum on them, as they would have been as notable as a hammer or a precision lathe used by the ancient Greeks.
Much about archaeology can be described as trying to figure out the context in which objects and constructions should be interpreted. A good example of this are the metal dodecahedrons (twelve-sided shape) which have been found during archaeological excavations at former Roman sites. Since 1739 over 115 of them have been recorded, most recently a fully intact copper specimen found near the Lincolnshire village of Norton Disney during the Summer of 2023 by a local group of archaeologists.
Two ancient Roman bronze dodecahedrons and an icosahedron (3rd c. AD) in the Rheinisches Landesmuseum in Bonn, Germany. (Credit: Kleon3, Wikimedia)
As the Norton Disney History and Archaeology Group notes on their page, this is the 33rd example of one of these items found in what was once Roman Britain, lending credence to the idea that such dodecahedrons originated within the Gallo-Roman culture.
As for the objects themselves, the ones so far found were dated to between the 2nd and 4th century CE, are all made out of some kind of metal alloy (e.g. bronze), are usually a dodecahedron but sometimes different (e.g. an icosahedron with 20 faces), yet all are hollow and usually with a single large hole in each face. The dodecahedron found at Norton Disney was analyzed to consist out of 75% copper, 7% tin and 18% lead, with a width of 8.6 cm and weighing in at 254 grams.
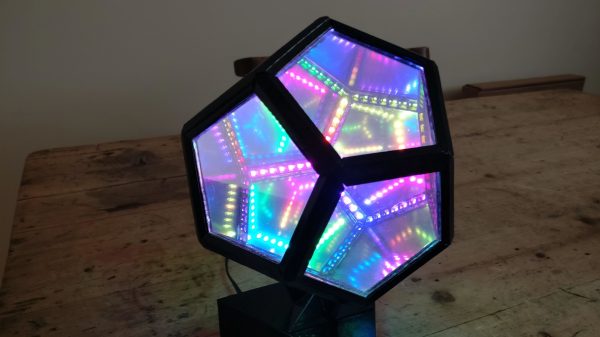
The infinity dodecahedron is one of those super eye-catching builds that many of us hardware hackers have on our ‘build one day’ project list. The very thought of actually doing it strikes a little fear into the heart of even the most intrepid maker, once you start to think about all the intricate little details and associated ways it could all go horribly wrong. Luckily for us, [Hari Wiguna] has documented his latest build as a long video build log, showing lots of neat tricks and highlighting many problems along the way. With the eventual goal of removing many of the issues that make such a build tricky, [Hari] hopes to make it practically easy. Let’s see how that turns out!
HASL-finished castellated (half hole) edge contacts make butt-jointing a breeze
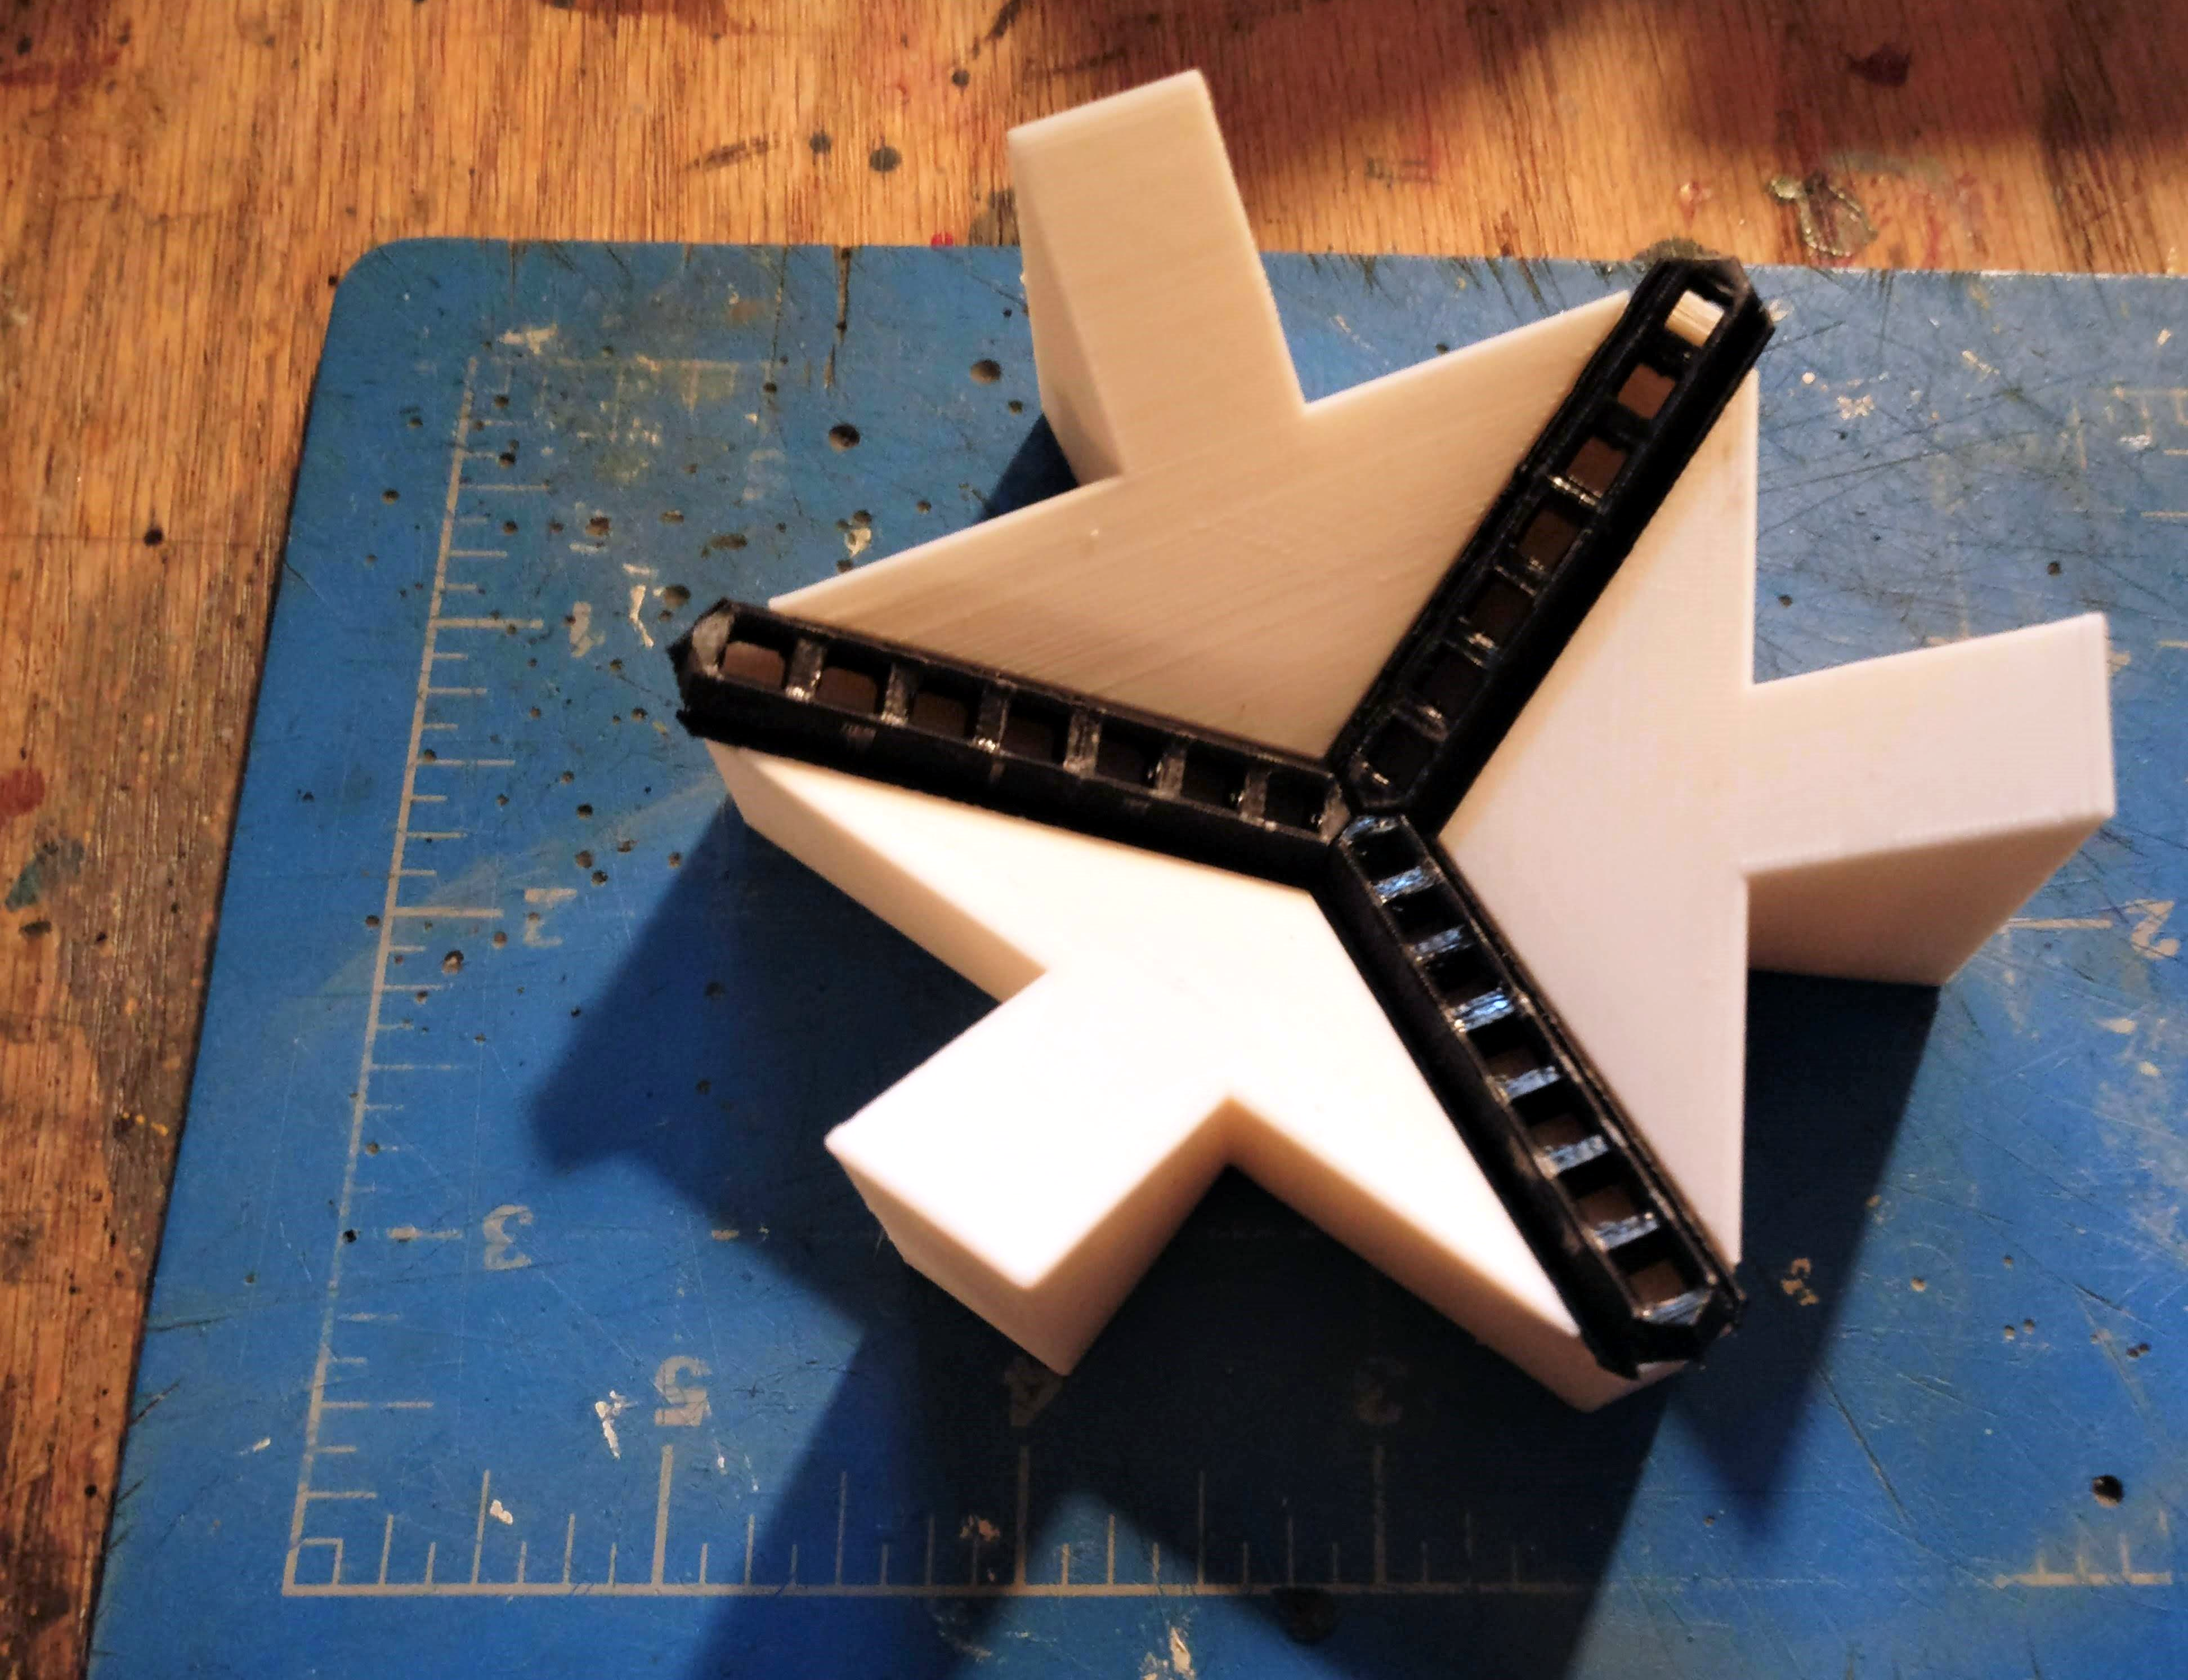
A common route for such a build relies on appropriately shaped 3D printed frame parts, with some kind of clear plastic for the 12 faces, and LED strips stuck to the inside of each of the 30 edges. Whilst this works, [Hari] thought he could do a bit better, using butt-jointed PCBs as the frame material.
The PCBs handily double up as something to solder LEDs onto (because that’s what PCBs are mostly intended for!) as well as a way to pass power and data signals around the frame in a minimally visible way. As will become obvious from the lengthy discussion in the video, a few simple tricks here and there are needed to make this strategy work. With the recent proliferation of PCB modules using castellated edges for termination, the usual Chinese PCB fab services have all started offering very good value services for this feature. Once a PCB feature that was a specialized (read that as ‘expensive’) offering, it is now quite affordable on your average maker’s budget.
Data path planning? Just use paper and tape!
One immediate practical issue was how to pass the data connection around from edge to edge, given that there are three edges per vertex. The solution [Hari] came up with was simple, just duplicate the signals on each end of the PCB, so the data out signal can be tapped from either end, as required.
Even with 3D printed jigs to hold the PCBs at just the right angles, there’s still some wiggle and a little risk of edges not quite aligning, due to accumulated errors around the frame. It did come together in the end, with the expected spectacular visuals. We’re sure many of you will be waiting for [Hari] to release the next version of the design to the community, hopefully with even more of the ease-of-build issues resolved, because we want one even more now.
Naturally, this is by no means the first infinity platonic solid we’ve seen, here’s a smaller one for starters. If you remove the mirrors and LEDs, then you’re just left with a plain old dodecahedron, like this cool folding project.
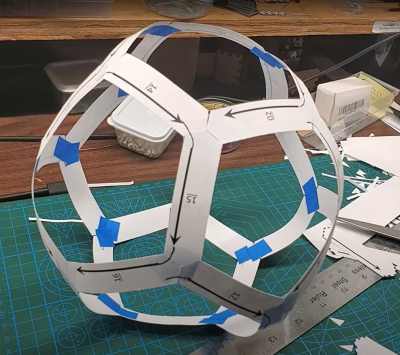
Debra Ansell of [GeekMomProjects] fame came up with a neat, 3D design that prints flat and then folds up into everyone’s favorite Platonic solid: a D12.
Why would you want to do this? Well, folding up your 3D prints gives you a third dimension “for free” without using all that support material. Here, all of the outside faces of the dodecahedron are printed flat against the build plate, which is probably the nicest side of your prints. And embedding LEDs in the resulting shape would probably be easy because they’re all in plane. And speaking of LEDs, we kinda expected to see them here, given Debra’s motto: “LEDs improve everything” — that part is up to you.
Debra notes that she likes PETG instead of PLA for the extra strength in the thin-printed hinges, and we’d bet that your printer’s tolerances will need to be spot on for the clips that hold the whole thing together. (We’d be tempted to apply a little super-duper glue.)
As always with Debra’s projects, there’s some creative solutions on display here that’ll help you out whether you need a D12 or a D20, so give it a look!
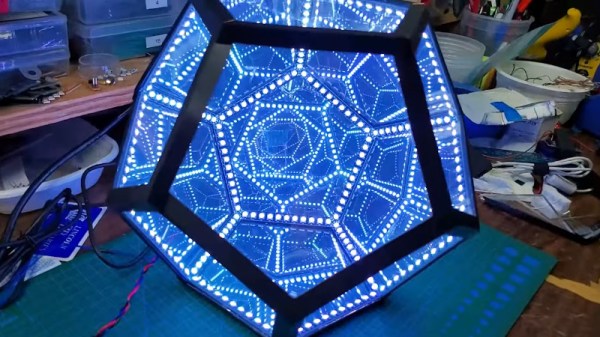
Much like us, [AGBarber] digs all the infinity polyhedra already out there, but laments the fact that almost all of them are too large to be used as desktop distractions conversation pieces. That’s probably because it’s a lot easier to build ’em big, but that didn’t stop [AGBarber] from trying, succeeding spectacularly, and paving the way for anyone who wants to take on the challenge of building a dazzling desk toy of their own.
We all know that all those little strips of LEDs have to be chained together somehow. Wires would work fine in a larger version, but at roughly softball size, they become a tedious and fiddly nightmare. So what did [AGBarber] do instead? That’s right, they designed two different types of custom corner PCBs. The 3D printed brackets that hold the LEDs and the panels together are no cakewalk, either — [AGBarber] recommends using a resin printer if you have access to one, though it isn’t strictly required.
Everything about this project is open source, including a bonus printable jig for gluing the brackets together at just the right angles. All the steps are well-documented, from applying the mirror film to programming the Wemos D1 mini that controls the lights [AGBarber] programmed in a ton of animations, too, which you can watch after the break.
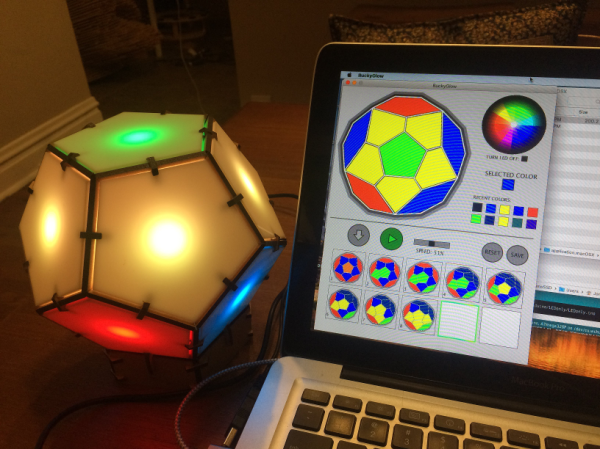
About a year ago, [Jonathan Bumstead] built a giant, touch-sensitive, interactive RGB LED geodesic dome that somehow escaped our attention entirely. For this year’s Hackaday Prize, he’s designed a smaller version that’s just as awesome, but a lot faster and easier to build.
When it’s time to relax, Bucky Glow puts on a light show. It comes ready to party without any programming necessary, but if you wanna put on some Pink Floyd and get your hands dirty, [Jonathan]’s custom Processing app makes it easy to program complex light shows.
[Jonathan] is currently working on some different Bucky Glow dissemination methods, such as a kit version. For now, you can buy a fully assembled Bucky Glow through the One Bit Kit store. Interact with the break to try it before you buy it.