The Seven-Segment Display That’s Also An Input Device

We’re used to seeing all manner of seven-segment displays, be they mechanical, electronic, or something in between. But what all these displays have in common is that they’re, you know, displays. Using them as inputs would just be crazy talk, right?

Perhaps, but we like where [Dave Ehnebuske] is going with “InSlide,” the seven-segment input device. The idea for this comes from the “DigiTag” display, which we covered back in October, and divides a standard seven-segment character into three vertical strips — two skinny ones for the outside vertical segments, and one wide strip holding the horizontal elements. By sliding these strips up and down relative to each other, the standard nine digits, plus a few other characters, can be composed.

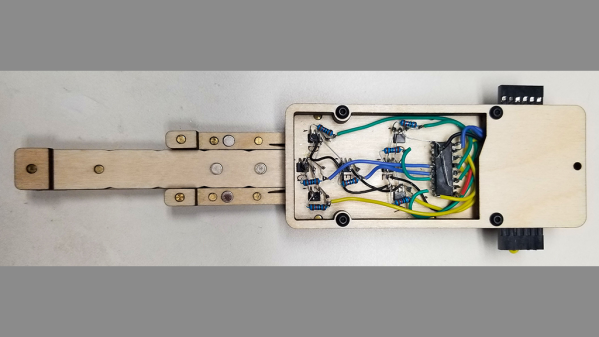
[Dave]’s take on this theme started by building his display from laser-cut plywood pieces, which is a nice choice because of the good contrast between the white wood and the engraver segments. Next, he embedded rare earth magnets in the slides and installed seven Hall effect sensors in the frame. The sensors are connected to an Arduino Nano via a 74HC165 parallel-load shift register, which lets multiple modules be daisy-chained together. He also built an Arduino library to read the current state of the segments; it supports the full hexadecimal character set, or even duodecimal if you like.

[Dave] has shared the library, and it looks like you can get the build files for the mechanism from the original project. That’s good, because this looks ripe for hacking. It looks like it would be pretty easy to motorize a display like this by adding rack-and-pinion gearing and steppers — something like that could make an interesting clock.

Garage Door Opener Ejection Seat

[Scott Prints] had a familiar problem. His garage door opener was boring, and rattled around annoyingly in his car’s center console. This was obviously a major issue that needed to be dealt with. His solution was to install an ejector seat. Er, well, an ejector seat button. At least, that’s what it’s labeled. (That’s sure to be a great conversation starter for passengers.)

The end result looks slick and combines several build techniques. He started by taking measurements and 3D-printing a test piece for the center console nook. Turns out, that’s a more complicated shape than it seems. Rather than try to measure the exact angles and radii, Scott turned to the tried-and-true method of fiddling with the parameters and printing a second test. Close enough.

The coolest and most challenging element of the build was engraving and cutting the aluminum plate that forms the visible part of the build. Turns out, the online recommendations for milling aluminum are laughably optimistic when you don’t have an industrial CNC machine. Slower, shallower cuts got the job done, albeit slowly. A red paint-filled marker made the letters pop. The guts of the donor garage door opener are fitted into a 3d-printed shell, and then a Big Red Button threads into the print, holding the whole build together. A bit of solder later, and the project is done. Simple, effective, and very stylish! We approve. Come back after the break for the build video.
Continue reading “Garage Door Opener Ejection Seat”

Pieca Is A Pi Camera With Some Very Nice Lenses

The advent of the high-quality version of the Raspberry Pi camera has given experimenters a good-enough quality camera system that they can use it to create better devices than mere snapshot cameras. It’s been used by experimenters for some exciting projects, but so far, very few of them have broken away from the Pi camera’s C-mount lens system. [Tom Schucker]’s Pieca is an interesting departure then, because it takes the Pi HQ camera into new territory by using Leica rangefinder lenses.

There are enough Pi camera projects that by now the process of setting one up should be pretty well known. This one is a bit different in its use of a focal length reducer, mounted inside a 3D-printed Leica lens mounting plate. The result is that the Leica lens is better matched to the much smaller size of the Pi camera sensor compared to a 35mm frame.

The camera’s aesthetic design is on the chunky side, probably because of the choice of a Pi 4 rather than a Pi Zero. It remains very usable though, and produces photographs with a distinctive feel. You can see more in the video below the break. Meanwhile if you aren’t lucky enough to own a stable of Leica lenses, perhaps you could think about adapting more common optics? We’ve seen it before with the original Pi camera.

Continue reading “Pieca Is A Pi Camera With Some Very Nice Lenses”