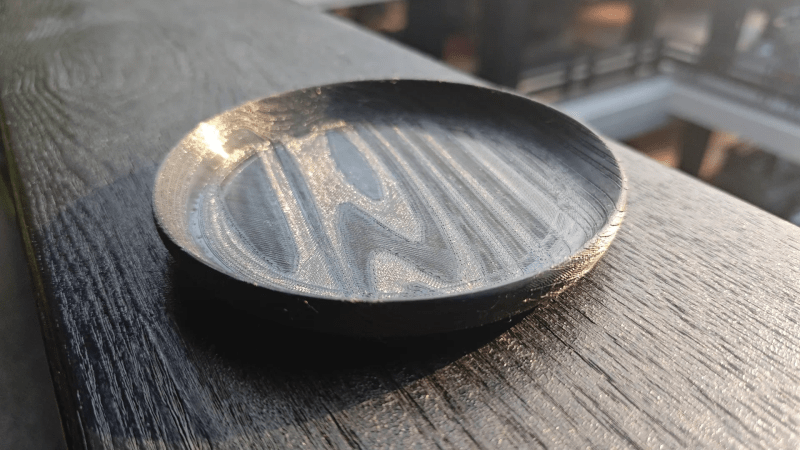
Adding textures is a great way to experiment with giving 3D prints a different look, and [PandaN] shows off a method of adding a wood grain effect in a way that’s easy to play around with. It involves using a 3D model of a log (complete with concentric tree rings) as a print modifier. The good news is that [PandaN] has already done the work of creating one, as well as showing how to use it.
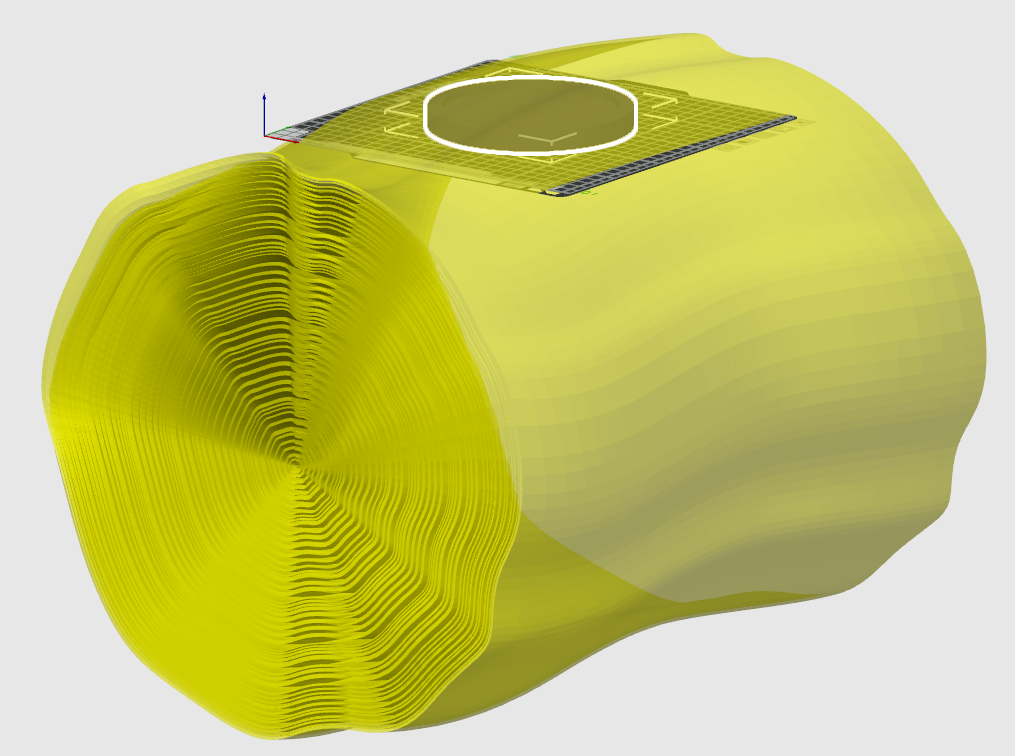
In the slicer software one simply uses the log as a modifier for an object to be printed. When a 3D model is used as a modifier in this way, it means different print settings get applied everywhere the object to be printed and the modifier intersect one another.
In the case of this project, the modifier shifts the angle of the fill pattern wherever the models intersect. A fuzzy skin modifier is used as well, and the result is enough to give a wood grain appearance to the printed object. When printed with a wood filament (which is PLA mixed with wood particles), the result looks especially good.
We’ve seen a few different ways to add textures to 3D prints, including using Blender to modify model surfaces. Textures can enhance the look of a model, and are also a good way to hide layer lines.
In addition to the 3D models, [PandaN] provides a ready-to-go project for Bambu slicer with all the necessary settings already configured, so experimenting can be as simple as swapping the object to be printed with a new 3D model. Want to see that in action? Here’s a separate video demonstrating exactly that step-by-step, embedded below.


I grew up in a Socialist country with terrible laminated furnitures with fake woodgrain. It will always look cheap, fake and sad for me.
I grew up in a Tropical country with real wood furnitures with real woodgrain. It will always look cheap, fake and sai for me, too.
I grew up in a mining colony on Titan. I don’t know the difference.
I grew down, because I am a mole person. with my tiny eyes I don’t know the difference either.
Time progresses backwards to my eternal ass, so every entity rearranges itself from entropy and vanishes in the end, so i don’t CARE about the difference.
I grew up with real wood and cheap laminated, but I hot a 3D printer a year ago. I think this is cool as hell.
“House! You were lucky to live in a house! We used to live in one room, all twenty-six of us, no furniture, half the floor was missing, and we were all huddled together in one corner for fear of falling.”
Eh, you were lucky to have a room! We used to have to live in the corridor!
What I would have given for a corridor! Where I grew up we couldn’t afford existence so we just floated in the void of non-reality.
I grew up in a Capitalist country with terrible laminated furnitures, plastic electronics, and even cars with fake woodgrain. It will always look cheap, fake and sad for me as well.
Combine that with wood filament and use higher temperature for darker color, matching the print modifier patterns.
At least on consumer printers, it takes a few seconds for the temperature of the hotend to change. This makes it kind of impractical to adjust it multiple times in one layer.
This comes up occasionally because people repeatedly invent the idea of reducing hotend temperature for bridges, to reduce droop. But parking the hotend for 10 seconds before each bridge isn’t super practical.
But if you have one of the rarae printer with dual hotends, it could be interesting to run them at 2 different temperatures for these purposes.
Upcoming hotends with induction heating have very low thermal mass and fast temperature control
You need active cooling. A quick blast of liquid nitrogen will drop the temp in a fraction of a second.
That’s been around since 2012: https://www.thingiverse.com/thing:49276
It is a good idea that many have built upon with varying degrees of success, but I think that the “roasted filament” method remains still firmly in the proof-of-concept arena.
The mass of the hotend means it takes time to change temperature. Additionally, the toolpath of solid layers usually alternates print direction. Both of which will give you some weird recent history print artefacts.
Introducing some mains hum onto the stepper driver power rails or relaying the controller PCB to add some ground loops will give you a realistic woodgrain effect that is generated randomly on the fly. Ask me how I know!
It’s big! It’s heavy! It’s wood!
Nice!
for bonus points it doesnt even look all that good!
Not even using “wood PLA”?
Shame.
Why all the derision here?
It’s a good idea and interesting implementation.
Don’t be asses.
+1 👍
It looks great, it’s cleverly done, and they provide the source so you can do it too. What’s not to like?
This is Hack-A-Day, and comments come in three flavors:
Should have used a 555/Arduino/ESP32/NAND gate/C/Assembly
Asian people bad, anything made by Asian people garbage, general racism against anyone east of Germany and west of Hawaii, excluding Russians
Finding vacuous criticisms to cover the fact that they’ve never built anything half as interesting in their lives, but definitely could if they wanted to and it’d be so much better trust me bro
… so how much would it take to learn basic carpentry and woodworking … compared to time spent figuring this out … somehow I suspect it is about the same … though, like with any hobby craft, woodworking in general is one of those skills you learn while doing, in a sense, you are thinking with your hands … reason being, if you never done woodworking at mildly complicated level, it does look impossible to figure out … you never know until you try.
funny has it, woodworking is one of those nearly 100% sustainable things, not only because wood is grown everywhere, discarded wood chips/dust can be recombined into particle boards … I am not exactly sure which kind of discarded plastic can be recombined into more plastic, but I stand corrected if it does similarly to wood chips/dust.
If you mean less-than-middle-school-shop-class proficiency in woodworking, maybe the time investment is comparable. I think you’re severely overestimating the amount of work this took to figure out given the vast amount work that had already been done with the tools used. As someone lucky enough to do woodturning for my own projects for a living, that took way longer to get proficient at than it took to learn how to tweak modern 3D printer settings to get the effects I wanted. In both cases, the machine does most of the hard work.
After sine thinking through I agree with you – it is easier to model a fake plastic wood that at the end will turn out the pattern one wants AND the “pre-thinker” (the software that figures out STL out of a model) does most of the grunt work.
Well, now that it’s been done once, you and I don’t need to take any time figuring this out.
Not to mention that real wood could never hope to simulate fake plastic wood in the same way (this part of the comment is a troll).
I mean, PrusaSlicer is free and I already have a 3D printer I use daily and at all hours of the day because it is pretty close to silent.
Doing things out of wood means buying wood, buying tools to work with said wood, and then having the space to use those tools and during a time of day when the noise of those tools would be tolerated.
I had the good fortune of having a scrap of plywood out of the trash JUST the right size for my current project, and a router I got on sale from Harbor Freight, and a garage where I can use it. The reason it has been a week to go from CAD to two simple pieces of carved wood is because I first had to design and 3D print the guard plate because I can’t afford the brass ones, and I can only work on the project during a tiny portion of the day between when I work and when it is too late at night to run power tools around the neighbors.
If I’d 3D printed those parts I would have had them done a week ago. I wanted wood grain to achieve a certain look so it has added a lot of extra time and effort to the project.
One idea might be to try wood pla filament, sand it down, then try applying wood stain afterwards to see what it looks like
In my experience the direction of the sanding has a much greater effect than the direction of the printing. Maybe the printed grain would show through if you used fine grit sandpaper and sand in the same direction as the grain, but sanding deep enough to eliminate layer lines and voids would take a lot of work
Use a displacement map, bake it into the model, export to STL. Achieve any any fake surface you like.
Maker’s Muse did a video on how to use Voxelizer and IdeaMaker software to turn bitmaps into 3D textures. I used this to make some models on Printables, search for “HardiePanel”.
Honestly a very interesting and elegant way to implement such a thing. Sampling a virtual bough of wood to cross-section and get the grain pattern. Why would it be any other way?