Computed Axial Lithographic printing gets even closer to the Star Trek replicator fantasy than any other 3D printer we’ve seen: there’s a machine, it glows with a mysterious bluish light, and an object appears. OK, the object is appearing inside a spinning vat of photochemical ooze, not in thin air, but that’s a detail. It’s still very cool tech, and now it’s open source enough to replicate with full documentation and a GitHub repository.
This project is descended from the same Berkeley research that we featured last year, but at that point, they were inviting everyone to join their Discord server, and that was about it. At the time, we put on our old man outfit to yell at clouds and say, “A Discord shouldn’t count as open source!” For once, it looks like those geriatric grumblings were heeded. There is still a corporate-hosted chat server named for a malignant goddess, and you’re still invited, but now there’s also actual, searchable documentation!
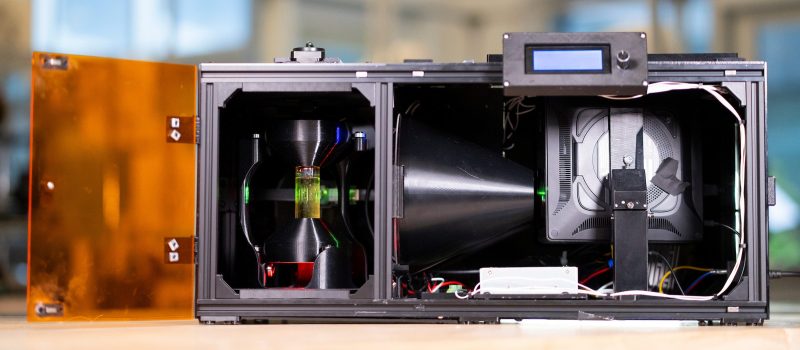
As with all CAL, there’s still the spinning vat of specially viscous photopolymer resin, and the light is provided by a NexiGo Nova Mini projector. There’s no FEP to worry about, and no stops and starts: the vat spins, the projector exposes the resin, and a part appears almost faster than can be believed, with spatial resolution like an older SLA
The instructions for putting that projector-based printer together look good; there are even instructions for mixing the special resin, though pay attention to the safety warnings in the “Don’t Try This At Home” banner. Apparently, they’re going to have FormLabs mix resin for those who cannot do it themselves, which seems like a valuable partnership for people who want to limit exposure to toxic ooze. Of course, that’s what a fume hood is for.


Yeah, still the unfriendly chemicals that have to be washed away.
Why can’t all chemicals just be replaced with entirely natural and chemical-free spring water???? /s
If you have to use “/s” you can simply decide not to use sarcasm at all
So written sarcasm should only be used if the writer is certain it will be understood as sarcasm by all?
Additionally, anyone that is mindful of the inherent ambiguity that sarcasm presents should never make it clear that they are being sarcastic for an audience that would otherwise understand.
Interesting.
P.S. The “interesting” is the sarcastic part.
Water is chemical.
Speaking of chemicals, I like the way you melt my mouth while I chow down
No video of it in action, who cares.
I think this is the same machine – printing around the 10 minute mark
https://www.youtube.com/watch?v=TWZ4I2GLYgI
Yes, that’s the one.
There’s also a video featured in the third link.
Many questions, not obviously answered in the source material.
What modifications need to be made to the goop? Increase viscosity was mentioned.
“Normal” resin has an optical depth around a millimeter: Blast all the UV you want, but anything deeper than that won’t be kicked off to polymerize. How does this polymerize something several millimeters deep in the vial?
What corrections need to be made to compensate for refraction at the vial wall? There’s no apparent optical element or immersion bath for that.
It’s not a modification to normal SLA resin, but a unique formulation. The formula and mixing instructions are in the docs, though unless you know what goes into the proprietary resin mix that’s used in the normal printer, that doesn’t tell you much about the difference.
I believe refraction at the vial wall is accounted for in software as part of the reverse tomography magic.
https://opencal-org.readthedocs.io/en/stable/materials/lab_directions/
Is the link from the source
Its not the base polymers nor the photoinitiators that limit UV penetration, its the dispersal agents that are blended specifically to accomplish that effect that are responsible.
The vial wall refraction compensation is just one of many factors that the software that creates the projection sequence must address. This isnt a straightforward slicing system. The entire process requires careful tuning and any change to any factor cascades into others. Its a lot of work for a very size limited process.
I agree my country might be bullshit, but no need to lump all of us stuck here as bullshit, cuz that’s just BULLSHIT!
Cheers
Alas, Hackaday has a Discord server. I’m told it’s mostly because the IRC channel turned into a ghost town.
Also consider that if Discord, Inc weren’t headquartered in the USA that statement could be construed as hate speech! Observing the patterns of censorship forces me to conclude that those laws don’t apply to all identifiable groups equally, though there’s nothing in the statutes that suggests such carve outs. It’s very confusing.