
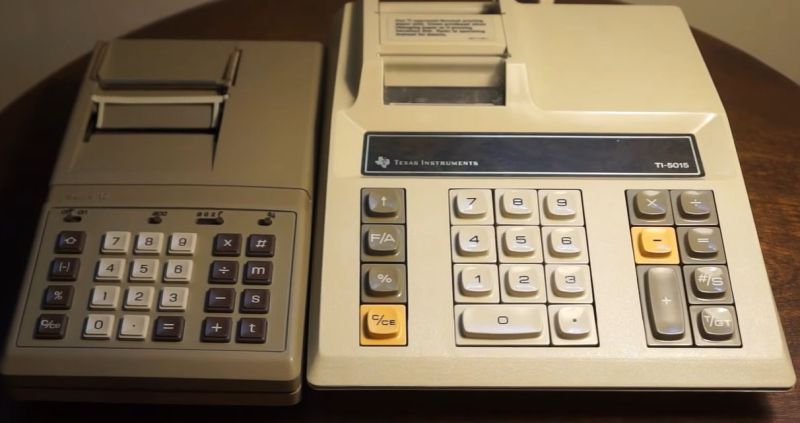
Thermal printers are still extremely common today, using small heating elements in combination with temperature-sensitive paper to create a dot matrix-like effect without messing with ink ribbons and complex mechanisms. Of course, even with just a line of elements you still needed one of these per pixel, which at least in the 1970s when the Sears 12 calculator was released added significantly to the cost. The solution here was to wiggle the elements, doubling the resolution of the print head, as detailed in this video by [Danalog].
Using a contemporary Texas Instruments TI-5015 calculator as comparison with its non-wiggling print head, it’s easy to see the advantages here. In an era where electronic calculators didn’t have displays but a thermal printer, this print quality was the selling point, yet adding more thermal elements added to the price tag of the final device and more complexity to the design in terms of driving circuitry.
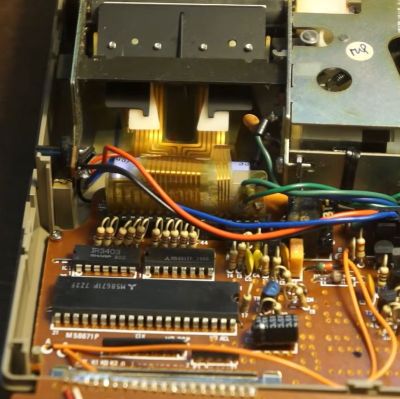
In this regard adding a way to make the print head move side-to-side at a set rate and tying this fact into the printing would save about half of that circuitry. Inside the Sears 12 is a fairly standard Mitsubishi M58671 calculator IC, but also the whole printer mechanism. When operating, as demonstrated in the video with the cover removed, you can see the whole print head moving rapidly.
With this mechanism this much cheaper Sears 12 definitely gives the TI-5015 a run for its money, even if as noted by [Danalog] the timing would go off a bit after a longer session, resulting slightly wavy printing. Presumably with the massive cost savings of buying a Sears calculator over a TI one, this was deemed an acceptable trade-off.












Printronix line matrix, anyone?
I just retired a P8000, thank The Printer Gods. Great printer, but I was tasked with making it work with our vendor’s software every year. That was not great.
Awesome company. Some of their engineers have gotten on the phone with me before and been far more helpful than I think I would have been if the situations were reversed.
Now, who’s going to try this on a modern one with an Arduino?
The thermal printers I used to work with (thick cardboard like thermal paper, think concert tickets) were applying a great pressure on the paper so I wonder how it would be possible to wiggle their head without tearing the paper (that being said their print heads were between 200 and 600dpi so high resolution printing was already on the table)
Reminds me of using piezo elements to shift the digital image sensor a half pixel over in the X/Y and take a second/third image. Basically analog interpolation.
Which device do that and for which application?
Smartphone cameras fir instance. The lens itself also might be piezoelectric
Only slightly related, but I in the 1980s I got gifted a TAXAN KP-810 9-pin dot matrix printer. It had an awesome mode (got to send the right control characters) where it would do micro-stepping and additional head passes on the same line, with a tiny vertical shift. It was consider a NLQ (Near Letter Quality – i.e near printing press, daisy wheel or laser printer) printer, with 24 cps (characters per second) at NLQ. Draft would do 150 cps. With a few really nice built in fonts that where 23 x 18 dots (rather than 9×9 dots like many of the other printers of the time).
This printer served me well. I used the “hand writing” font and a bunch of coding to fill out my college application. The code positioned the printer head the fields and filled in the text. Fortunately I had rescued and repaired a discarded photocopier and could make copies to test/develop the code… (Since you had to go somewhere to get physical copies of these multiple page folding collage application forms.)
I wrote a printer driver for Epson printers, which could print at a higher resolution but couldn’t hit the ribbon twice. So you had to do as much work as you could in the first pass and then fill in missing detail on an optional second pass. Then I did the same for calculating gaps vertically and step the amount of time necessary. But the minimum step allowed you to draw at double the resolution of standard text out of it.
The Apple Imagewriter would normally lay down dots at 80×72 dpi for 80-column text, but could microstep the platen and switch to condensed-text modes to do up to 160×144 dpi (or 144×144 if you wanted square pixels). TimeOut SuperFonts (IIRC) was an add-on for AppleWorks that could take advantage of this to produce higher-quality documents in whatever fonts you wanted to use. I also wrote a driver (of sorts) that did the same thing to do NLQ printing from within BASIC; output redirection enabled use of the driver from within your own programs or at the command line (to LIST a program, for instance).
Many matrix printers could do that, intentionally or not (due to imprecision of positioning). Apple didn’t invent it, just “formalized” as a feature
Isn’t this the old technique called “dithering”?
it’s dithering mixed with double-strike
This would be the printing equivalent of half dot on monitors in terminals like the HP 2640 or the later very nice HP 150. I think.
every now and then i think ‘i could use a printer’ and lately i am really attracted to the extremely inexpensive and small 8.5″ wide thermal printers. but i don’t like thermal paper….what i really want is a thermal printer that prints on regular paper! a char printer, if you will
Tiny high-voltage sparks darkening the paper. Ya, sounds interesting:)
Zx81 printer burnt the paper to print. It was two contacts hitting the coating of this metallic silver paper burning it off arching a black impression onto the paper
Ah good old ZX-Printer and the burning of print to paper
What on earth are you talking about and/or smoking?
How this is new? Software was doing this to matrix printers in early-mid 90s. Some text editors eere abusing it to emulate boldness by double-strike and to make highres fonts in grahical mode
Danalog mentioned!!!!! I’ve followed her channel for a while and enjoy the offbeat devices and presentation, though I am looking forward to better gear / a sturdier workbench to show them off.