A clock is by its very nature a device for measuring time, and thus it moves forward at a constant rate. But how about in a theatrical setting, where time runs at the whim of the director? For the stage, a clock with more flexibility is required. To this endeavor [Playful Technology] has you covered, with a larger than life stage clock whose hands are independently controllable by DMX.
Behind the clock is a very unusual part, not the modified clock mechanism one might expect, but a dual stepper motor with a concentric shaft. This is driven by an Arduino with a stepper driver shield more familiar from the world of 3D printers, and an RS485 interface for DMX interfacing. The hands are built in OpenSCAD, and 3D printed to be an interference fit on the shafts. The DMX controller software has a handy rotating knob style interface, allowing easy hand manipulation.
You can see the results in the video below, complete with an exhaustive dissection of the Arduino code. Meanwhile DMX is itself a fascinating subject, and in the past we’ve taken a deep dive into RS485.
When we think of 1960s synthesizers it’s usual to imagine instruments with vast arrays of controls and patch cables for configuring their many filters, oscillators, and other parameters. They created the templates for much of what we know today as electronic music.
In all the rush to look at full-blown synths though, it’s easy to forget their more mundane cousin, the electric organ. These instruments graced many a ’60s suburban home or church hall, and [Emma Repairs] has an interesting one. It’s a Philips Philicordia, and it’s sent us here at Hackaday down one of those rabbit holes when we should really be writing.
The instrument is a relatively straightforward single voice electric organ on the outside, but under the hood it’s a different matter. In an age when the transistor was revolutionizing electronic music, the folks in Eindhoven designed this one using tubes. There are a set of conventional enough tubes performing the role of amplifiers and oscillators, but the real party piece of this unit is the array of neon tube dividers. A neon bulb can be used as a switching element, and in those days when affordable digital logic chips were several years away, it made sense to use them in digital circuits.
The inside of the Philicordia is a feast of vintage Philips parts that will be instantly familiar to anyone who’s worked on Western European electronics of this era. The exterior design of the instrument screams understated early-1960s cool, and after she’s introduced it you can hear her playing it in the video below. Further down that rabbit hole we found that one of these instruments provided the distinctive organ sound on Chris Montez’s 1962 hit Let’s Dance, so they weren’t all uncool.
It’s a fact of life when starting a computer, that booting into whatever operating system you use will take a while. Mine takes somewhere around 30 seconds, and yours probably does too. There has always been the promise of something faster just around the corner, but somehow the OS just keeps getting a little bigger. Perhaps the only computer with a disk based operating system I have ever owned which bucked this trend was a Commodore Amiga, and that machine’s booting speed was achieved by keeping most of its OS in a ROM. The subject of today’s Daily Drivers takes the idea of a long boot time and shreds it, leaving an experience more akin to that Amiga of old. It’s called KolibriOS, it’s small enough to run from a floppy disk if you want it to, it’s lightweight, and fast as lightning. It achieves this feat by being written entirely in assembly language, and it exists as a free fork of the earlier MenuetOS which moved to a proprietary licence in its 64 bit version. I downloaded the ISO file, and gave it a spin.
You can surf the web with NetSurf, but not the encrypted web.
The minimum system requirements for KolibriOS are meagre, 1Mb of disk space, 8Mb of RAM, and a 586-class 32-bit processor. On a 2020s ThinkPad it boots in the proverbial blink of an eye, and drops immediately into a GUI desktop. It has the slightly pixelated look of a 1990s machine, there’s none of the anti-aliasing we’re used to today going on there. Installed software ranges from a set of games, emulators, graphics editors and viewers, internet software including the Webview and Netsurf web browsers, and assembly software development.
The immediate impression is of a mature and useful operating system, without any crashes or blue screens, and with applications that load on a dime. Unfortunately though, despite all the competence I can’t call it a Daily Driver by my definition of being able to write for Hackaday, because the web browser doesn’t support https. Immediately the majority of the modern Internet is off-limits, including this site. This changes the parameters of my review and I can no longer proceed as I normally would, but it doesn’t end it. Something this polished deserves a while to play around. Continue reading “Jenny’s Daily Drivers: KolibriOS 0.7.7”→
A few weeks ago we published the first in a new series of articles, Know Your Food. It was born out of the realisation that most people know surprisingly little about what they eat, and to apply a bit of Hackaday curiosity to received opinion on the subject. As we put it then: “To know both how common foodstuffs should be made, as well as how they are made industrially, should be an essential for everyone” We’ll continue in that vein, with a look at organic food.
If you buy your food in a supermarket it’s likely that in the vegetable aisle you’ll be presented with a choice. On one hand you will have the normal vegetable, and on the other and usually for a slightly higher price, the organic version of the same vegetable. What’s going on?
So What Is This Organic Stuff All About?
It is unlikely that a typical organic farm in the 2020s will resemble this John Constable painting. John Constable, Public domain.
Organic production is a system of agriculture that emphasises natural fertilisers, pesticides, and farming methods over synthetic or intensive ones. It has its roots in the first half of the 20th century, and as the decades progressed it has become an important sector of agricultural industry. I grew up steeped in organic agriculture because my grandfather was an early adherent in the years following the war, so I’ve seen it from the sharpest end. There is a lot to commend organic production for and plenty of reasons to embrace it, but with that come some problematic aspects, and even dubious claims. Here I’ll try to unpick some of that.
It’s tempting to believe that all organic production is somehow a return to a 19th century rural idyl, complete with the obligatory chickens in the farmyard. Some organic producers do take a slice of this back-to-the-land approach to their craft, but the reality of organic farming is a very modern approach to managing the ecosystem. Organic farmers are not wary of progress, and neither are they reluctant to use pesticides or other chemicals. Instead they do so according to the principles of organic agriculture, so any techniques they use are designed to be beneficial to the ecosystem, and any chemicals have a natural origin. Continue reading “Know Your Food: Organic Production”→
Last September, Denmark was gripped by a spate of drone sightings near airports. It’s familiar territory for Hackaday, as we reported on a similar drone panic saga at British airports back in the last decade. Back then the British police dragged their feet and hid behind secrecy laws for years to avoid admitting they overreacted, but it seems in Denmark they do things differently (Danish language, Google Translate link.).
The Danish police in Jutland have rolled back their report, and noted that a reported observation alone is not enough to confirm a drone was present. It’s not confirmed why they’ve taken this step, but we’ve been told that there’s been an effort within the drone community to identify possible aircraft flight paths which could have resulted in a false drone sighting at the times in question.
We welcome this correction, and hope that its important message travels widely. Of course it is the right thing to do for a police force to take drone reports seriously, but overreacting as the British police did is of little help. We commend the Danish police for taking this step, and we’re likely to trust any drone reports from them a little bit more in the future. If you’d like to read our plea for a sensible response at the time, it’s here.
We’re all used to satellite navigation systems such as GPS or GLONASS, sheer magic in which the combination of a set of reference transmitters and super-accurate timing information can be used to calculate a position to an astounding precision. They had land based predecessors such as LORAN and Decca Navigator which worked in a similar fashion but with fixed land-based reference transmitters. Terra is an attempt to do the same thing without a network of dedicated transmitters, instead using FM broadcast transmitters as its fixed points.
This might seem like an impossible task without access to the transmitters, but they have a workaround using the Internet as a backhaul. Instead of transmitting their timing information like the systems mentioned above, they rely on a set of reference receivers sharing it online to the client’s receiver software. So far they have a demo running in Denver.
The interesting thing about this system is that it’s open-source, and requires only a relatively inexpensive software defined radio receiver and a computer to operate. Now anyone with a group of internet-connected friends to set up reference receivers can have their own positioning system, it’s no longer the exclusive preserve of governments. We like this idea, and we look forward to seeing it being tested more widely.
The bare PCB, with the expansion connector bottom centre.
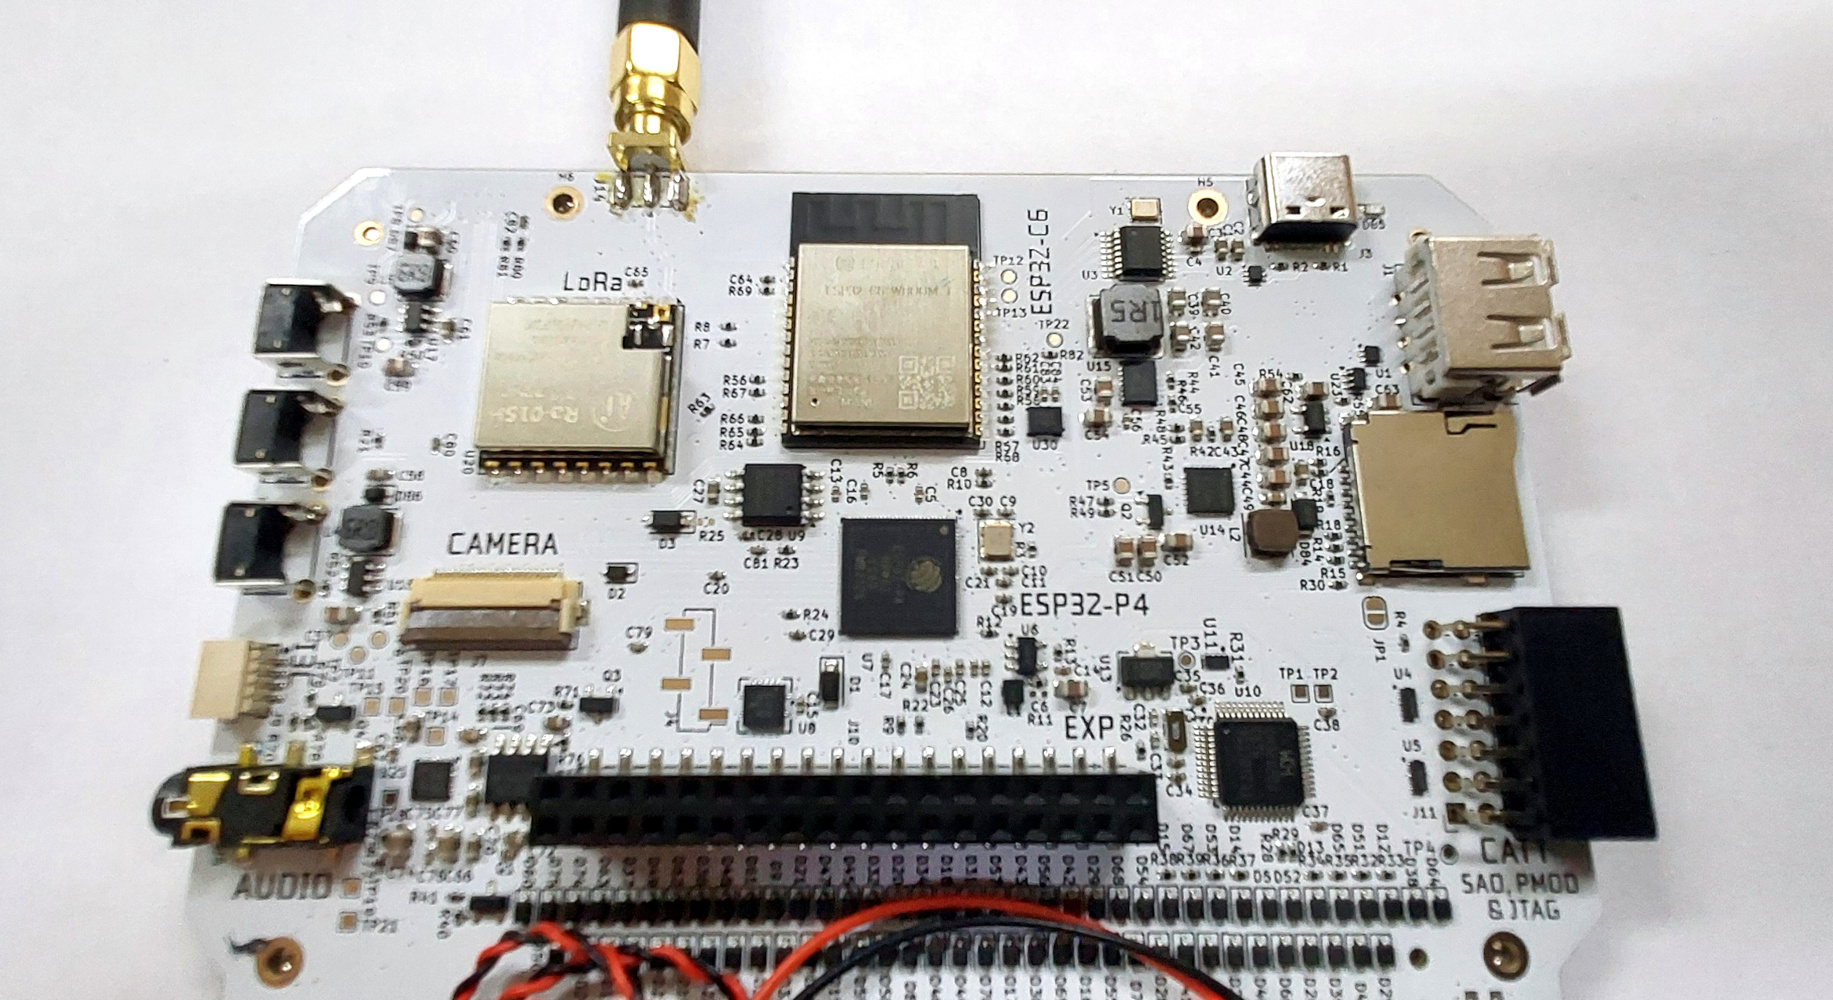
The Tanmatsu (Japanese for “Terminal”), is a general putpose palmtop computer based around an ESP32-P4 application processor from Espressif. It takes the form of a PCB and PETG 3D printed sandwich, with the front face PCB sporting a silicone QWERTY keyboard and an 800×480 MIPI DSI display. The keyboard should be familiar to many readers, being the same moulding as the Solder Party KeebDeck which has appeared on other devices.
Under the hood that P4 has two 400MHz RISC-V cores and 32MB of PSRAM with 16MB of Flash, and there’s an ESP32-C6 for WiFi, BLE and IEEE 802.15.4 mesh networking. There’s an Ebyte LoRa module with an SMA antenna too, which can be had in 868, or 915MHz versions depending on where in the world you live. Continue reading “Review: The Tanmatsu, A Year On”→