Unlock on LAN

Unlock On LAN Apartment Security

Here’s a cool little variation of that handy little function called Wake on LAN — [Jonathan] found himself locked out of his apartment one too many times, so he decided to add his own fail safe backup in order to get inside without a key — using a Raspberry Pi of course.

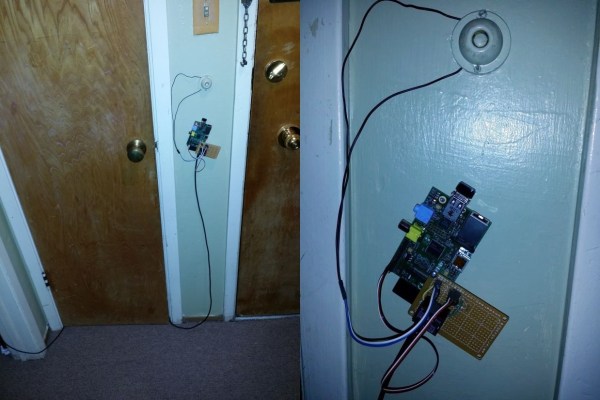
His apartment is one of those older style ones where the door is always locked and you use a buzzer to let someone in (or a key to get in yourself). This made it super easy to add some internet connectivity to the system. [Jonathan] tapped into the buzzer with a relay since the system uses medium voltage AC to operate. A Raspberry Pi triggers a transistor using its GPIO to click the relay on and off, effectively controlling the lock.

Using a WiFi dongle he’s connected the Pi to his home network and written a simple perl script to trigger the relay — all he has to do is visit a URL on his phone or computer and the door will unlock instantly!

Once the system worked [Jonathan] soldered all the components onto a breadboard and hooked it up. He still needs an enclosure for it, but it’s been working well since he installed it.

Another option would be to use an RFID tag system through the door, which could be pretty cool as well.

Levitating Speaker

Levitating Speaker Plays Back Eerie Recordings

Let’s face it, levitating anything is pretty fascinating — especially when you think there should be wires. This project puts a new spin on magnetic levitation by using a PID controller to levitate a speaker while it plays music!

It uses the standard levitation setup — an electromagnet, a permanent magnet, and a hall effect sensor. A microcontroller implements the PID system, varying the current supplied to the electromagnet to keep the speaker floating at just the right height. Music is wirelessly transmitted to the speaker via Bluetooth, but unfortunately the speaker’s power is not. It features a small lithium ion battery which has a run-time of around 5 hours before it has to be recharged manually.

As you’ll notice in the following video, having a floating speaker has a pretty interesting effect — especially when it starts spinning.

Continue reading “Levitating Speaker Plays Back Eerie Recordings”

A Remote Controlled, Fully Functional, Steam Powered Tank

Steam Powered Tank for the 21st Century

Steam power anything these days is pretty cool, but rarely have we ever seen such a complex build as this steam powered, remote controlled 1/16th scale tank.

[Ian] is an electronics design engineer whose hobbies include messing around with steam power. The Steam Turret Tank is based on a 1/16th scale Tamiya King Tiger die-cast model tank. It features a 3.5″ diameter marine boiler from MaccSteam, which is a fully equipped miniature version of a real boiler, complete with pressure gauges, safety valves, and a ceramic burner. It can produce pressures of up to 70PSI (max 120PSI), but for this project, [Ian] is limiting it to around 30PSI.

A small 2″ diameter fuel tank contains a propane mixture to fuel the boiler. Two Regner 40451 Piccolo steam engines make up the drive train, with mechanical linkages controlled by servos to engage the various features. The tank can go forward, backward, spin in place, and the turret can both rotate and adjust trajectory. It also has controllable headlights, and can even “fire” the turret.

Continue reading “A Remote Controlled, Fully Functional, Steam Powered Tank”

Homemade Triple Monitor Mount Looks Professionally Made

Professional Monitor Mount

Reddit user [popson] just finished off this impressive monitor mount build. Designed completely in Sketchup, it’s adjustable and will fit monitors from 20″ to 27″.

While designing it they stuck with standard material sizes, and it makes use of a lot of cold rolled steel — box tube, angle, and tube. Wide aluminum channel provides the adjust-ability for various monitor sizes, and standard VESA monitor mounting brackets guarantee monitors will fit.

sketchup model of monitor mount

There’s a lot of welding involved, but like [popson] says, he’s no pro — it’s not that hard to do. Once everything was done, they painted it glossy black to protect it from rusting.

The adjustment knobs are even home-made, cut from a wooden plank using a hole saw, sanded, and varnished.


He’s even added RGB LED light strips onto each of the monitors for a fully immersed gaming experience.

Continue reading “Homemade Triple Monitor Mount Looks Professionally Made”

Proximity Sensing LEDs Can Add A New Dynamic To Your Projects

Proximity Sensing LEDs

Looking for a fun and easy way to add a bit more interaction to your LED-laden projects? Why not turn them into proximity sensing LEDs?

Our hacker, [Will], is just getting into designing his own PCBs. He was looking for a simple project to try out that wouldn’t be too hard to design and manufacture a PCB for, so he came up with this clever little interactive LED array.

It’s actually a very simple circuit which also makes it super easy to build on a prototyping breadboard. Each proximity sensing LED is made up of five components. Three resistors, an LED, an IR LED, and a photo transistor. The IR LED is chosen specifically for the type of photo transistor being used — in this case, it emits a wavelength of 880nm, which is the type of light the photo transistor recognizes.

These components are wired in a manner that the IR LEDs are always on. The normal LED is wired in series with the photo transistor, and thus the LED only turns on when the photo transistor sees reflected 880nm light bounced back at it by whatever object you wave over top.

What would be really cool is if you added some 555 timers to the mix and had a delay before the LEDs fade away — then you could have a huge array that leaves motion trails long after you’ve triggered the sensors!

[via Dangerous Prototypes]

Purely Mechanical Display Uses 804 Balls To Create A Kinetic Display

Whoa. That’s all we have to say about this art installation.

Oops, did we say art? Don’t let that three letter word scare you, because this project called Breaking Wave is nothing short of an absolutely incredible, fully mechanical, machine.

It’s kind of hard to tell in the picture, but there are 804 rusty spheres hanging from cables which make up the pixels of this display. Each of those cables could be attached to a servo for a very simple, digital-to-analog display — it’d be expensive, but you could display anything. But no, that’s not how this works. Instead of each of those cables is wrapped around a different size drum or roller, which are all connected to a large central hub motor driving a cam.

As the beastly hub-motor spins, the display morphs and changes shapes. It is all pre-programmed manually by varying the sizes of the rollers and the lengths of the cables, a mind numbing task of its own. What’s more, because it is three dimensional, you can only see the patterns if you’re standing in the right place at the right time.

Continue reading “Purely Mechanical Display Uses 804 Balls To Create A Kinetic Display”

The ChalkJET: An Ink Jet Printer For The Streets

Need to do some guerrilla street advertising? What you need is the ChalkJET 9000, an ink jet printer on wheels.

Using two Arduino Duemilanoves for the brains, this little cart features eight cans of spray chalk which can be individually actuated. Small solenoids pull down on levers in order to spray the cans. Encoders on the wheels of the cart keep track of the spacing in between each pixel as the cart gets dragged along.

A small LCD mounted on the handle allows you to select which text you would like to print, but it doesn’t look like manual entry of new words is possible — You’ll need to load up a library while connected to a computer before hitting the streets!

Continue reading “The ChalkJET: An Ink Jet Printer For The Streets”