Proximity Sensing LEDs Can Add A New Dynamic To Your Projects

Proximity Sensing LEDs

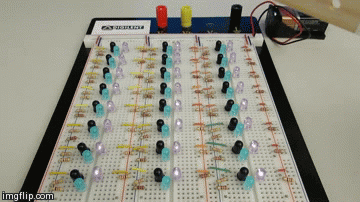
Looking for a fun and easy way to add a bit more interaction to your LED-laden projects? Why not turn them into proximity sensing LEDs?

Our hacker, [Will], is just getting into designing his own PCBs. He was looking for a simple project to try out that wouldn’t be too hard to design and manufacture a PCB for, so he came up with this clever little interactive LED array.

It’s actually a very simple circuit which also makes it super easy to build on a prototyping breadboard. Each proximity sensing LED is made up of five components. Three resistors, an LED, an IR LED, and a photo transistor. The IR LED is chosen specifically for the type of photo transistor being used — in this case, it emits a wavelength of 880nm, which is the type of light the photo transistor recognizes.

These components are wired in a manner that the IR LEDs are always on. The normal LED is wired in series with the photo transistor, and thus the LED only turns on when the photo transistor sees reflected 880nm light bounced back at it by whatever object you wave over top.

What would be really cool is if you added some 555 timers to the mix and had a delay before the LEDs fade away — then you could have a huge array that leaves motion trails long after you’ve triggered the sensors!

[via Dangerous Prototypes]

WiFi Raspberry Pi Touchscreen Camera

raspberry_pi_open-case-parts

Adafruit has a tutorial on their site that shows how to fashion together a cloud-connected, point-and-shoot camera. The best part of this project is that it can be customized to the heart’s content, unlike traditional digital cameras or smartphones. The integrated touchscreen and open-source computing allows for Instagram-like filters that can be scrolled through easily. No case is needed, but a 3D printed one can be attached for a more polished outcome.

The backup system of this Raspberry Pi-enabled device connects wirelessly to the internet and uploads the photos through the use of a Dropbox API. This functionality is great for syncing the camera to a cloud based server which then can be turned into a makeshift picture database for a website. The camera might be good for recording timelapse photography as well where a program could automatically create GIFs from the backup photos. It doesn’t seem like it would be hard to make either, especially because Adafruit pretty much always provides great documentation. Their videos are usually good too. The one posted below is relatively short, but provides enough information to see how it works.

Continue reading “WiFi Raspberry Pi Touchscreen Camera”

Rapid Fire Mod For A Wireless Mouse

Rapid Fire Wireless Mouse

Sometimes changing your computer mouse can be uncomfortable for a while until you get used to the replacement. It may also take some time to get used to new features or the lack of features the new mouse has. [Jon] bought an awesome wireless mouse that he really likes but it is missing one critical feature: rapid fire for gaming. He previously modded his old wired mouse to have a rapid fire button using a 555 timer. That worked fine as the mouse ran off the USB’s 5 volts, and that’s the voltage the 555 timer needed. The new wireless mouse has a 1.5 volt battery and can not support the 555 timer. What’s a gamer to do?

[Jon] searched around the ‘net but could not find any wireless rapid fire mods. Eventually, he did find a low-voltage variation called the LMC555 and ordered a few for his project. The new wireless mouse was taken apart in order to find out how the mouse buttons work. In this case, the signal pin is pulled low when the mouse button is pushed. Now that it is known how the mouse button works, just a couple of resistors, a capacitor, an NPN transistor and a push button switch are all that are necessary to finish up this mod. When the push button is pressed, the LMC555 timer activates the transistor in order to ground the mouse button signal pin. This happens to the tune of 1236 times a minute! That is a lot of rapid firing.

The few components were soldered up neatly and packed into the limited spare area inside the mouse. A hole drilled in the side of the mouse’s housing holds the new rapid fire push button in an ergonomically pleasing location.

Earlier, we mentioned [Jon] has done this mod before on a wired mouse. He learned about that project here on Hackaday. Check it out if your wired mouse is craving a rapid fire button.

Video after the break…

Continue reading “Rapid Fire Mod For A Wireless Mouse”

THP Semifinalist: Retro Populator, A Pick And Place Retrofit For A 3D Printer

A huge theme of The Hackaday Prize entries is making assembly of electronics projects easier. This has come in the form of soldering robots, and of course pick and place machines. One of the best we’ve seen is the Retro Populator, a project by [Eric], [Charles], [Adam], and [Rob], members of the Toronto Hacklab. It’s a machine that places electronic components on a PCB with the help of a 3D printer

The Retro Populator consists of two major parts: the toolhead consists of a needle and vacuum pump for picking up those tiny surface mount parts. This is attaches to a quick mount bolted right to the extruder of a 3D printer. The fixture board attaches to the bed of a 3D printer and includes tape rails, cam locks, and locking arms for holding parts and boards down firmly.

The current version of the Retro Populator, with its acrylic base and vacuum pen, is starting to work well. The future plans include tape feeders, a ‘position confirm’ ability, and eventually part rotation. It’s a very cool device, and the ability to produce a few dozen prototypes in an hour would be a boon for hackerspaces the world over.

You can check out a few videos of the Retro Populator below.


SpaceWrencherThe project featured in this post is a semifinalist in The Hackaday Prize. 

Continue reading “THP Semifinalist: Retro Populator, A Pick And Place Retrofit For A 3D Printer”

Exoskeleton Lift

Homemade Superhero: [James’] DIY Exoskeleton

We’re not just a bunch of monkeys with typewriters here at Hackaday; we don our hacker hat whenever our schedules allow. Or, in the case of Hackaday’s own [James Hobson]—aka [The Hacksmith]—he dons this slick exoskeleton prototype instead,turning himself into a superhero. Inspired by the exoskeleton from the film Elysium, this project puts [James] one step closer to the greater goal of creating an Iron Man-style suit.

For now, though, the exoskeleton is impressive enough on its own. The build is a combination of custom-cut perforated steel tubing and pneumatic cylinders, attached to a back braces of sorts. In the demonstration video, [James] stares down 170 pounds of cinder block affixed to a barbell, and although he’s no lightweight, you can tell immediately from his reaction how much assistance the exoskeleton provides as [James] curls the makeshift weights over and over. And that’s only at half pressure. [James] thinks he could break the 300 pound mark of lifting if he didn’t break his legs first.

There’s plenty of behind-the-scenes footage of the build process to be had, so make sure you stick around after the jump for a sizable helping of videos, and check out [The Hacksmith’s] website for more of his projects.

Continue reading “Homemade Superhero: [James’] DIY Exoskeleton”

Voices From The Past: Recovering Audio From Wire Recordings

wire recorder setup[Nick]’s grandfather was quite the old school hacker. In the 1940s, he built his own wire recorder and microphone to capture everything from his children’s Chirstmas wishes to his favorite songs and programs from the radio. Only 20 or so spools have survived and were doomed to silence until [Nick] was able to find a vintage wire recorder, restore it, and feed digitized audio into Audacity.

Once he restored one of the two machines that he was able to get his hands on, [Nick] was in business. Since his grandfather also rolled his own spools, [Nick] had to build a playback spindle that would hold them. His uncle found an old mechanical counter to do the job, which [Nick] secured to the workbench. He fed the output from the wire recorder’s playback head into a guitar pre-amp, effectively digitizing the audio for recording in Audacity.

After playing all the spools, he adjusted the levels where necessary and cleaned up the recordings. His biggest challenge was feeding the wires back on to their original spools, which he managed with an electric drill and a rubber grommet. Be sure to check out the mp3 clips on [Nick]’s page. If you’re in the mood for old audio hacking stories, here’s one about building a tape recorder in 1949.

Extrinsic Motivation: Off-grid Solar System Monitoring Solution

3700201407712010539

This solar monitoring project was entered in The Hackaday Prize and didn’t make the semifinal cut, but it is worth featuring on the site because we think that it is pretty cool. The idea started all the way back in May of 2013 when [Michel] was planning to attempt to bring his house totally off the grid in an effort to become as independent from the local Utility company as possible. After a bit of calculating, he figured out that the solar cells on the roof could potentially provide about 80% of the power needed, which of course took into account the lack of sun during the winter months in his area.

[Michel] posts a lot of the technical details on the Hackaday.io page and lists the components that were required to set up this system. At night, a lighting mechanism shows whether the building is being run off of the Photovoltaic (PV) System or if it is getting power from the grid. He states in the projects logs why it is important to monitor the solar cells and provides some amazing graphs of the data that was recorded through the energy-intelligence platform that he integrated into his home. An example can be seen posted below. A few quick specs of the project include the solar field being made of 16 solar modules providing 4300 Wp (Watts – peak) of electrical power. The system comes with a comprehensive remote control as well. We like this idea a lot. Now, would you install something like this up on your own home or office? Let us know in the comments.


SpaceWrencherThis project is an official entry to The Hackaday Prize that sadly didn’t make the quarterfinal selection. It’s still a great project, and worthy of a Hackaday post on its own.

Continue reading “Extrinsic Motivation: Off-grid Solar System Monitoring Solution”