The Raspberry Eye Sees All

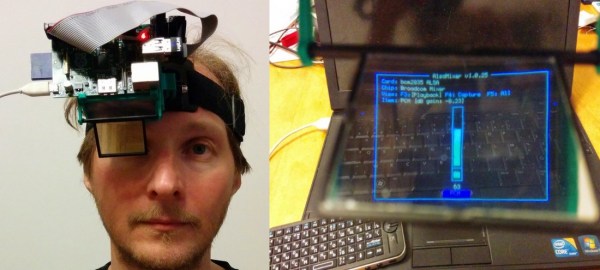
[Roman Rolinsky] wanted to try to do something interesting with his Raspberry Pi and a 2.4″ LCD he had laying about… So he made a rather bulky version of Google Glass.

We’ve seen a few examples of home brew Google Glass before, or even real-life subtitle glasses used for translation on the fly, but what we really like about [Roman’s] project (besides the fact he hosted it on our very own awesome project hosting site) is that he’s put together the projection system himself out of basic components.

To create the HUD, he’s using a semi-transparent mirror which he took out of a game of Khet 2.0 called the Eye of Horus Beamsplitter — which is a really cool real-life puzzle board game like those games where you have to reflect the laser to solve a puzzle. He’s then using a 3x Fresnel magnification lens which is placed over top of his 2.4″ LCD in a 3D printed enclosure. This magnifies and reflects the image onto the mirror which is placed directly over his eye, allowing for a see through display.

Stick around after the break to see a video of the Raspberry Eye in action!

Continue reading “The Raspberry Eye Sees All”

Make A 3D Scanner For 60€ Using Old Hardware

3d laser scanner

[Till Handel] just put the finishing touches on a paper he wrote about how to build a cheap 3D scanner — mostly out of spare parts.

Using parts from old printers and notebooks, he’s cobbled together this rather rough-looking laser scanner. But don’t be fooled by its looks! It’s capable of scanning 360° around itself at distances from 0.3 – 5m, making it an excellent candidate for scanning rooms.

It uses a line laser and a webcam mounted on an arm driven by a stepper motor, which looks like it’s out of an old optical drive. An Arduino Uno and an A4988POW stepper driver control the system. The paper (Caution: PDF) is very detailed and published under GPLv3 (a general public license).

Continue reading “Make A 3D Scanner For 60€ Using Old Hardware”

Filament Extruder Pumps Out 1kg/hour!

3D printers are awesome, and while the plastic filament may not be as much as a rip off as printer ink (yet), it’s still marked up at least 500%! If you really want to break free, you’re going to need your own filament extruder.

ABS, a typical printing material, will run you about $30 USD per kilogram. Don’t get us wrong, that will go a long way — but did you know ABS pellets (technically processed MORE than filament) can be as cheap as $3-4/kg?

What if you could buy the pellets, and make your own filament with them? If you do a lot of printing, this could save you a lot of money. We’ve seen lots of different filament extruders here on Hackaday, and here’s yet another iteration — capable of extruding at an extremely fast rate of 1kg per hour! [Ian McMill] was inspired by [Xabbax’s] Low Cost Filament Extruder, and has put together an excellent Instructable guide on how to make your own — with his own flair of course.

Take a look!

Prototyping Brief Case Would Be Fun To Take Through Customs


[Baldor] prototypes electronic circuits all the time, but unfortunately he doesn’t really have a dedicated work space to do this! Annoyed at having to get all his tools ready and then put them away again after every project, he’s come up with his very own electronics prototyping briefcase.  [Edit: here’s the link in the Wayback Machine if you’re visiting from the future. Unfortunately, the images didn’t seem to make it.]

He started with a very old hand-made wooden tool briefcase and added some fun stuff. His case features four breadboards, all with individual positives, and each pair with common grounds. Banana clips allow for various setups with different wiring. He has 5 integrated volt meters, along with 5 buck-boost DC-DC voltage regulators, each set for 3V, 5V, 9V, 12V, and 18V. It’s an ingenuous setup and would make prototyping a breeze compared to most work benches!

In addition to the basic prototyping tools, he’s also got a development board and a place for his Pickit2. Underneath the main prototyping area he stores the power supply, and a veritable army of jumpers. We’re impressed.

Now all he needs is a portable electronics lab in a box once his prototypes are proven!

[Thanks Xavier!]

The Pyro Board: A Two Dimensional Ruben’s Tube

Like visualizing music? Love fire? If so, you’re going to want to take a look at this Pyro Board.

What happens when you take a tube, put some holes along it, add a speaker on one end, pump some propane in, and then light it on fire? You get an awesome fire visual — also known as a Ruben’s Tube. It works because the sound pressure from the speakers causes the flow rate of gas leaving the holes to vary, which results in a visible “standing frequency” of flames, i.e. a flaming VU meter.

The folks over at [Fysikshow] decided to step it up a notch by building a 2-dimensional Ruben’s tube with 2500 holes. They have a steel box with the evenly spaced holes on the top, and two speakers attached to the sides. And it works amazingly well — see for yourself after the break.

Continue reading “The Pyro Board: A Two Dimensional Ruben’s Tube”

Leak-Proof Water Blob Provides Hours Of Fun

With the warm weather slowly creeping back it’s time to think of warm summer days, and with that comes this rather interesting leak-proof water… blob?

[Leisha] over at Homemade Toast has come up with a super inexpensive way to make a water blob  — or a giant outdoor waterbed? It certainly looks cool, and apparently keeps children entertained for hours playing on it. We wonder how bouncy you could make one for bigger kids (i.e. us).

It’s made out of a roll of painter’s plastic drop sheet, and instead of trying to tape, glue or otherwise seal the edges, [Leisha’s] figured out an easy way to melt the seams together using a clothes iron. By sandwiching parchment paper over the two pieces of plastic, you can gently run the iron along the edge, creating a very strong bond, without melting a hole in the plastic.

Seriously — we want to see someone make a giant version of this for some extreme waterbed bouncing!

[via Viral Nova]

Interactive Gloves Turn Gestures Into Music

Imogen Heap wearing her Mi.Mu gloves

[Imogen Heap] is a UK-based musician who is trying to change the way we think about making music. She’s been working on a pair of gloves called the Mi.Mu, and they’re getting close to production.

In the included interview she explains that while computers and technology have brought many new advances to music, twiddling dials and pushing random buttons “is not very exciting for me, or the audience”. With these gloves, the artist becomes one with the music and interaction.

The current iteration of gloves use flex sensors along each finger to determine the movement (along with motion sensors for other gestures). She’s been through many designs and hopes to integrate e-materials into the next — using the actual glove as the sensor (not physical flex sensors).

She’s been working with both developers and musicians mapping the various motions of the gloves to music which makes sense in an intuitive way, and it’s very unique to see in action.

Continue reading “Interactive Gloves Turn Gestures Into Music”