Making QR Codes In Google Docs

screen-shot-2013-09-18-at-1-48-20-am

[Jordi] sent us this great tip on how to generate QR codes inside Google Docs. This can be super handy if you ever need to make a lot of them at one time, plus they update on the fly!

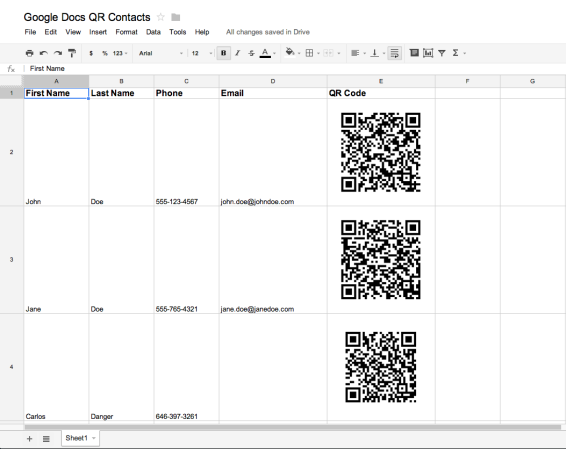
In his example he set up the code to create vCards so he could transfer contacts to his phone quickly and easily. The code pulls in a Google API QR generator and provides you with a QR code as an image! The following is his code, which can be easily modified to suit your needs:

=image("https://chart.googleapis.com/chart?chs=200x200&cht=qr&chl=BEGIN:VCARD%0AN:" & A2 & "%20" & B2 & "%0ATEL;CELL:" & C2 & "%0AEMAIL:" & D2 & "%0AEND:VCARD")

Or if you just want the bare bones:

=image("https://chart.googleapis.com/chart?chs=200x200&cht=qr&chl=<strong>YOUR CELL</strong>")

And if you need a full walkthrough, there is a video after the break. Those wanting to tinker around with more QR code hijinks will enjoy forming images from QR codes and milling QR codes into your copper layers.

Continue reading “Making QR Codes In Google Docs”

Mechanical Typewriter Types Your Tweets!

ScreenShot027

While we weren’t able to visit the Toronto Maker Faire this past weekend, a friend let us know about this great hack. A mechanized typewriter that types out tweets directed at the maker, @mschwanzer!

[Michael Schwanzer] has a few blog posts outlining the build, but the first part of this news article and accompanying video explain it quite nicely. The printer-typewriter features an array of solenoids that are controlled by an Arduino using shift registers. A Raspberry Pi collects the information from Twitter and then parses the data to the Arduino for typing. A simple concept, but a complex and relatively expensive build.

During the fair, people could have their own tweets printed and streamed on this site. You can still see it in action though, just check out the video after the break! Continue reading “Mechanical Typewriter Types Your Tweets!”

Seven Decade Programmable Resistor

124

[Gerry Sweeney] was tired of messing around with resistors while prototyping his projects, so he decided he wanted a resistor decade box. The problem is they are typically big and rather expensive ($100+). Unhappy with the selection available for purchase, he decided to design his own.

In the accompanying video, he shows off his first attempt after being inspired by a past post we covered that used a combination of resistors and thumbwheel decimal switches. He modified the design a bit and used surface mount resistors instead, which made for a fairly compact and convenient seven decade resistor box. But he still wasn’t happy with it.

He decided to design his own PCB instead. The simple design utilizes surface mount resistors to conserve space, and jumpers to select the resistance. No bulky switches get in the way and it’s fairly cheap to produce.

Check out the great video explanation of the project after the break. He also shows off the insides of a commercial resistor decade box!

Continue reading “Seven Decade Programmable Resistor”

Hacking A Disco Laser

hacked laser disco

[Mark] was looking for a cheap disco laser projector for parties, and he found one. Unfortunately for him, the advertised features were a bit lacking. The “sound activation mode” was merely an on off circuit, as opposed to it actually being controlled by the music — he set out to fix this.

Taking the unit apart revealed a very convenient design for hacking. All of the components were connected to the main PCB by connectors, meaning the laser driver board was completely separate! He replaced the PCB completely using a prototyping board, an Arduino pro mini, a microphone with a simple preamp, a rotary encoder, and a MSGEQ7 chip to analyse the levels. Oh, and a MOSFET to control the motor via PWM output. It even ended up being close to the same size as the original!

If you happen to have one of these projectors and want to fix it too, he’s posted the source code and circuit diagram on github.

After the break, check out the before and after video. It’s still a cheap disco laser projector, but at least it works as advertised now!

Continue reading “Hacking A Disco Laser”

Revenge Of The Glueless Stool And A New Folding Chair

glueless stool

[Vincent] is at it again, with the final iteration of his glueless stool and a new project.

As many of you commented on the original post, three legs might not be enough. He might have taken note, as the final design contains not 3, not 4, but five legs. After the break we have a clip of it being used, and it looks quite sturdy!

But is that it? Is [Vincent] done with innovative wood furniture? Nope. Not since his wife came up with a challenge to create a practical, foldable, and especially, not ugly — chair. He began by researching the dry subject of chairs and determined the approximate popliteal height that his chair should provide. Keeping with the theme, he wanted this chair to be cut from a single piece of wood, just like the stool. A few sketches later and he had a basic design ready, still glueless, but unfortunately this time requiring hinges. After a few hiccups in his CNC program, he had a working foldable chair, but our guess is it’s not quite the final design.

Just like last time, all the files are freely available from his Github, so if you happen to have a CNC router, or maybe a laser cutter, you can make your own!

Continue reading “Revenge Of The Glueless Stool And A New Folding Chair”

Aux-in On A 30 Year Old Boombox

finished

[Michael] just sent us this nice example of some good ol’ fashioned radio hacking.

He originally received the radio from his grandmother, and while he doesn’t listen to the radio much, he felt he couldn’t just let it go to waste. So like any good hacker he cracked open the case and took a look inside.

The beauty with radios from the 80’s is the simplicity of it all. They typically have single layer PCBs and nice big components which makes it so much easier to tinker with.

He used a bench power supply to bypass the main transformer for safety’s sake, and began probing the various points. The cassettes audio output was the easiest to find, but unfortunately it required the play button to be activated. Not wanting to lose functionality (or have an annoying rattling cassette mechanism), he continued probing and eventually found similar wires coming from the radio part of the PCB. Upon further probing he discovered he could trick the radio band button so that the radio would be off, but the output could still be used. After that it was just a matter of wiring, soldering, and adding an auxiliary plug to the case.

We’ve covered lots of auxiliary port hacks in the past, but this one is a great example of saving old technology from the dump.

[Thanks Michael!]

Retrotechtacular: Linotype Machines, Mechanical Marvels

For this week’s Retrotechtacular we’re looking at Linotype Machines; mechanical marvels that brought about the mass production of printed media.

It was a cold dreary day in 1876, when a German inventor living in America named [Ottmar Mergenthaler] was approached by [James O. Clephane], who required a faster way of producing legal briefs. Various patents existed for newspaper typewriters but they did not work very well, so [Mergenthaler] set to work on a new design. Traditionally type sets were cast on one machine, and stamped on another to create the text. On a train [Mergenthaler] thought, why not just combine the machines? And with that the idea for a revolutionary machine was born.

The Linotype Machine has a library of matrices, which are character molds that create the slug — the name for a cast line-of-type. The operator uses a keyboard to input the line of text, which then releases the matrices of the corresponding letters. These are then transferred to the casting station, where type metal is cast into the matrices in a process called hot metal typesetting. The matrices are then returned to the library, and the cast lines of text are cooled, removed, and used for stamping in the mass production of printed media. It sounds simple enough, but now realize the entire machine is mechanically automated; as long as you keep filling it with type metal, you can continue producing slugs simply by typing on the keyboard.

The machines were used from the late 19th century all the way up to the 60’s and 70’s until they were replaced by more efficient offset lithography and computer typesetting.

After the break, check out the fascinating documentary from the 1960’s, you will marvel at the mechanical workings of the machine. If you don’t have 35 minutes to blow, at least check out 1:30 to 6:45 for the basic overview. But you probably won’t be able to stop watching.

Continue reading “Retrotechtacular: Linotype Machines, Mechanical Marvels”