Seven Decade Programmable Resistor

124

[Gerry Sweeney] was tired of messing around with resistors while prototyping his projects, so he decided he wanted a resistor decade box. The problem is they are typically big and rather expensive ($100+). Unhappy with the selection available for purchase, he decided to design his own.

In the accompanying video, he shows off his first attempt after being inspired by a past post we covered that used a combination of resistors and thumbwheel decimal switches. He modified the design a bit and used surface mount resistors instead, which made for a fairly compact and convenient seven decade resistor box. But he still wasn’t happy with it.

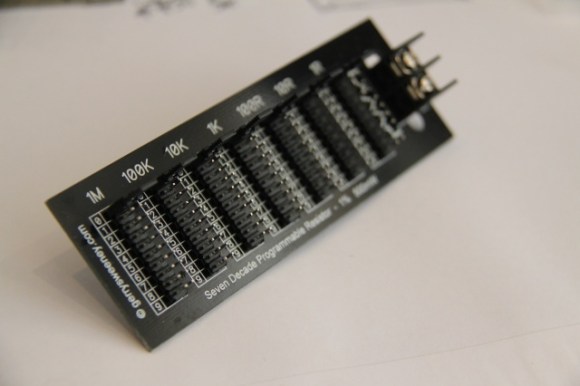
He decided to design his own PCB instead. The simple design utilizes surface mount resistors to conserve space, and jumpers to select the resistance. No bulky switches get in the way and it’s fairly cheap to produce.

Check out the great video explanation of the project after the break. He also shows off the insides of a commercial resistor decade box!

Continue reading “Seven Decade Programmable Resistor”

RepRap Simpson Puts A New Spin On Delta RepRaps

Just when you think you’ve seen it all in the 3D printer world, something new pops up! [Nicholas Seward] posted a video of RepRap Simpson, his latest project.  Simpson is a delta robot – but unlike any delta we’ve seen before. Previous offerings vertical rails on which the arms travel. As you can see, this design mounts three articulated arms directly to the base of the printer, using steel cables as part of the joint mechanism.

Judging by [Nicholas’] posts on the RepRap forums, Simpson’s grounded delta design has already gone through a few revisions. The basic geometry though, has remained the same. [Nicholas] calls this edition a “Proportional Gear Drive Joint Simpson”. The name may not roll off the tongue, but the movements are incredibly smooth, organic, and fast.

As with any delta design inverse kinematics play a huge role in the software. [Nicholas] is trying to simplify this with an optical calibration system. For the adventurous, the equations are posted on the forums, and a python Gcode preprocessor is posted on Thingiverse.

Even Simpson’s base received special attention.  It’s built from a water jet cut piece of basalt.  We like the use of opposed helical gears on the large joints, as well as the guitar machine heads used to tension the cable drive. One thing we are not sure of is the longevity of system – will cable stretch play an issue? Will the printed parts suffer wear from the cables? Only time will tell.

Continue reading “RepRap Simpson Puts A New Spin On Delta RepRaps”

Functional NES Controller Coffee Table

For reddit user [the_masked_cabana], button mashing has taken on a whole new meaning.  His gigantic NES controller coffee table makes it hard to punch in the Konami code without breaking a sweat.

Even before discussing the electricals, this is one impressive build.  Each component was cut from multiple layers of MDF and assembled with screws, glue, and putty.  Once they were sanded smooth, he used layers of carefully applied Krylon paint to achieve a plastic sheen that is remarkably faithful to its 5″ counterpart.  For the more precise lettering, custom cut vinyl stickers did the trick.

Of course, looking the part is only half the battle.  Tearing apart an original NES controller, he soldered wires to the button connections and ran them to eight arcade style buttons located under the replica button covers.  A collection of bolts and springs keep everything aligned and produce the right kind of tactile feedback to the user.  A removable cable in the back provides the connection to the console.

If a four foot NES controller isn’t practical enough for you, he also added some storage space in the base and a removable glass cover that converts the controller into a coffee table.  For more details on the build, check out the reddit discussion.  You can also find an eerily similar working NES controller table in this geeky coffee table roundup from five years ago.

The Bitbox Console: An Open Source Gaming Rig

Bitbox Console

A simple resistive DAC is all you need to drive a VGA display. Combining that with an on-chip DAC for audio, the STM32F405RGT6 looks like a good choice for a DIY game console. [Makapuf’s] Bitbox console is a single chip gaming machine based on the STM32 ARM processor.

We’ve seen some DIY consoles in the past. The Uzebox is a popular 8 bit open source game system, and [makapuf] was inspired by its design. His console’s use of a more powerful 32 bit processor will allow for more complex games. It will also provide more colors and higher quality audio.

One of the keys of the Uzebox’s success is the development tools around it. There’s a full emulator which allows for debugging with GDB. [Makapuf] has already built an SDL based emulator, and can debug the target remotely using GDB. This will certainly speed up game development.

After the break, check out a demo of the first game for the Bitbox: JUMP. Also be sure to read through [makapuf]’s blog for detailed information on the build.

Continue reading “The Bitbox Console: An Open Source Gaming Rig”

3D Printering: Alternative Filaments

printering

ABS and PLA are the backbones of the 3D printing world. They’re both easy to obtain and are good enough for most applications. They are not, however, the be-all, end-all filaments for all your 3D printing needs. Depending on your design, you may need something that is much tougher, much more flexible, or simply has a different appearance or texture. Here are a few alternative plastics for your RepRap, Makerbot, or other 3D printer:

Continue reading “3D Printering: Alternative Filaments”

Hacking A Disco Laser

hacked laser disco

[Mark] was looking for a cheap disco laser projector for parties, and he found one. Unfortunately for him, the advertised features were a bit lacking. The “sound activation mode” was merely an on off circuit, as opposed to it actually being controlled by the music — he set out to fix this.

Taking the unit apart revealed a very convenient design for hacking. All of the components were connected to the main PCB by connectors, meaning the laser driver board was completely separate! He replaced the PCB completely using a prototyping board, an Arduino pro mini, a microphone with a simple preamp, a rotary encoder, and a MSGEQ7 chip to analyse the levels. Oh, and a MOSFET to control the motor via PWM output. It even ended up being close to the same size as the original!

If you happen to have one of these projectors and want to fix it too, he’s posted the source code and circuit diagram on github.

After the break, check out the before and after video. It’s still a cheap disco laser projector, but at least it works as advertised now!

Continue reading “Hacking A Disco Laser”

$25 Coupon Code For Texas Instruments Store

ti-25-buck-coupon

If you’ve been coveting a piece of Texas Instruments hardware you should put in an order before September 30th. A coupon code for $25 off a purchase was posted to the Stellaris ARM Community forums and it should work until that date. Above is the overview of an order placed yesterday for two Tiva Launchpads (apparently TI has rebranded the Stellaris chips as Tiva for some odd reason). After applying the coupon code “National-1yr” the total price of [BravoV’s] order is just under one dollar (including shipping). The coupon code can be entered into a box on the right hand column of step #3 (payment) when placing an order.

UPDATE: There are now multiple comments reporting that the coupon code no longer works.

We’re pretty sure you can use this coupon code on anything in the TI store. But if you don’t have a Stellaris/Tiva Launchpad yet we highly recommend getting one. We picked ours up about a year ago. It’s a great way to try your hand at ARM programming. We have had some issues with how the breakout headers are organized — there’s some gotchas with multiple pins being connected (read the last five paragraphs of the project write up linked in this post for more). But for the price and ease of programming this will get you up and coding in no time. If you need some ideas of what to do with the board look at our posts tagged as “Stellaris”.

[Thanks Vlad]