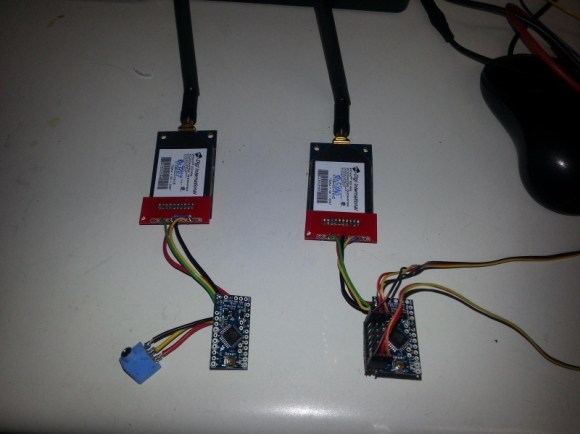
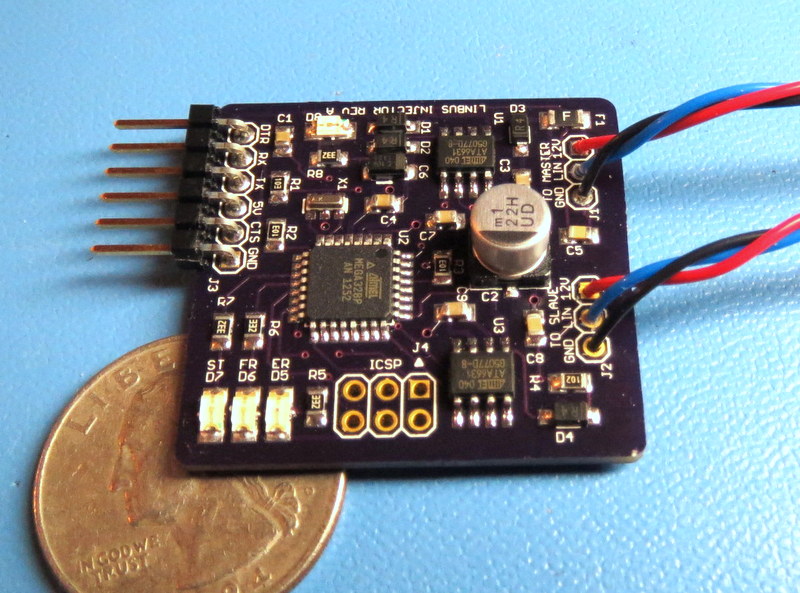
Confuse The Birds With This Daylight Simulation System

F7WW1DAHQP02H5D.LARGE

Hackers love a challenge. So when [Patrick’s] father-in-law asked him to look into a daylight simulation system for his bird breeding cages, [Patrick] quickly discovered the ridiculous prices for commercial systems… so he convinced his father-in-law to let him design and build one instead.

Like any project, [Patrick] quickly listed the requirements of the system before starting anything.

  • It must brighten gradually in the morning
  • Stay constant throughout the day
  • Dim in the evening to a very low intensity

In addition to this, the lighting transition should be smooth, and the lights cannot flicker, as this can be stressful for the birds — oh, and it needs to be reliable.

To build the system, [Patrick] has chosen an Arduino Duemillenova, an RTC, a small LCD screen, some cheap LEDs from eBay and a handful of N-channel NPN transistors to provide the PWM for the LEDs. The entire system cost less than $100 — a much cheaper alternative to commercial systems.

We think the system looks great, but as a big fan of the Hack a Day community, [Patrick] would love to hear your feedback!

EL Wire Nixie Tube Is In Your Reach

FUQ84C3HS0D05D9.MEDIUM

Nixie tubes are awesome, but sometimes a little out of reach for some makers, whether it is a matter of obtaining them, or figuring out how to drive them. The hackerspace over at H3 Laboratories decided to try making a fun alternative — EL wire nixie tubes.

[Marty] leads us through the build in a very detailed Instructable, which makes use of CoolNeon EL wire. He’s using an Arduino Uno with a CoolNeon shield to control it. The trickiest part of this build is forming the numbers to minimize the overlap — to figure this out he modeled it in Blender. He created a test jig and formed the numbers using coat hanger wire first before playing around with the EL wire.

EL wire can be soldered together — it’s just a bit of a fine art, which is explained in another detailed Instructable. To black out parts of the number and the trailing wires, [Marty] made use of black plastic dip. The numbers are mounted on a Styrofoam cylinder which fits into the bottom of a large masonry jar. It’s a great build and a fun project to get into Nixies … without actually getting into Nixies.

Stick around for a video of it in operation.

Continue reading “EL Wire Nixie Tube Is In Your Reach”

LuxBlaster: Blast A Beam Of Light At The Most Intense Light Source

HighBeams

[Hazim] wrote in to tell us about his project that teaches inconsiderate drivers a lesson! Well, theoretically. The LuxBlaster is a spot light which points towards the most intense light source.

The idea is that you can blast drivers who do not turn their high-beams off with a reverse high-beam of your own. It is very important to note that this should never be used, as [Hazim] also clearly states. While this project is meant to prove that it can be done (a “what if”) project, it has two components that are very well done and can easily be used in different projects: the Arduino controlled spotlight and the light intensity tracker.

What would you use an Arduino controlled spotlight for? Smart lighting? What about a light source tracker? Let us know in the comments.

Continue reading “LuxBlaster: Blast A Beam Of Light At The Most Intense Light Source”

An Arduino Programmable Load

Having a big block of hot to dump current into is a very useful thing to have if you’re testing batteries, power supplies, high power LEDs, electroplating, or any thing else that would normally require a huge resistor. [Jakub] found himself in need of an electronic load, and instead of a transistor and a pot, decided to make something more automatic: a programmable load built around an Arduino shield.

The idea behind this load is pretty simple: connect a device to a FET and shunt resistor to measure current. Drive the gate of the FET with an op-amp that maintains either constant current or constant voltage. Control everything with a DAC, and you have a programmable load controlled by an Arduino.

With such a small form factor, getting rid of all that heat was bound to be a problem. For this, [Jakub] is using a 50×50 mm BGA style heat sink with a 5V fan. If it’s good enough for a big CPU, it should be able to handle dumping 70 Watts into a FET. There’s also a conservative application of thermal paste and a very small thermistor underneath the FET that’s able to be read by the Arduino. It might slowly heat up your room, but it’s not going to catch fire.

With the Arduino sketches [Jakub] wrote for his load he was able to characterize a pair of Idea batteries and figure out how much charge a three-year-old recyclable battery had. It’s a great piece of work, and if [Jakub] is willing to go through the hassle of a Kickstarter, it would make a fine crowdfunded product.

SoundCube: A Companion Cube That Can Talk

sound_companionCube

The Enrichment Center likely disapproves of the SoundCube: a portal music box in the form of a Portal Companion Cube. [Andreas] finished this project a couple of years ago, but we’re glad he’s finally had time to give a rundown on the details at his blog.

The build is primarily a modified speaker box cube—constructed out of what appears to be MDF—with four Alpine SXE-1725S speakers placed at the center of the middle faces. The faces were routed out to resembled the Companion Cube, while the electronics mount and the speaker grills were 3d printed. Inside is a homemade amplifier built around an Arduino Mega, with a TDA7560 quad bridge amplifier, a TDA7318 audio processor, a Belkin bluetooth receiver, and a 3.5″ touchscreen for volume control and for input selections.

Two 12v 7.2Ah lead-acid batteries keep the cube functional for an entire weekend of partying, but probably add a few pounds to the already hefty MDF construction. Check out [Andreas’s] blog for more pictures and his GitHub for all the necessary code.

Meltinator 9000 Fuses Glass By Degrees

kiln[Richard]’s wife scored an Evenheat glass-fusing kiln, but the 20-year-old temperature controller was broken. He could have simply ordered a replacement controller, but that kind of problem solving doesn’t get you on Hack a Day. His wife wanted more control over the kiln and he convinced her that building their own was the way to go. Thus, the Meltinator 9000 was born.

[Richard]’s design uses an Arduino Uno and an Adafruit display shield, protoshield, and thermocouple reader board. He built a simple relay driver with a resistor, BJT, and a diode and connected it to pin 13 and its built-in indicator. To [Richard]’s delight, all of this fit in the original enclosure.

[Richard]’s software provides 25 fusing schedules with ten steps apiece. Each step has a target temperature,  rate of temperature change, and a hold time which can be increased on the fly. He ran a test program that heated the kiln to 1500°F at a rate of 2550°F/hour. He then cooled it to 500°F at a rate of 1000°F/hour, which took longer than he thought. The good news is that the kiln is well-insulated!  [Richard] has the software available on his GitHub.

Don’t have a glass kiln? Prefer to control beer-related temperatures? You could always hack your stove in the name of homebrewing.

Open Bitcoin ATM

openBitcoinAtm

If there’s one thing Bitcoins can benefit from, it’s easier accessibility for first-time users. The process can be a bit daunting if you’re new to cryptocurrency, but [mayosmith] is developing an open Bitcoin ATM to help get coins in the hands of the masses. There are already some Bitcoin dispensers out there. The Lamassu is around 5k a pop, and then there’s always the option of low-tech Condom Vending Machine conversions.

[mayosmith’s] build is still in the proof-of-concept phase, but has some powerful functionality underway. The box is made from acrylic with a front plate of 12″x12″ aluminum sheet metal, held on by 2 aluminum angles and some bolts. Slots were carved out of the aluminum sheet for the thermal printer and for bill acceptor—the comments identify it as an Apex 7000. Inside is an Arduino with an SD Shield attached. Dollars inserted into the acceptor trigger the Arduino to spit out a previously-generated QR code for some coins via the thermal printer, though all values are pre-determined at the time of creation and stored sequentially on the SD card. Stick around for a quick video below, and check out the official page for more information: http://openbitcoinatm.org

Continue reading “Open Bitcoin ATM”