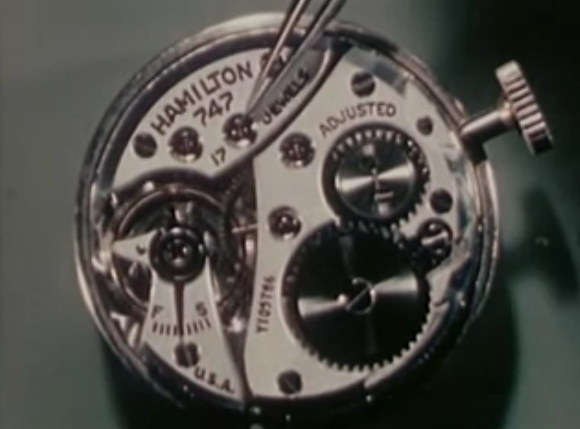
Atomic Clapperboard

Whether you know it as a clapperboard, a slate, slate board, time slate, or by another name, you probably recognize this staple of movie making. It’s a handy way to help synchronize sound with video, and to keep track of clips when it comes time to edit. But this clapperboard is quite a bit more accurate than most. It’s got an atomic clock source for dead-on accuracy.

The project came from the growing availability of Rubidium clock source modules on eBay. They can be had for under $100 and you’ll enjoy accuracy of 0.1 ppm. [Luddite Tech] grabbed one for himself and included it in this build. As you can see in the clip after the break, the contrast of the eight-digit display is adjustable, and shines brightest when the marker is snapped. We’d guess the cable he connects at the beginning of the demo is used to set the initial time reference. After that the in-built WiFi can be used to push the time markers to a computer.

Continue reading “Atomic Clapperboard”

Magic Clock Locates Your Friends

Just like the clock from Harry Potter, a team of media informatics students at the University of Munich built a grandfather clock that doesn’t keep track of time; instead, it keeps track of where everyone is, whether it be their university, work, or in prison.

The build uses Android and iOS apps on each team member’s cell phone to send their current location to a web server. A circuit built inside an old grandfather clock the team picked up from eBay communicates with the web server through a WiFly Shield to control a quartet of servos and drive the clock hands.

Because the grandfather clock only came with two clock hands, the team used a series of four concentric shafts to move each hand around the dial. With a bit of clever gear fabrication on their laser cutter, they were able to use unmodified servos move the hands all the way around the clock.

The avatars on the tip of each clock hand are the remains of decapitated LEGO minifigs, a choice that makes sense after viewing the build video available after the break.

Continue reading “Magic Clock Locates Your Friends”

How’s The 60Hz Coming From Your Wall?

If you’ve ever wondered why NTSC video is 30 frames and 60 fields a second, it’s because the earliest televisions didn’t have fancy crystal oscillators. The refresh rate of these TVs was controlled by the frequency of the power coming out of the wall. This is the same reason the PAL video standard exists for countries with 50Hz mains power, and considering how inexpensive this method of controlling circuits was the trend continued and was used in clocks as late as the 1980s. [Ch00f] wondered how accurate this 60Hz AC was, so he designed a little test.

Earlier this summer, [Ch00f] bought a 194 discrete transistor clock kit and did an amazing job tearing apart the circuit figuring out how the clock keeps time. Needing a way to graph the frequency of his mains power, [Ch00f] took a small transformer and an LM311 comparator. to out put a 60Hz signal a microcontroller can read.

This circuit was attached to a breadboard containing two microcontrollers, one to keep time with a crystal oscillator, the other to send frequency data over a serial connection to a computer. After a day of collecting data, [Ch00f] had an awesome graph (seen above) documenting how fast or slow the mains frequency was over the course of 24 hours.

The results show the 60Hz coming out of your wall isn’t extremely accurate; if you’re using mains power to calibrate a clock it may lose or gain a few seconds every day. This has to do with the load the power companies see explaining why changes in frequency are much more rapid during the day when load is high.

In the end, all these changes in the frequency of your wall power cancel out. The power companies do the same thing [Ch00f] did and make sure mains power is 60Hz over the long-term, allowing mains-controlled clocks to keep accurate time.

Automatic Daylight Saving Time Compensation For Your Clock Projects

Pretty early in development of my Ping Pong Clock I came up with the idea of automatic Daylight Saving Time compensation. It’s an interesting feature, but it’s a luxury and so I figured I could add it as a future improvement. Now’s the time and I’m reporting back on what I’ve learned and how you can add this to your own projects.

There’s two things to think about before adding this feature. Is it worth the effort and does it make the clock more confusing rather than easier to use?

As to the latter, if you are responsible for setting the time initially but you are not responsible for resetting the clock when we fall back or spring forward will it cause confusion? Perhaps initially, but the battery-backed RTC that I used in my project should mean that you set it once and never have to reset it again. The one exception is DST and that’s what I’m compensating for.

Whether it is worth it or not is difficult to answer until after the fact. You should take into consideration that the DST rules are not set in stone, they change from time to time. Add to that the fact that not all parts of the world observe the practice. This means that not only do you need to implement the compensation, but you should add a method of switching it on and off as well as changing the rules for when it is observed.

Join me after the break to learn the method and code I use to make time adjustments automatically twice a year.

Continue reading “Automatic Daylight Saving Time Compensation For Your Clock Projects”

Glass PCB LED Clock

This clock looks fantastic because of the glass PCB used for the build. This banner image allows you to see all the traces and components, but when it is lifted off of the desk surface the LEDs which make up the 7-segment digits appear to be floating.

The concept isn’t new, but it’s a much larger format than we’ve seen before. When we first looked at [CNLohr’s] glass PCB fabrication he was using microscope slides. This uses a much larger pane of glass but it seems the fabrication still uses copper foil glued to the glass, then toner transfer etched like normal.

Here he’s testing out some 74LV164 chips as constant current drivers. One of the commenters on the Reddit thread is skeptical about using the chip in this way and so are we. But as the video after the break shows, it seems to work (at least for now). [CNLohr] also mentions that the AVR soldered on the display is burnt out which doesn’t help his case. Still, we love the look and can’t wait to see where he goes from here!

Continue reading “Glass PCB LED Clock”

Start Thinking 4th Dimensionally With A Time Circuit Tutorial

When [Phil Burgess] showed off a few I2C – controlled seven-segment displays on adafruit’s weekly vlog, the comments immediately turned to the time circuits featured in everyone’s second-favorite time machine, the Back to the Future DeLorean. The time circuits are now active, so now you can easily add a temporal display to your car well before a hover conversion.

[Phil] used these LED displays, conveniently controlled by a four-wire I2C bus. Although the displays are addressable independently, it’s only possible to assign each display to one of 8 I2C addresses. [Phil] figured out a neat way to control the 9 displays of the time circuit with the help of a 74HC138 3-to-8 line decoder.

The case was constructed out of clear acrylic lasercut in adafruit’s shop and spray painted with faux-metal paint. After installing the seven-segment displays, a Teensy, ChronoDot, and a few AA batteries finished up the build.

With any luck, the design files for the laser cut case should be available shortly, so get those I2C displays while they’re still in stock.

Building A CMOS Clock On A Breadboard

If you’re going to learn digital logic, why not aim high? That’s what [Easton] and his friend did when they built a clock using only 4000-series logic chips. On a breadboard, no less.

For a 1 Hz clock, [Easton] and his friend used a 4060 counter paired with a flip flop. This counts off 59 seconds until, with the help of an AND gate, the seconds counter rolls over to zero. After repeating that again for the minutes and building a similar circuit for the hour, and [Easton] had a working 4000-series 24-hour clock.

The breadboard clock may not be the prettiest thing, or a textbook example of how to prototype circuits,  but that was fixed with [Easton]’s friend’s PCB layout of a 12-hour clock. We couldn’t find any pics of this, but we’re sure it’s awesome and a great way to learn about logic and design.