A Simple, DIY GPS Tracker

Today, there are dozens of off-the-shelf solutions for a GPS tracking device. Most of them use GSM, some of them use satellites, and all of them are astonishingly inexpensive. If you want to track a car, dog, or your luggage, you’ve never had more options.

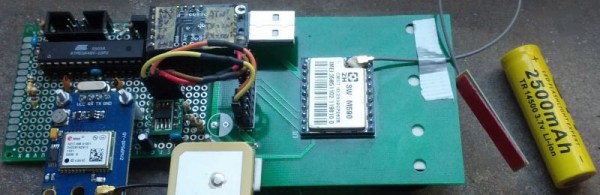
[Emilio] wanted to track his own car, and the original solution for this was a smartphone. This smartphone was also a good choice, as it’s a programmable GPS device connected to a cell network, but there had to be a simpler solution. It came in the form of an eight euro GPS module and a three euro GSM module (Google Translatrix right here). The rest of the hardware is an ATMega48V [Emilio] had sitting around and a 2500 mAh lithium cell. It’s a cellular tracker make out of eleven euro’s worth of hardware and some junk in a drawer.

There are only a few caveats to this hardware. First, the ATmega48V only has one UART. This is connected to the GPS module at 9600, 8N1. The connection to the GSM M-590 module is only 2400 bps, and slow enough for a bitbanged UART. This hardware is soldered to a piece of perfboard, thus ending the hardware part of this build.

The software is a little more complex, but not by very much. The GPS part of the firmware records the current latitude and longitude. If the GSM module receives a call, it replies with an SMS of the current GPS coordinates and a few GPS coordinates seen earlier. Of course, a pre-paid SIM is required for this build, but those are cheap enough.

Not even ten years ago, a simple, DIY GPS tracker would have cost a small fortune. Now that we have cheap GPS modules, GSM modules, and more magical electronics from the East, builds like this are easy and cheap. What a magical time to be alive.

Valentine Heart

Animated LED Valentine Heart

With only a week left until Valentine’s day, [Henry] needed to think on his feet. He wanted to build something for his girlfriend but with limited time, he needed to work with what he had available. After scrounging up some parts and a bit of CAD work, he ended up with a nice animated LED Valentine heart.

[Henry] had a bunch of WS2812 LEDs left over from an older project. These surface mount LED’s are very cool. They come in a small form factor and include red, green, and blue LEDs all in a single package. On top of that, they have a built-in control circuit which makes each LED individually addressable. It’s similar to the LED strips we’ve seen in the past, only now the control circuit is built right into the LED.

Starting with the LEDs, [Henry] decided to build a large animated heart. Being a stickler for details, he worked out the perfect LED placement by beginning his design with three concentric heart shapes. The hearts were plotted in Excel and were then scaled until he ended up with something he liked. This final design showed where to place each LED.

The next step was to design the PCB in Altium Designer. [Henry’s] design is two-sided with large copper planes on either side. He opted to make good use of the extra copper surface by etching a custom design into the back with his girlfriend’s name. He included a space for the ATMega48 chip which would be running the animations. Finally, he sent the design off to a fab house and managed to get it back 48 hours later.

After soldering all of the components in place, [Henry] programmed up a few animations for the LEDs. He also built a custom frame to house the PCB. The frame includes a white screen that diffuses and softens the light from the LEDs. The final product looks great and is sure to win any geek’s heart. Continue reading “Animated LED Valentine Heart”

Retro Modern Nixie Clock

[Reboots] is a humble hacker who enjoys nixie tubes. So when he saw an old General Electric battery charger for sale at a hamfest, he thought: “that case would make a nice clock…”

He was first exposed to nixie tube clocks a few years ago when his brother gave him a DIY nixie clock kit from [Peter Jensen’s] website TubeClock.com — it was an easy build, and worked very well. It also introduced him to a unique driver for nixie tubes, an HV5622 high-voltage shift register made by Supertex inc. Compared to the traditional (and rare) 74141 nixie driver chips or discrete transistor drivers, the HV5622 is much smaller, requires less microcontroller I/O’s, and is not as picky when it comes to powering it.

The nixie tubes he chose for the project came from a lot sale on eBay, Russian surplus IN-12 tubes. He even managed to find an english datasheet for them!

Continue reading “Retro Modern Nixie Clock”

Re-engineering Some FM Transmitter Firmware

[Furrteck] had a little adventure with this FM transmitter he picked up on eBay. It worked alright, but he wanted to be able to scan through the frequencies, and to have the device return to the same settings after power cycling. He cracked it open and got to work to achieve all of his goals.

The device is driven by an ATmega48, and there’s a 6-pin ISP header on the board. An initial read of the chip wouldn’t work, and he soon discovered the unstable power supply was to blame. After connecting his own regulated source he could read the chip id without a hitch, but the code is locked so no dumping was possible. Fortunately he managed to trace out the board, and includes a full schematic in his write up. With this in hand he erased the chip and started programming his own firmware from the ground up.

The video after the break shows off the completed project. He can now scan through frequencies with audio feedback to let he know when he’s found a station to hijack. The new code will also write a tuned station to EEPROM for use the next time the rig is powered up.

Continue reading “Re-engineering Some FM Transmitter Firmware”

Multi-channel Analog Input Module Is A Good Jumping-off Point For Many Projects

[Scott Harden] has already produced some projects which measure analog inputs. But he’s got plans for more and wanted a base system for graphing analog signals. You can see the small board next to his laptop which offers the ability to sample up to six signals and push them to a PC via USB.

The ATmega48 and a few supporting components are all you’ll find on that board. The USB connection is taken care of by an FTDI cable. He went that route because the cables are relatively cheap, easy to come by, and already have driver support on all the major operating systems. If you look at the screen you can see a window graphing one analog input in real-time. He wrote this in Python (which is once again a cross-platform tool) and it has no problem graphing all six inputs at once.

This is immediately useful as an upgrade to [Scott’s] ECG machine. His future plans include a Pulse Oximeter, EEG, and EEG.

LED Case Lights Reflect CPU Usage

A lot of Linux users include system monitor information in their status panel so that they can see when the CPU is grinding away. [Kevin] is taking the concept one step further by changing his case lights based on CPU usage. Above you can see green, orange, and magenta, but [Kevin’s] implementation uses the full spectrum of color.

The project is based on an ATmega48. It’s running the V-USB stack and connects to one of the motherboard’s internal USB ports. This lets him easily push the CPU usage data over to the microcontroller where it is translated into color. One RGB LED has been installed behind each fan panel on the front of the case, with a white LED above and below as an accent. Pulse-width modulation via some MOSFETs lets him mix and match for just the right color. He’s powering the add-on off of the PSU rails rather than USB so that it turns off when the computer goes to standby.

Don’t miss [Kevin’s] explanation of the system, and a demo of it in action after the break.

Continue reading “LED Case Lights Reflect CPU Usage”

Build A Binary Wall Clock For Just A Few Bucks

The weekend is almost here and if you’re looking for an afternoon project consider building your own binary wall clock. [Emihackr97] built the one you see above using parts on hand, but even if you put in an order for everything, it won’t cost you much.

He used a cardboard box as the housing for the clock, marking a grid for the LEDs on the face and drilling holes to house them. Two columns for hours and another two for minutes let the clock display 24-hour time with alternate firmware for 12 hour time. Since there are two buttons – one to set hours, the other to set minutes – a little coding would make it possible to select between the two either by clicking both buttons at once, or holding down one button.

[Emihackr97] is driving the display with an ATmega48, which is a pin-compatible replacement for the ATmega168/328. Those chips are the type most commonly found on Arduino boards an indeed this project is running the Arduino bootloader, but uses an ISP programmer and breadboarded circuit to keep the costs low. There are plenty of pins to drive the 13 LEDs directly, making the soldering quick and painless. Check out a demo clip after the break.

If you’re successful at this build and get the itch for something with more style, there’s a ton of ways to spice up the look of a binary clock.

Continue reading “Build A Binary Wall Clock For Just A Few Bucks”