[Till Handel] just put the finishing touches on a paper he wrote about how to build a cheap 3D scanner — mostly out of spare parts.
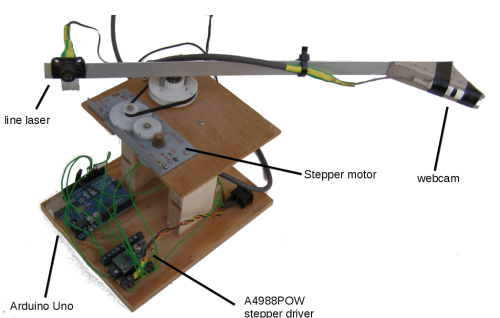
Using parts from old printers and notebooks, he’s cobbled together this rather rough-looking laser scanner. But don’t be fooled by its looks! It’s capable of scanning 360° around itself at distances from 0.3 – 5m, making it an excellent candidate for scanning rooms.
It uses a line laser and a webcam mounted on an arm driven by a stepper motor, which looks like it’s out of an old optical drive. An Arduino Uno and an A4988POW stepper driver control the system. The paper (Caution: PDF) is very detailed and published under GPLv3 (a general public license).
Continue reading “Make A 3D Scanner For 60€ Using Old Hardware”

 No, that’s not Heisenberg without his hat. It’s [Jens], and


