Raspberry Pi Tablet — The PiPad

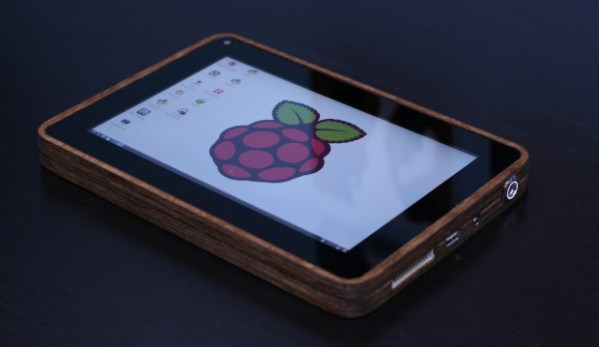
[Michael Castor] wanted a tablet, but not just any tablet. He wanted an all-in-one system running Linux, and he wanted it to look good. So he made himself a wooden PiPad.

He started the project at the beginning of 2013, and like many of our projects, it took a little while to get some momentum going. He bought most of the components early on but then it got pushed to the back burner. Two weeks before the Maker Faire Bay Area 2013, [Michael] decided he wanted to show it off, and thus began the mad dash to finish it in time.

The build consists of a very nice piece of 1/2″ Baltic birch plywood which was cut to shape using a CNC router. A scrap piece of carbon fiber makes for a stylish but not too flashy back cover — He even managed to get [Eben Upton] to sign it! Inside is a 10,000mAh lithium ion battery, a Raspberry Pi, a cellphone battery charging system and a capacitive touchscreen LCD. Almost all touchscreens run off 12V, but [Michael] managed to find a 5V HDMI to LVDS converter, which works perfectly. The device gets about 6 hours of battery life, which is more than enough for [Michael]. The device looks great, and he’s even made it through airport security with it!

We love seeing unique projects like this — don’t forget to submit your own projects through our Tip line!

The 2014 Line Of MakerBots

makerbots

With the Consumer Electronics Show over, it’s finally time to take a look at the new line of MakerBot printers (here’s the press release). Unlike MakerBot’s previous offerings with a one size fits all business model, they’re branching out with a product line that can only be described as, ‘regular, small, and large’.

The new MakerBots include an updated Replicator that’s just slightly larger than the previous version. It includes Ethernet, an option for WiFi, an on-board camera, and a control panel with a 3.5″ LCD and rotary encoder. This new Replicator will retail for $2900, $700 more than the current Replicator (single extruder).

The other new MakerBots include the stripped down and small Replicator Mini. It’s a no-frills machine with a build volume of 10 x 10 x 12.5 cm (~4 x 4 x 5 in) with 200 micron resolution. Also in the new lineup is the Replicator Z18, an impressively large printer with a 30.5 x 30.5 x 45.7 cm (12 x 12 x 18 in) build volume, 100 micron resolution, plastic sides for a heated build volume, and all the bells and whistles on the new Replicator. The Mini will sell for $1375 and the Z18 is expected to sell for $6500.

The updated Replicator is available now, and the Mini and Z18 will be available sometime in the next few months.

Lazing With A Ruby

ruby

[Ben Krasnow], builder of amazingly complex and technical devices, is finally starting work on his ruby laser. He’s been collecting parts for this project for the past few years, but only recently has he started recreating the first visible light laser.

While the design and manufacture of the first ruby laser was astonishingly complex, the basic idea behind it is pretty simple. [Ben]’s laser uses a synthetic ruby rhod with the ends ground optically flat. This rod is placed inside a flash tube. When the flash tube lights up, the rod absorbs the light and re-emits it as a coherent beam for several milliseconds. This beam bounces between two mirrors – one fully reflective and another partially reflective – and emits a constant stream of coherent photons. It’s tremendously more complex than simply connecting a laser diode to a power source, but replicating a build that graced the covers of Time and Newsweek only fifty years ago is pretty impressive

Right now, [Ben] has most of the mechanical and optical parts of his ruby laser on his workbench. The next step is constructing a huge capacitor bank to charge the flash tube every millisecond or so. What [Ben] will end up using his laser for remains up in the air, but if we come across some erbium or neodymium rods we’ll be sure to send them his way.

Continue reading “Lazing With A Ruby”

A DiskVaccuum For Obsolete Disk Formats

drive

[Jim] has a box of disks for a very old Compucolor II computer, and with bit rot slowly setting in he figured it might be time to dump all those disks to a more permanent format. After reviewing the existing tools to read these disks, he decided to build his own floppy disk interface that he calls the DiskVaccuum.

The DiskVaccuum is based on a Papilio Pro FPGA board and a few chips worth of level conversion. The FPGA is able to read bits and move the head of the disk with ease, saving everything to the drive of a much more modern computer.

On the USB side of the Papilio board, [Jim] wrote a shell of sorts in Python to capture tracks on the disk, read out the track listing, save an image file, and do all the things a proper DOS should. Right now the project is only for the Compucolor II disk drive, but [Jim] played around with KiCAD enough to create a Papilio-to-disk-drive interface board with connectors for most of the disk drives of this particular vintage. The hope is to generalize the hardware and software to read disks for other systems, including those with 8-inch drives.

[Jim] put up a video describing the hardware and demoing his Python capture utility. You can check that out below.

Continue reading “A DiskVaccuum For Obsolete Disk Formats”

Teaching Mario To Play Pong And Snake Through Innumerable Exploits

This is the coolest classic Super Nintendo Entertainment System (SNES) hack we’ve seen in quite a while. What you’re seeing is called “Super Mario World (Total Control)” by [Masterjun]. Our first recommendation is that you watch the video, then come back here for an explanation. Similar to what we saw for Pokemon Yellow on Gameboy, [Masterjun] created entire Pong and Snake clones within Super Mario World. He also created a menu and ending screen, along with his trademark smiley face graphic. Even more amazing is that this was unveiled live on a real SNES running an unmodified game cartridge. [Masterjun] actually used dual multitap cables, effectively connecting 8 controllers to a SNES. This gave him enough bandwidth to quickly download his new binary through the controller ports alone.

Welcome to the world of Tool Assisted Speedruns (TAS), where emulators and scripts are used to create high-speed runs through video games. The runners often work frame by frame, painstakingly inputting commands to create the perfect run. Game bugs and glitches are often exploited in these speed runs. In fact, in runs such as this one, the speed run takes second place to showing off the exploit. The output of speed run creation is a script file of control inputs which can be executed on an emulator to “re-run” the TAS at any time. This script can also be saved to a PC or Raspberry Pi and played back into the controller port of a real game system. A PIC based hardware translator is used to convert the data to NES or SNES controller format. As one might expect, these scripts run open loop. With no feedback from the running game, they can and do become desynchronized due to differences in console hardware, such as the tolerance of the oscillator crystal. When everything is in sync and does work , the results are awesome.

Continue reading “Teaching Mario To Play Pong And Snake Through Innumerable Exploits”

A Business Card That Plays Simon Says

BusinessCard_01_08

When your name is Simon and you want to build your own circuit board business card, it makes perfect sense to incorporate a game of Simon Says, and that’s exactly what [Simon] did with his Business Card.

You may see a resemblance to the Engineer’s Emergency Business Card; that’s because [Simon] took inspiration from that card to build his own.  The game of Simon Says is played via 4 low-profile pushbuttons and 4 0805 LEDs.  The microcontroller of choice to run the game is an ATtiny45 set up to work with the Arduino IDE.  But with only 5 pins available for I/O, [Simon] had to give up 4 pins to the LEDs and configure the remaining pin as an analog input.  The buttons are tied into a voltage divider that feeds the analog input, so depending which button is pressed, a different voltage is read in, thus a value from 0 to 1023 determines which button was pressed.

One of the great things about this write-up is that it goes through the process of etching PCBs at home using the toner-transfer method.  We’re not sure how many home-etched business cards he’s willing to pass out, but surely whoever does get the card, will never forget his name.

Continue reading “A Business Card That Plays Simon Says”

A Vibrating Timepiece

vibratingWatch

It may not look like much, but the above pictured device is [qquuiinn’s] handy little watch that indicates time through pulsed vibrations. Perhaps we should refrain from labeling it as a “watch,” however, considering it’s [qquuiinn’s] intention to remove the need to actually look at the thing. Vibrations occur in grandfather clock format, with one long vibration for each hour, accompanied by one, two, or three short pulses for the quarter-hour increments.

The design is straightforward, using an ATTiny85 for the brains along with a few analog components. The vibration motor sticks to the protoboard with some glue, joining the microcontroller, a coin cell battery, and a pushbutton on a small protoboard. The button allows for manual time requests; one press responds with the current time (approximated, probably) in vibrations. The build is a work in progress, and [qquuiinn] acknowledges the lack of an RTC (real-time clock) causes some drift in the timepiece’s accuracy. We suspect, however, that you’d address that problem—twice daily—when you replace the battery: it only lasts ten hours.