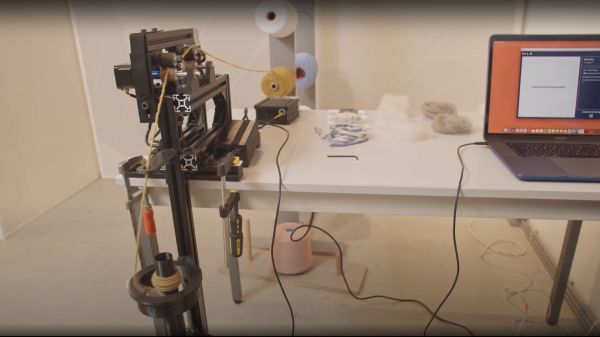
open hardware textile spinning machine constructed from aluminium extrusions, arduino electronics and 3D printed parts

An Open Hardware Automatic Spinning Machine

The team at the Berlin-based Studio HILO has been working on ideas and tools around developing a more open approach to small-scale textile production environments. Leveraging open-source platforms and tools, the team has come up with a simple open hardware spinning machine that can be used for interactive yarn production, right on the desktop. The frame is built with 3030 profile aluminium extrusions, with a handful of 3D printed, and a smidge of laser cut parts. Motion is thanks to, you guessed it, NEMA 17 stepper motors and the once ubiquitous Arduino Mega 2560 plus RAMPS 1.4 combination that many people will be very familiar with.

The project really shines on the documentation side of things, with the project GitLab positively dripping with well-organised information. One minor niggle is that you’ll need access to a polyjet or very accurate multi-material 3D printer to run off the drive wheel and the associated trailing wheel. We’re sure there’s a simple enough way to do it without those tools, for those sufficiently motivated.

We liked the use of Arduino for the firmware, keeping things simple, and in the same vein, Processing for the user interface. That makes sending values from the on-screen slider controls over the USB a piece of cake. Processing doesn’t seem to pop up on these pages too often, which is a shame as it’s a great tool to have at one’s disposal. On the subject of the user interface, it looks like for now only basic parameters can be tweaked on the fly, with some more subtle parameters needing fixing at firmware compilation time. With a bit more time, we’re sure the project will flesh out a bit more, and that area will be improved.

Of course, if you only have raw fibers, that are not appropriately aligned, you need a carder, like this one maybe?

Continue reading “An Open Hardware Automatic Spinning Machine”

ZeroBug: From Simulation To Smooth Walking

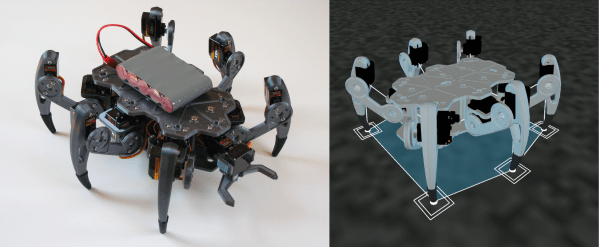
Thanks to 3D printing and cheap hobby servos, building you’re own small walking robot is not particularly difficult, but getting them to walk smoothly can be an entirely different story. Knowing this from experience, [Max.K] tackled the software side first by creating a virtual simulation of his ZeroBug hexapod, before building it.

Learning from his previous experience building a quadruped, ZeroBug started life in Processing as a simple stick figure, which gradually increased in complexity as [Max.K] figured out how to make it walk properly. He first developed the required movement sequence for the tip of each leg, and then added joints and calculated the actuator movements using reverse kinematics. Using the results of the simulations, he designed the mechanics and pulled it back into the simulation for final validation.

Each leg uses three micro servos which are controlled by an STM32F103 on a custom PCB, which handles all the motion calculations. It receives commands over UART from a python script running on a Raspberry Pi Zero. This allows for user control over a web interface using WiFi, or from a gamepad using a Bluetooth connection. [Max.K] also added a pincer to the front to allow it to interact with its environment. Video after the break.

The final product moves a lot smoother than most other servo-driven hexapods we’ve seen, and the entire project is well documented. The electronics and software are available on GitHub and the mechanics on Thingiverse.

Continue reading “ZeroBug: From Simulation To Smooth Walking”

Perlin Noise Helps Make Trippy Typographic Art

Perlin noise is best explained in visual terms: if a 2D slice of truly random noise looks like even and harsh static, then a random 2D slice of Perlin noise will have a natural-looking blotchy structure, with smooth gradients. [Jacob Stanton] used Perlin noise as the starting point for creating some interesting generative vector art that shows off all kinds of different visuals. [Jacob] found that his results often exhibited a natural quality, with the visuals evoking a sense of things like moss, scales, hills, fur, and “other things too strange to describe.”

The art project [Jacob] created from it all is a series of posters showcasing some of the more striking examples, each of which displays an “A” modified in a different way. A few are shown here, and a collection of other results is also available.

Perlin noise was created by Ken Perlin while working on the original Tron movie in the early 80s, and came from a frustration with the look of computer generated imagery of the time. His work had a tremendous and lasting impact, and was instrumental to artists creating more natural-looking textures. Processing has a Perlin noise function, which was in fact [Jacob]’s starting point for this whole project.

Noise, after all, is a wide and varied term. From making generative art to a cone of silence for smart speakers, it has many practical and artistic applications.

Remoticon Video: Meta_Processing Is A Mashup Of Text And Block Programming

Very few people want to invent the universe before they blink their first LED. Sure, with enough interest a lot of folks will drill-down to the atomic level of technology and build their way back up. But there’s something magical about that first time you got your blinky to blink, and knowing how to write makefiles plays no part in that experienc). Now apply that to projects using smartphone as wireless interfaces… how simple can we make it for people?

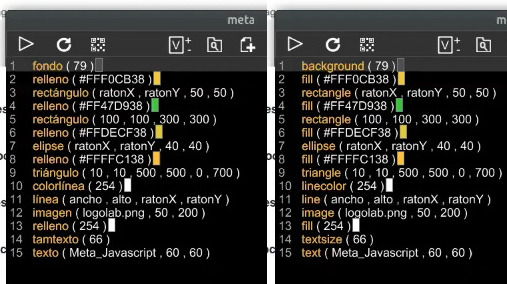
Meta_Processing can translate the instructions into any of 14 languages

Jose David Cuartas is working to answer that very question and gives us a guided tour of his progress in this Meta_Processing workshop held during the Hackaday Remoticon. Meta-Processing is an IDE based on — as you’ve probably guessed — Processing, the programming language that unlocked higher-level functionality to anyone who wanted to perform visually-interesting things without becoming software zen masters. The “Meta_” part here is that it can now be done with very limited typing and interchangeably between different spoken languages.

The approach is to take the best of text programming and block programming languages and mash them together. In that way, you don’t type new lines, you add them with a click of the mouse and select the instruction you want to use on that line from a list. It means you don’t need to have the instructions memorized, and avoids typos in your code. The docs for that instruction will be shown on the bottom bar of the IDE to help you with parameters. And the kicker is that since you’re selecting the instructions, choosing any of the IDE’s 14 available spoken languages will update your “code” with translations into the new language.

In the workshop, video of which is included below, Jose demonstrates a number if interesting examples including audio, video, and user input, using a surprisingly small amount of code. The IDE even spawns a server on the network so that the apps you’ve written can be loaded by a smartphone. It has support for communicating with Arduino-compatible devices with digital read/write, analog read, and servo control. There’s even a fork of the project called Meta_Javascript that rolls in the ability to work with REST-like APIs.

People learn in many different ways. Having options like this to help people get to blinky very quickly is a great way to break down barriers to understanding and using computers.

Continue reading “Remoticon Video: Meta_Processing Is A Mashup Of Text And Block Programming”

3D Printed SCARA Arm With 3D Printer Components

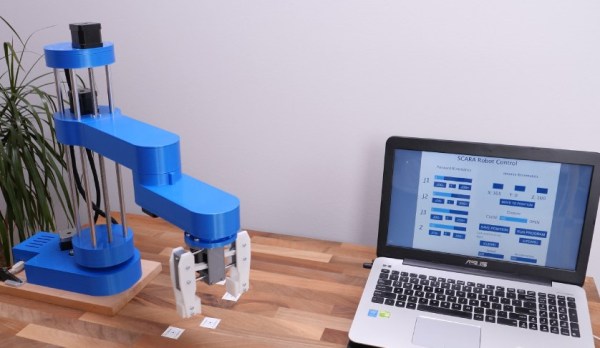
One of the side effects of the rise of 3D printers has been the increased availability and low cost of 3D printer components, which are use fill for range of applications. [How To Mechatronics] capitalized on this and built a SCARA robot arm using 3D-printed parts and common 3D-printer components.

The basic SCARA mechanism is a two-link arm, similar to a human arm. The end of the second joint can move through the XY-plane by rotating at the base and elbow of the mechanism. [How To Mechatronics] added Z-motion by moving the base of the first arm on four vertical linear rods with a lead screw. A combination of thrust bearings and ball bearings allow for smooth rotation of each of the joints, which are belt-driven with NEMA17 stepper motors. Each joint has a microswitch at a certain position in its rotation to give it a home position. The jaws of the gripper slide on two parallel linear rods, and are actuated with a servo. For controlling the motors, an Arduino Uno and CNC stepper shield was used.

The arm is operated from a computer with a GUI written in Processing, which sends instructions to the Arduino over serial. The GUI allows for both direct forward kinematic control of the joints, and inverse kinematic control,  which will automatically move the gripper to a specified coordinate. The GUI can also save positions, and then string them together to do complete tasks autonomously.

The base joint is a bit wobbly due to the weight of the rest of the arm, but this could be fixed by using a frame to support it at the top as well. We really like the fact that commonly available components were used, and the link in the first paragraph has detailed instructions and source files for building your own. If the remaining backlash can be solved, it could be a decent light duty CNC platform, especially with the small footprint and large travel area. Continue reading “3D Printed SCARA Arm With 3D Printer Components”

OTA ESP32 GUI Makes Updates Simple

One of the disadvantages of having cheap WiFi-capable boards like those based on the ESP32 is that you have to update them. If you have even a few in every room of your house, it can be a pain to pull them out and connect them to a cable for programming. Over the air programming is a great answer, and [Kevin] shows how you can control the update via a simple GUI. You can see a video demonstration of how it works below.

[Kevin] uses a ready-made OTA library to do the work, but creates a GUI configuration and downloader tool. There is a manual step to force the board into the OTA mode, which might be a mild inconvenience, but it improves security since you need physical access to the device to do an update.

Continue reading “OTA ESP32 GUI Makes Updates Simple”

Arduino Does Multitouch

A lot of consumer gadgets use touch sensors now. It is a cheap and reliable way to replace a variety of knobs and switches on everything from headphones to automobiles. However, creating a custom touch controller for a one-off project can be daunting. A recent ACM paper shows how just about any capacitive sensor can work as a multitouch sensor with nothing more than an Arduino although a PC running processing interprets the data for higher-level functions.

The key is that the Arduino excites the grid using PWM and then examines the signal coming out of the grid. Finger poking changes the response quite a bit and the Arduino can sense it using the analog to digital converters onboard. You can find the actual software kit online. The tutorial document is probably more interesting than the ACM paper if you only want to use the kit.

The optimum drive frequency is 10 MHz. The examples rely on harmonics of a lower frequency PWM signal to get there. The analog conversion, of course, isn’t that fast but since your finger touch rate is relatively slow, they treat the signal as an amplitude-modulated input which is very easy to decode.

The sensors can be conductive ink, thread, or copper strips. There are several example applications, including a 3D printed bunny you can pet, a control panel on a sleeve, and an interactive greeting card.

The sensor forms an image and OpenCV detects the actual touch configuration. It appears you can use the raw data from the Arduino, too, but it might be a little harder.

We imagine aluminum foil would work with this technique. If you get to the point of laying out a PCB, this might come in handy.