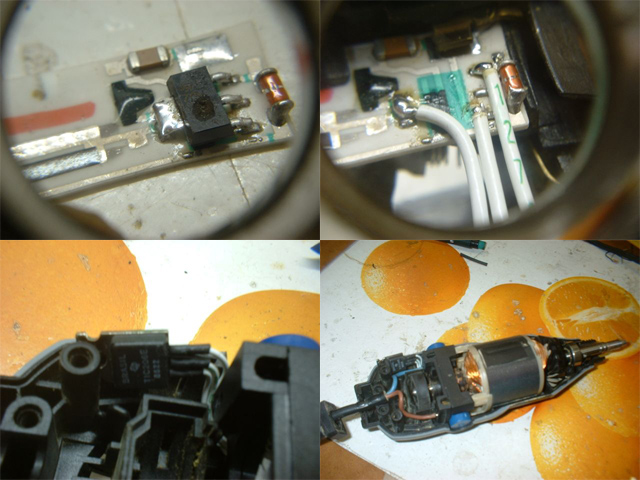
Reworking The Electronics For Better Computer Speaker Audio

[Michael Chen] liked the sound he was getting out of these Corsair SP2200 computer speakers, with one big exception. They were giving off some unpleasant crackling sounds. He figured this might be as easy as replacing a faulty potentiometer, but soon found out the fix was going to be more complicated than that. All said and done he ended up reworking the design of the speakers’ amplifier board.

The hardest part was identifying the problem. Once he had cracked open the case he found the volume potentiometer was working correctly by testing it with a multimeter. Next he inspected the board for bad solder joints but didn’t really find any. The breakthrough came when he realized that the crackling was also happening when he used headphones. With that discovery he started making a few more observations and realized that the crackling didn’t happen when the volume knob was all the way up or all the way down. There was an impedance issue between that potentiometer and the amplifier circuit. He rerouted the signal flow on the board to use the headphone amp as a filter and it fixed the problem. Fittingly, he’s entered this project into the Instructables Fix & Improve contest.

Recovering From A Seagate HDD Firmware Bug

Hard drive firmware is about the last place you want to find a bug. But that turned out to be the problem with [BBfoto’s] Seagate HDD which he was using in a RAID array. It stopped working completely, and he later found out the firmware has a bug that makes the drive think it’s permanently in a busy state. There’s a firmware upgrade available, but you have to apply it before the problem shows its face, otherwise you’re out of luck. Some searching led him to a hardware fix for the problem.

[Brad Garcia] put together the tutorial which illustrates the steps needed to unbrick the 7200.11 hard drive with the busy state bug. The image in the lower right shows the drive with a piece of paper between the PCB and the connectors which control the head. This is necessary to boot the drive without it hanging due to the bug. From there he issues serial commands to put it into Access Level 2, then removes the cardboard for the rest of the fix.

In the tutorial [Brad] uses a serial-TTL converter. [BBfoto] grabbed an Arduino instead, using it as a USB-ttl bridge.

Make Your Own Custom IPhone Back Glass

[Jake von Slatt] is at it again; putting his own artistic spin on ordinary items. This time around it’s the glass on the back of an iPhone. It kept breaking and after a few replacements he wanted to try to replace the glass with a piece of etched brass. But part way through that experiment, he figured out how to use toner transfer to develop these stunning custom iPhone glass back plates.

The first step is to source the correct replacement back for your phone. These are made of two parts, the glass and a plastic backer. By carefully heating and wedging the two parts with some popsicle sticks he was able to separate the pieces. Next, he cleans and buffs the glass, preparing it for the artwork he is about to apply. Toner transfer paper, just like that used for PCB resist, is used to print and adhere a design to the underside of the glass. From there he hand paints over the black outline to achieve the results seen above.

It takes time and patience, but shouldn’t be any harder than etching a circuit board.

[Todd] Literally Debugs This Printing Calculator

This printing calculator is a thrift store find. [Todd Harrison] picked it up for a measly $3, and it still works! But the device is about twenty years old and he thinks it’s time to clean up the aging hardware.

After cracking open the case he digs out some of the stuff that has made its way inside. This includes a few dried up moths (debugging complete). While everything is open he gives a tour of the components. The calculator has a VFD which is definitely worth the price tag of the unit even if you just want to reuse the display in another project. But that’s not all. The printing head would be a fun thing to play with as well. We could see using this in projects similar to some of the thermal printer hacks we’ve seen.

When put back together, and given a new ink ribbon, the unit is ready for another 10-years of holding down one corner of your desk. Don’t miss [Todd’s] tear-down and clean-up video after the break.

Continue reading “[Todd] Literally Debugs This Printing Calculator”

A Look Inside What Makes Cruise Control Work

[Todd Harrison] took a look inside the business end of the cruise control system from his 1994 Jeep Grand Cherokee. We were a bit surprised at how the system operates. The parts seen in the image above make up the throttle control, using a trio of solenoids to vary the level of vacuum inside the device.

We categorized this as a repair hack, but [Todd] is just rubbernecking and doesn’t have any real plan to fix the system. It’s been on the fritz for ten years and this piece may not even be the culprit. But we’re still satisfied because he gives us a look at the system which uses the amber-colored stoppers on the three solenoids to plug three different sizes of weep holes. The unit is a vacuum enclosure where a throttle wire connects to a rubber diaphragm and adjust engine speed as the diaphragm moves. The vehicle’s computer actuates the three solenoids, allowing leakage to vary the level of vacuum, thereby keeping the throttle at just the right level. Neat!

Continue reading “A Look Inside What Makes Cruise Control Work”

Resurrecting A Hi-Fi Cabinet

[VintagePC] pulled this old stereo out of a barn. It was in pretty shabby shape, but he managed get it running again and make it look great as well.

While it had been protected from the elements, it had not been protected from the rodents. Mice had chewed their way through the fiberboard backing and made a nice home inside. He mentions that they chewed the string which operates the tuning dial, and we’re sure they were the cause of other problems as well. He gives the wise advice of not powering on an old set like this until you have a chance to assess the situation.

The insides of the amplifier were about as disorderly as the last radio repair we looked at. But after carefully working his way through the circuits, replacing capacitors and resistors as needed, he started to make some progress. The receiver coil needed to be rewound and he used wire from an old CRT monitor for this purpose. The loop antenna was remounted and the record player arm was given a new cartridge and balanced using a clever LEGO apparatus. Some veneer work and wood finishing brought the case itself back to its original beauty. We’d say the hard work was well worth it. He’s got a big piece of furniture he can always be proud of!

Ancient Radio Repair

They sure don’t build them like that anymore. [J.W. Koebel] managed to take this 1934 Simplex Model P radio and bring it back to life.

So where do you start with a repair job like this one? Being a ham radio guy he has a good idea of what he’s doing, and started by replacing the AC capacitor with one which will provide quality noise filtering. He tried to make fixes throughout that would improve functionality and declutter the wire mess. This led him to find a snapped solder connection on the volume knob. Next he tested out the speaker and found that the primary transformer needed replacing. After as replacing the A67 converter (we’ve got no idea what that is) he swapped out the rest of the original capacitors, most of the resistors, and fixed the mechanical problems with the tuning dial. The result is a working radio that looks fantastic!

[via Reddit]