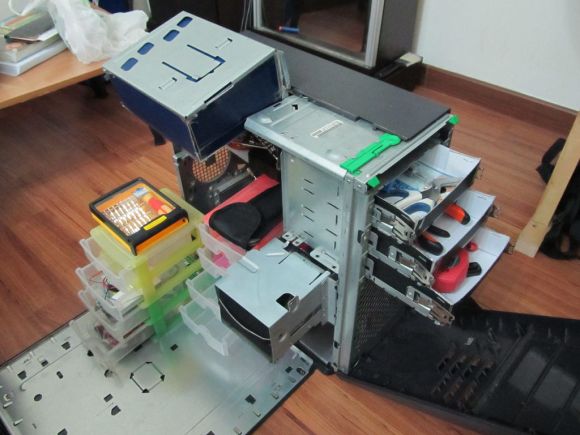
Software Advice For Anyone Thinking About A CNC Router

Excellent results can come from a small CNC router, but don’t forget the software!

CNC tools, whatever their flavor, can greatly enhance your “making” or DIY ability. My current tool of choice is a CNC router. Being familiar with a manual milling machine, the concept seemed similar, and the price of these is quite reasonable when compared to some other tools. As described in this post, my machine is a Zen Toolworks model, but there are certainly other options to visit like this Probotix V90 model noted recently in this post.

Although any number of CNC router models look great in videos and pictures, rest assured that even the best machines require some patience to get one running satisfactorily. Setting up the machine can be a challenge, as well as figuring out what your machine is capable of, but one thing that might slip peoples’ minds is the software involved. Read on to find out all you need to know the basics of what goes on behind the scenes to “magically” produce interesting parts. Continue reading “Software Advice For Anyone Thinking About A CNC Router”

Repairing A Non-Serviceable Welding Hood

LB5fUD1 - Imgur

[Unixgeek] owns an Optrel welding hood, which contains a lens that auto-adjusts for various welding tasks. It stopped working properly, and this hood is “Non-Serviceable”, so he had to either throw it away or hack it. The problem was that he knew it contained batteries, but they weren’t accessible. Using his milling machine, he was able to fix it himself. After removing the outer layer of plastic [Unixgeek] found that it was filled with foam. With continued milling he finally uncovered the batteries. They are standard CR2330 cells, so he could easily replace them, or set up a separate battery holder.

We like seeing this sort of hack, as simple as it is, because of how much we truly hate devices with planned obsolescence built in. This is a >$300 safety device that gets broken when some coin cells finally die. Any sort of hack to keep people from having to throw away their devices is a good thing.

Do you have a favorite planned obsolescence hack? Share it in the comments!

Hacking Digital Scales For The Disabled

analphabeticscale

[Jan] works with both physically and mentally disabled individuals, some of whom cannot read, making many of their tasks more difficult. Although [Jan] is not in a position to teach reading or writing skills, he was able to build an add-on device for the scales used in repackaging sweets to provide simple feedback that the user can interpret.

The device has three LEDs—red, green, and yellow—to indicate the package does not weigh enough (red), weighs too much (yellow), or lies within an acceptable range (green). The industrial scales at [Jan’s] workplace each have a serial output to connect to a printer, which he used to send data to the device. An ATMega8 controls the lights and an attached LCD, with the usual trimpot to change the display’s contrast and a rotary encoder to adjust the device’s settings. Everything fits snugly into a custom-made frosted acrylic enclosure, laser-cut at a local hackerspace.

[Jan] provides a rigorous guide to approaching each step on his Instructables page, along with source code and several pictures. See a video overview below, then enjoy another scale hack: building one from scratch.

Continue reading “Hacking Digital Scales For The Disabled”

UsbXlater For PS4 Keyboard And Mouse Action

USB

[Frank Zhao]—an awesome guy, an inadvertent Hackaday contributor, and an Adafrut fellow—has come up with a device to use a keyboard and mouse with Playstation 4 games. He calls it the UsbXlater, and even if [Frank] can’t get it working with his PS4, it’s still going to be an awesome tool.

On the board are two USB ports and an STM32F2 microcontroller. The micro provides a USB host interface and a USB device interface, enabling it to translate mouse movements and keystrokes into something a PS4 can understand.  While this project was originally designed to use a keyboard and mouse on [Frank]’s shiny new PS4, it’s not quite working just yet. He’s looking for a few gamer/dev folks to help him suss out the communication between a keyboard/mouse, the UsbXlater, and a PS4.

Of course, even if this device is never used for what it’s designed for, it’s still a very, very interesting tool. With two USB ports, the UsbXlater could act as a signal generator for USB devices and hosts, analyze USB traffic, or provide other applications that haven’t even been thought of yet.

[Frank] is hitting his head against the wall trying to figure out the PS4 protocol, so if you have some USB skills, feel free to hit him up for a blank PCB, though preference falls to people who will game with it and to those with a USB traffic analyzer. If you lack the skills for USB development, [Frank] is still looking for a better name for his device.

[Ben Heck] Builds The Ultimate Glue Gun

glue

For how many can be found on the workbenches and in the toolboxes of makers and hackers the world over, finding a glue gun that does more than just heat up and drip glue everywhere can be a challenge. [Ben Heck] finally solved this problem with a hot glue gun that’s more like an extruder from a 3D printer than a piece of junk you can pick up at Walmart for a few dollars.

By far, the most difficult part of this project was the glue stick extruder. For this, [Ben] used a DC motor with a two-stage planetary gear system. This drives a homemade hobbed bolt, just like the extruder in 99% of 3D printers. The glue stick is wedged up against the hobbed bolt with a few 3D printed parts and a spring making for a very compact glue stick extruder.

The electronics are a small AVR board [Ben] made for a previous episode, a thermistor attached to the hot end of the glue gun, a solid state relay for the heater, and analog controls for speed and temperature settings. After finishing the mechanics and electronics, [Ben] took everything apart and put it back together in a glue gun-shaped object.

The finished product is actually pretty nice. It lays down constistant beads of hot glue and thanks to a little bit of motor retraction won’t drip.

You can check out both parts of [Ben]’s build below.

Continue reading “[Ben Heck] Builds The Ultimate Glue Gun”

Digitally Controlled Dual Power Supply

[Kerry] set out to build a digitally controlled dual supply for his bench. He’s already built a supply based on the LM338 linear regulator, but the goal this time was to build it without a linear regulator IC, and add digital control over both the current and voltage.

In part one of the build, [Kerry] explains the analog design of the device. He had an extra heatsink kicking around, which can dissipate enough heat from this linear supply to let it run at 10 A. A NE5532 opamp is used to track a reference voltage, which can be provided by a DAC. The current is measured by a LT6105 shunt sense amplifier, then compared to a reference provided by another DAC.

Part two focuses on the digital components. To interface with the analog circuitry, two MCP4821 DACs are used. These are controlled over SPI by an ATmega328P.

Fortunately, [Kerry] also has his own DC load project to test the supply with.

$40 Lens Hack Gives Your FLIR Higher Clarity

[Josh Oster-Morris’s] FLIR camera can see a bit more clearly now that he’s hacked it to have its own makeshift “macro” mode. You may remember [Josh] from his power distribution Motobrain project. He’s still improving the Motobrain, and he wanted to better understand the thermal characteristics of the high current draws (upwards of 100amps!)

After reading that the FLIR 4  could be hacked into a better version, [Josh] immediately purchased his own. The FLIR is, however, limited at close-range imaging, because the resolution of the FLIR’s microbolometer is relatively low.  He had fortunately decided to stay tuned in to [Mike’s] YouTube channel and saw his follow-up video a few days later on refocusing the FLIR camera with an external lens. [Josh] hit up Amazon for a Gallium Arsenide lens normally used for CO2 lasers, and found one for around $40. He then mounted this lens into a simple paper frame held together by tape and staples, and fitted it onto the FLIR.

After you’ve checked out [Josh’s] blog for more examples of how astoundingly clear the images become, check out [Mike’s] video detailing the hack below.

Continue reading “$40 Lens Hack Gives Your FLIR Higher Clarity”