DIY Scroll Saw

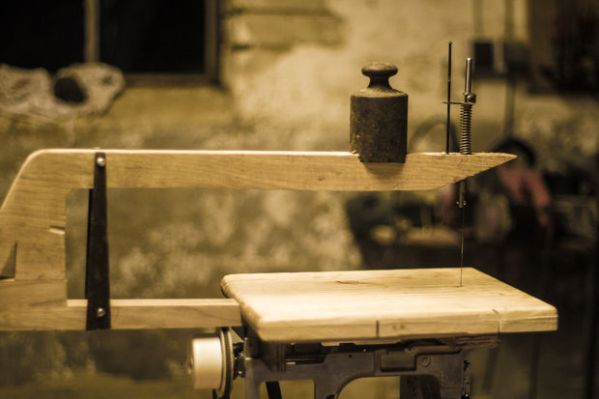
Scroll saws are super handy tools, but it’s sometimes hard to justify buying one for a single project. So why not make it your project? [SDX42] shows us how, using a…wait a second, is that an old sewing machine?

First a little back story. He picked up an old sewing machine that had been thrown out by its previous owner: they said it didn’t work right. He took it anyway and decided to fix it up. He encountered two problems. First, it turned out to be a lot harder to fix than he first imagined. Second, he realized he had no use for a sewing machine. What he did need, however, was a scroll saw.

A sewing machine is actually fairly similar to a scroll saw. They both work by converting rotary movement into linear reciprocation. The only difference is the layout. [SDX42] flipped the mechanism upside down and built a scroll saw frame on top of the stripped-down sewing machine. It’s a bit more complicated than that, but we’ll let him explain it to you in the video after the break.

Continue reading “DIY Scroll Saw”

DIY Pipe Freezing Kit

Have you ever needed to freeze a water pipe to do a quick plumbing job without shutting off all the water? It’s actually a fairly common practice for contractors, except they use a rather expensive tool to do it. As it turns out, there’s actually a fairly cheap and easy DIY solution you can do with minimal supplies or experience.

[Go Repairs] shows us that all you need is some pipe insulation (or a large sponge), a plastic bag, two zip-ties, and a air duster can. Wrap the insulation and plastic bag around the pipe, and zip-tie it in place. Holding the air duster can upside down, release the majority of the contents into the insulation. Congratulations, you’ve just frozen your pipe. Continue reading “DIY Pipe Freezing Kit”

Hackaday Links: January 19, 2014

hackaday-links-chain

[Nick] wrote in to tell us about his first blog post. He’s showing off a PWM LED driver he build around a 555 timer. This project uses a lot of basics; some 555 experience, PCB etching, and surface mount soldering. We’d like to know more about the blue substrate on his circuit board!

After seeing the BOM spreadsheet with KiCAD integration a couple of weeks back, [Vassilis] sent in a link to his own Excel-based Bill of Materials helper. We’re wondering if anyone has a similar tool that will work with Open Office?

While we’re on the topic of downloadable documents, here’s a reference PDF for all types of DC measurements. The collection is a free offering from Keithley. [Thanks Buddy]

Since you’re brushing up on your knowledge you may also be interested in a free online microcontroller course offered by UT Austin. They’re targeting the Tiva C Launchpad as the dev board for the class.

This website seems to be a little creepy, but the teardrop shaped 3D printed music box which is being shown off is actually rather neat.

Hackaday Alum [Phil Burgess] threw together a point and shoot camera for Adafruit. It’s a Raspberry Pi, camera board, touchscreen display, and USB battery all rubber banded together. The processing power of the RPi is used to add image processing effects which are shown off in the demo video.

We don’t own a DeLorean. If we did, we’d probably follow the lead of Queen’s University Belfast and turn it into and electric vehicle. [Thanks Jake]

The 3D photocopiers are coming. Here’s a hacked together proof-of-concept from [Marcelo Ruiz]. After laser scanning the part is milled from floral foam.


Making A 20dB Low Noise Amplifier For A 400MHz Radio

[Will] recently tipped us about a 400MHz Low Noise Amplifier (LNA) module he made. His detailed write-up starts by explaining the theory behind an amplifying chain. Assuming a 50 Ohm antenna system receives a -70dBm signal, the total peak to peak voltage would be less than 200uV (.0002 volts). If the first amplifying stage doesn’t consist of an LNA, then the added noise would later be amplified by the other elements of your system.

[Will] then detailed how he picked his LNA on Digikey, mainly by looking for one that had a less than 1dB Noise Figure. His final choice was the Sky65047: a small budget-priced 0.4-3.0GHz low noise amplifier with a theoretical gain of 20dB at 400MHz. He made the PCB you can see in the picture above, removing the soldermask on the signal path in order to lower the permitivity. Because of a few mistakes present in the application note, it took [Will] quite a while to get his platform up and running with a 20dB gain but a 4.5dB NF. He also measured the input return loss using a directional coupler, which ended up being quite close to the datasheet’s 14dB number.

Dallas Makerspace Tour

[Paul] sent us this video tour of the Dallas Makerspace made by member [Andrew Floyd], who walks us around and provides narration for a very impressive space. Once inside the 6000 sq ft facility, he takes us past the entrance lounge and into the electronics room, which has more electronics component storage than visible wall space, and down the hall to show off some laser-cut and 3d-printed creations.

Every makerspace has its specialties, and the Dallas gang shows off their awesome darkroom (complete with creepy, lurking Nic Cage) and blacksmith/forge work areas. They even have bi-weekly blacksmithing classes from a local master blacksmith. The space has since expanded, conquering their next-door-neighbors to expand project storage, add a biolab, a second classroom, a conference room, and more.

Enjoy the video after the break, and then head over to their website for more info: dallasmakerspace.org.

Continue reading “Dallas Makerspace Tour”

Three Axis Position Indicator With Digital Calipers

[Malte] just finished a little project for his Wabeco F1200 milling machine: a compact external display for three digital sliding calipers (Translated from German). As you may have already guessed, [Malte] was lucky enough to be able to fit disassembled calipers onto the machine and use them for positioning. Before embarking on this adventure, he noticed that there were similar projects present on the internet, but all of the calipers used had different data interfaces and protocols. The calipers that [Malte] bought have a mini USB connector, even though the interface itself isn’t USB. As he couldn’t find any information on that interface, he turned to his oscilloscope to decode the protocol.

[Malte] then built an AVR-based platform that reads out the three calipers and shows the position data on the dot matrix LCD shown above. The AVR firmware is written in a mixture of Basic and assembler language. The source code, schematics, and other resources can be downloaded from the project’s web page. We are impressed on the professional aspect of the final result.

Continue reading “Three Axis Position Indicator With Digital Calipers”

Reviving A Stubborn Laptop Battery

We’ve all gotten bored of certain toys and left them on the shelf for months on end. But what do you do when this prolonged period kills the batteries? Well if you’re [Andrew] you take apart the battery pack and bring it back to life!

[Andrew] picked up one of those Panasonic Toughbooks awhile back and although it’s hardly a top of the line laptop specs-wise, it does have some pretty cool features: it’s shock-proof, splash-proof, and extreme-temperature-proof. It even had a touch screen before touchscreens were cool. Despite its durability, however, the laptop was left to sit for a bit too long, and the battery pack no longer accepted a charge.

[Andrew] quickly disassembled the battery pack and began measuring the cells with his trusty multimeter, assuming just one cell had gone bad. Curiously though, no cells reported 0V. What he did find was that each cell and sub-pack reported 2.95V, which is 0.05V below the “safe operating limits” of typical lithium ion cells. Continue reading “Reviving A Stubborn Laptop Battery”