We featured 3D printer projects on last week’s Hacklet. This week, we’re looking at a few awesome projects created with those printers. Trying to pick great 3D printed projects on Hackaday.io is a bit like staring at the sun. There are just way too many to choose from. To make things a bit easier, I’ve broken things down into categories. There are artistic prints, complex mechanical or electronic prints, and then there are simple functional prints, which is the topic we’re featuring today. Simple functional prints are designs which perform some function in the world. By simple, I mean they have only a few moving parts or electronic components. Let’s get right to it!
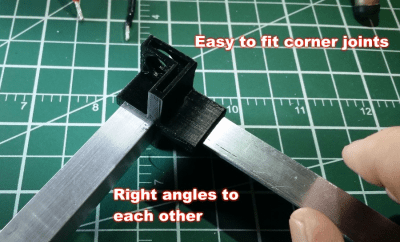 We start with [Scott] and L Extrusion Endcaps. Every Home Depot, Lowes, or hardware store has a selection of extruded aluminum. Typically there are a few flat bars, and some L brackets. L brackets are great, but they can be a pain to work with. Most of us don’t have the skills or the tools to weld aluminum, so nuts and bolts are the only way to go. [Scott’s] given us another option. He’s designed a set of 3D printable brackets that slip onto the ends of the brackets. The brackets make quick work of building boxes, racks, or anything with 90° or 45° angles.
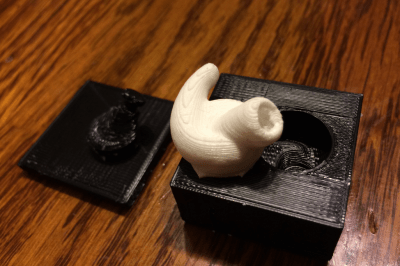 Next up is [Joe M] with 3D Printed Molds: Custom Silicone Earbuds. [Joe] had a set of Bluetooth earbuds he enjoyed, but the rubber tips left a bit to be desired. Not a problem when you have a 3D printer on hand. [Joe] measured the plastic part of his earbuds and the rubber tips from a different set he liked. A bit of CAD magic later, and he had a model for the perfect earbud tip. While he could have directly printed the tip in a flexible filament like NinjaFlex, [Joe] opted for a pure silicone tip. He printed molds, then mixed silicone caulk with cornstarch (as a catalyst). The resulting earbuds sound and feel great!
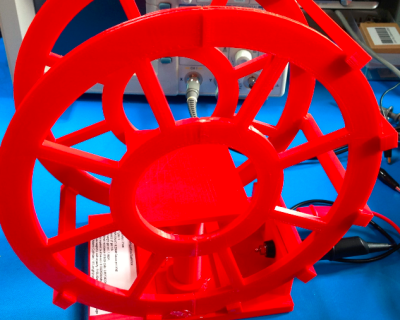 Next we have [Jetty] with Highly Configurable 3D Printed Helmholtz Coil. Helmholtz coils are used to create uniform magnetic fields. Why would you want to do that? It could be anything from measuring magnets to cancelling out the effect of the earth’s magnetic field on a device being tested. [Jetty’s] wrote an OpenScad program which allows the user to enter parameters for their coil. [Jetty’s] program then calculates the coil’s magnetic properties, and outputs a printable .stl file. Building the coil is as simple as printing it and wrapping some copper wire. [Jetty] found that his coil was within 60nT (nanoTesla) of the expected value. Not bad for a bit of plastic and wire!
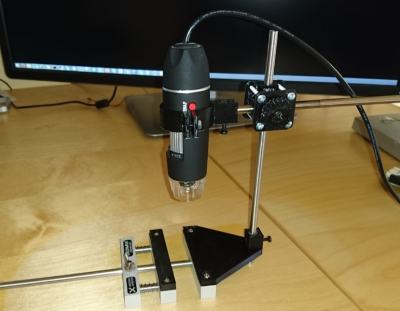 Finally we have StickScope, [SUF’s] entry in the 2016 Hackaday Prize. Like many of us, [SUF] loves his StickVise. Sometimes you need a bit of magnification to see those tiny 0201 resistors though. [SUF] had a cheap USB microscope on hand, so he designed StickScope, a USB microscope mount designed especially for the StickVise. Two 6mm steel rods are the backbone of the design. 3D printed clamps hold the system together like a miniature boom microscope. This is actually the third revision of the design. [SUF] found that the original design couldn’t be used with parts close to the bar which holds the microscope. A small jaw extender was the perfect tweak.
If you want to see more simple functional 3D printed projects, check out our new simple functional 3D prints list! If I missed your project, don’t be shy, just drop me a message on Hackaday.io. That’s it for this week’s Hacklet. As always, see you next week. Same hack time, same hack channel, bringing you the best of Hackaday.io!

 We start with [Alberto] and Dtto v1.0 Modular Robot. Dtto is [Alberto’s] entry in the 2016 Hackaday Prize. Inspired by Bruce Lee’s famous water quote, Dtto is a modular snake-like robot. Each section of Dtto is a double hinged joint. When two sections come together, magnets help them align. A servo controlled latch solidly docks the sections, which then work in unison. Dtto can connect and separate segments autonomously – no human required. [Alberto] sees applications for a robot like [Dtto] in search and rescue and space operations. Continue reading “Hacklet 109 – Complex 3D Printed Projects”