Finely powdered aluminium can make almost anything more pyrotechnically interesting, from fireworks to machine shop cleanups – even ceramics, as [Degree of Freedom] discovered. He was experimenting with mixing aluminium powder with various other substances to see whether they could make a thermite-like combination, and found that he could shape a paste of aluminium powder and clay into a form, dry it, and ignite it. After burning, it left behind a hard ceramic material.
[Degree of Freedom] was naturally interested in the possibilities of self-firing clay, so he ran a series of experiments to optimize the composition, and found that a mixture of three parts of aluminium to five parts clay by volume worked best. However, he noticed that bubbles of hydrogen were forming under the surface of the clay, which could cause cracks during the firing. The aluminium was reacting with water to form the bubbles, somewhat like a unwanted form of aerated concrete, and for some reason the kaolinite in clay seemed to accelerate the reaction. Trying to passivate the aluminium by heating it in air or water didn’t prevent the reaction, but [Degree of Freedom] did find that clay extracted from the dirt in his back yard didn’t accelerate it as kaolinite did, and the mixture could dry out without forming bubbles.
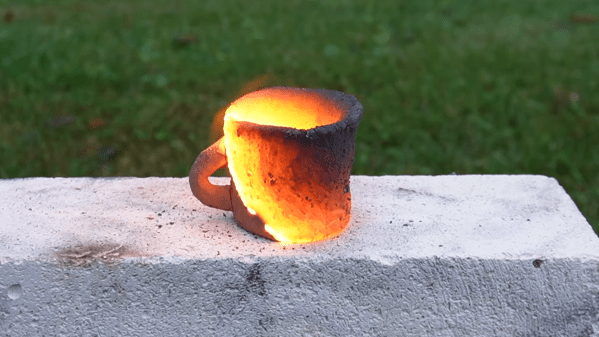
This mixture wasn’t totally reliable, so to make it a bit more consistent [Degree of Freedom] added some iron oxide to accelerate the burn through an actual thermite reaction – some mixtures burned hot enough to start to melt the clay. After many tests, he found that sixteen parts clay, seven parts aluminium, and five parts iron oxide gave the best results. He fired two cups made of the mixture, a thin rod, and a cube, with mixed results. The clay expanded a bit during firing, which sometimes produced a rough finish, cracking, and fragility, but in some cases it was surprisingly strong.
The actual chemistry at work in the clay-aluminium mixtures is a bit obscure, but not all thermite reactions need to involve iron oxide, so there might have been some thermite component even in the earlier mixtures. If you need heat rather than ceramic, we’ve also seen a moldable thermite paste extruded from a 3D printer.
alumina4 Articles
The Hall-Héroult Process On A Home Scale
Although Charles Hall conducted his first successful run of the Hall-Héroult aluminium smelting process in the woodshed behind his house, it has ever since remained mostly out of reach of home chemists. It does involve electrolysis at temperatures above 1000 ℃, and can involve some frighteningly toxic chemicals, but as [Maurycy Z] demonstrates, an amateur can now perform it a bit more conveniently than Hall could.
[Maurycy] started by finding a natural source of aluminium, in this case aluminosilicate clay. He washed the clay and soaked it in warm hydrochloric acid for two days to extract the aluminium as a chloride. This also extracted quite a bit of iron, so [Maurycy] added sodium hydroxide to the solution until both aluminium and iron precipitated as hydroxides, added more sodium hydroxide until the aluminium hydroxide redissolved, filtered the solution to remove iron hydroxide, and finally added hydrochloric acid to the solution to precipitate aluminium hydroxide. He heated the aluminium hydroxide to about 800 ℃ to decompose it into the alumina, the starting material for electrolysis.
To turn this into aluminium metal, [Maurycy] used molten salt electrolysis. Alumina melts at a much higher temperature than [Maurycy]’s furnace could reach, so he used cryolite as a flux. He mixed this with his alumina and used an electric furnace to melt it in a graphite crucible. He used the crucible itself as the cathode, and a graphite rod as an anode. He does warn that this process can produce small amounts of hydrogen fluoride and fluorocarbons, so that “doing the electrolysis without ventilation is a great way to poison yourself in new and exciting ways.” The first run didn’t produce anything, but on a second attempt with a larger anode, 20 minutes of electrolysis produced 0.29 grams of aluminium metal.
[Maurycy]’s process follows the industrial Hall-Héroult process quite closely, though he does use a different procedure to purify his raw materials. If you aren’t interested in smelting aluminium, you can still cast it with a microwave oven.
Activated Alumina For Desiccating Your Filament
When you first unwrap a shiny new roll of filament for your FDM printer, it typically has a bag of silica gel inside. While great for keeping costs low on the manufacturing side, is silica gel the best solution to keep your filament dry at home?
Frustrated with the consumable nature and fussy handling of silica gel beads, [Build It Make It] sought a more permanent way to keep his filament dry. Already familiar with activated alumina beads, he crafted a desiccant cylinder that can be popped into the oven all at once instead of all that tedious mucking about with emptying and refilling plastic capsules.
A length of aluminum intake pipe, some high temperature epoxy, and aluminum mesh are all combined to make a simple, sealed cylinder. During the process, he found that using a syringe filled with the epoxy led to a much more precise application to the aluminum cylinder, so he recommends starting out that way if you make these for yourself.
We suspect something with a less permanent attachment at one end would let you periodically swap out the beads if you wanted to try this hack with the silica beads you already had. Perhaps some kind of threaded pipe fitting? If you want a more active dryer, try making one with a Peltier. If you want to know just how dry your filament is getting, you could also put in a sensor. You might also wonder, do you really need to dry filament at all?
Continue reading “Activated Alumina For Desiccating Your Filament”
DIY Tube Oven Brings The Heat To Homebrew Semiconductor Fab
Specialized processes require specialized tools and instruments, and processes don’t get much more specialized than the making of semiconductors. There’s a huge industry devoted to making the equipment needed for semiconductor fabrication plants, but most of it is fabulously expensive and out of reach to the home gamer. Besides, where’s the fun in buying when you can build your own fab lab stuff, like this DIY tube oven?
A tube oven isn’t much more complicated than it sounds — it’s just a tube that gets hot. Really, really hot — [Nixie] is shooting for 1,200 °C. Not just any materials will do for such an oven, of course, and this one is built out of blocks of fused alumina ceramic. The cavity for the tube was machined with a hole saw and a homebrew jig that keeps everything aligned; at first we wondered why he didn’t use his lathe, but then we realized that chucking a brittle block of ceramic would probably not end well. A smaller hole saw was used to make trenches for the Kanthal heating element and the whole thing was put in a custom stainless enclosure. A second post covers the control electronics and test runs up to 1,000°C, which ends up looking a little like the Eye of Sauron.
We’ve been following [Nixie]’s home semiconductor fab buildout for a while now, starting with a sputtering rig for thin-film deposition. It’s been interesting to watch the progress, and we’re eager to see where this all leads.


