A Very Detailed Reflow Oven Build

smd-solder-reflow-oven

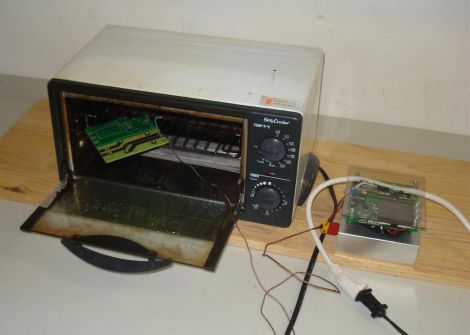
If you do a lot of SMD soldering, a reflow oven is the fastest and most efficient way to get all those tiny components attached to your PCB. [Frank Zhao] saw the reflow ovens we featured here over the last few weeks and figured he might as well show off his rig as well. We’re certainly glad he did, because his very thorough writeup is a great stepping stone for anyone looking to construct a reflow oven of their own.

Like many others, he started off with a used toaster oven, modifying it to be controlled directly via the power cable rather than the oven’s dials. He built a small PCB to regulate the oven, which features an ATmega32u4 and thermocouple to keep the temperature in check. Control of the heating element is done using a solid state relay, for which he built his own heatsink.

He studied the reflow profile of the solder he would be using, programming the microcontroller to regulate the heating/cooling process without requiring any user input, aside from turning the oven on.

Check out the video below to see a brief overview of his system, and be sure to swing by his writeup to take a look at all the build details. There are a handful of additional videos along with plenty of pictures there, walking through each step of the process.

Continue reading “A Very Detailed Reflow Oven Build”

Do You Know What You’re Doing When Integrating PC-side Apps With USB Microcontrollers?

The advent of integrated USB peripherals in microprocessors (PIC, AVR, etc.) has certainly taken a lot of the work out of developing USB devices, not to mention reducing the silicon parts in these designs. But do you know what you’re doing when it comes to controlling them with user-friendly applications? [Simon Inns] is lending a hand with this in his recent tutorial. He shows how to use USB capable AVR chips along with your own Windows applications.

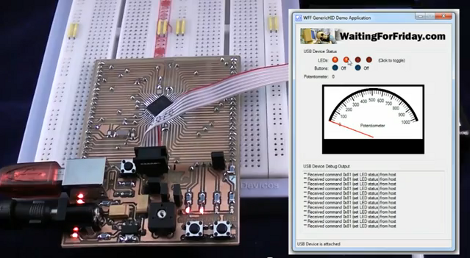
After the break you can see the video from which the above screenshot was captured. That’s a development board of his own making which hosts an ATmega32U4, as well as a USB-B port, LEDs, potentiometer, and a few switches. Taking a closer look, we love the breadboard friendly headers he used on the bottom of the board to break out all of the pins.

His demo shows the Windows app turning LEDs on the board on and off, as well as ADC data displaying the current potentiometer position with the onscreen dial. His code package includes the hardware design, firmware, and app software needed to follow along with what he’s doing.

Continue reading “Do You Know What You’re Doing When Integrating PC-side Apps With USB Microcontrollers?”