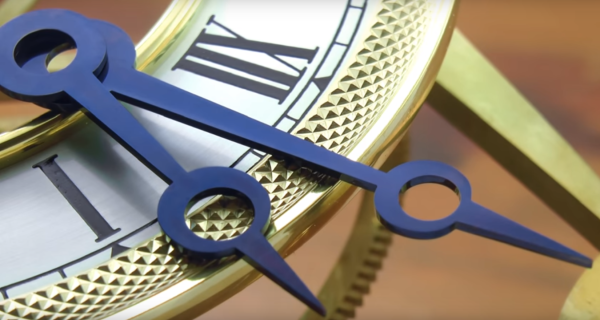
Metalwork of any kind is fascinating stuff to watch. When the metalwork in question is in service of the clockmaker’s art, the ballgame changes completely. Tiny screws and precision gears are created with benchtop lathes and milling machines, and techniques for treating metals border on alchemy – like heat-bluing of steel clock hands for a custom-built clock.
If you have even a passing interest in metalwork and haven’t followed [Clickspring]’s YouTube channel, you don’t know what you’re missing. [Chris] has been documenting a museum-quality open-body clock build, and the amount of metalworking skill on display is amazing. In his latest video, he covers how he heat-blues steel to achieve a wonderful contrast to the brass and steel workings. The process is simple in principle but difficult in practice – as steel is heated, a thin layer of oxides forms on the surface, enough to differentially refract the light and cause a color change. The higher the heat, the thicker the layer, and the bluer the color. [Chris] uses a custom-built tray filled with brass shavings to even out the heat of a propane torch, but even then it took several tries to get the color just right. As a bonus, [Chris] gives us a primer on heat-treating the steel hands – the boric acid and methylated spirits bath, propane torch flame job and oil bath quenching all seems like something out of a wizard’s workshop.
We’ve covered [Chris]’ build before, and we encourage everyone to tune in and watch what it means to be a craftsman. We only hope that when he finally finishes this clock he starts another project right away.
Continue reading “Metal Magic: Heat Bluing Steel Clock Hands”