Planar Speaker Build Uses Hard Drive Magnets

We like to see people building things that are a little unusual, and we really like it when said unusual thing uses salvaged parts. This project from [JGJMatt] ticks all our boxes — the build creates a planar speaker that uses salvaged magnets from a hard drive.

A planar speaker, according to the post, uses wires and magnets to manipulate a flat film that acts as the transducer. The speaker housing is 3D printed and looks great but is otherwise unremarkable. The fun starts when a Dremel with a diamond disk cuts the magnets in half. Cutting neodymium poses several challenges. For example, if you heat the material up too much while cutting, it can lose its magnetism.

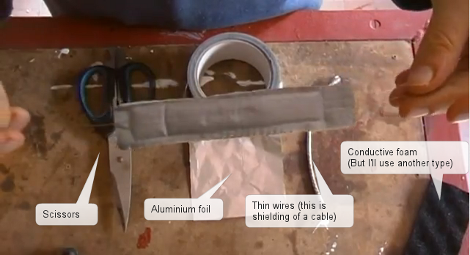
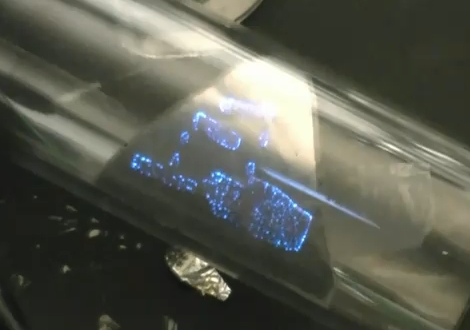
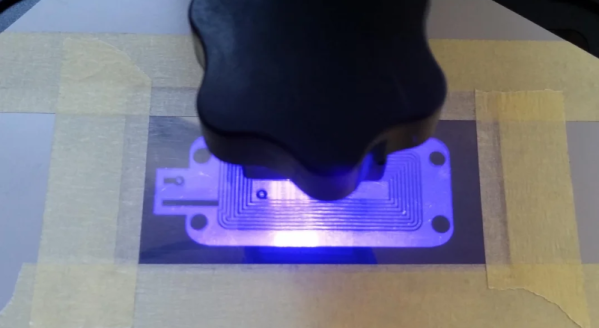
With the proper magnets, you can move to the tedious method of creating the coils. The post shows three different methods. But the part we really liked was using a resin 3D printer as a UV source to expose a resist mask which transfers to a copper or aluminum foil that will be the sound-generating film. [JGJMatt] used a similar technique to put resist on PC board blanks, too. Unfortunately, there were some issues so the finished speakers didn’t use the foil prepared using this method. Instead, a quick modification to the resin printer allowed a thin film of resin to rest on the foil, which was then exposed.

Once you have the pieces, there isn’t much left to do but put them together. Honestly, this is one of those things you probably won’t do yourself unless you are obsessed with speakers. But there were a lot of interesting techniques here that might come in handy, even if you don’t care about audio reproduction.

[JGJMatt] showed us a ribbon speaker before. We have seen some speakers that are practically all 3D printed.

You Bring It, This Blings It: Retrofitting A Hot Foil Stamping Machine

Hot foil stamping is a method often used to embellish and emboss premium print media. It’s used on things like letterhead and wedding invitations to add a touch of luxury. The operation is actually quite simple, where a custom die is heated, pressed into a heat transfer foil, and then transferred on to the print media. Some of the very first manuscripts used gold leaf embossing to decorate intricate calligraphy. You can also see it often used to decorate the sides of religious texts.

Professional foil stamping machines are often pricey and the cheaper ones you can get from eBay are usually poorly made. [Lindsay Wilson] found this out when he purchased a low-cost hot foil stamping machine that was too difficult to use reliably. It got shelved for years until he had another hot foil stamping project. This time he was prepared. He took the machine apart and robust-ified it by attaching it to a heavy-duty arbor press. He also retrofit the heating assembly with his own temperature controller to improve the accuracy for the foils he wanted to use.

Continue reading “You Bring It, This Blings It: Retrofitting A Hot Foil Stamping Machine”

HDTV Antenna Of A Different Color

We’ve seen our share of commercially available HDTV antennas that work really poorly. For at least four years now we’ve gone without cable television, using a coat hanger antenna we made ourselves to record over-the-air broadcasts. But it’s a pretty ugly beast — we’re lucky enough to have an attic in which it can be hidden. If you’re in need of free television and don’t want an eyesore of a an antenna try building this foil and cardboard version. Even it if doesn’t work at all you’re only out about ten bucks.

The expensive part is the matching transformer which converts screw terminals to a coaxial cable connection so that it may be connected to your HDTV. You’ll need a few nuts and bolts, but we assume you can beg, borrow, or steal the tin foil, cardboard, and glue that round out the parts list. Glue, measure, cut, fold, fasten, finished! You’ll be watching horrible summer TV in no time!

If it doesn’t perform as expected just reuse that connector and try your luck with a fractal antenna.

Building A Flex Sensor From Component Packing Materials

Hacks like this one don’t help us recover from extreme pack-rat behavior. Driving home the point that one should never throw anything away [Peter] built a flex sensor from component packing material. It uses the black conductive foam in which integrated circuits are sometimes embedded for shipping. Above you can see the grey rectangle which is the sensor itself. in the background of the image, each component used in the build is labelled except for the tape.

The project starts with the foam being cut to the appropriate size and thickness. He does the same with some aluminum foil, then rips tape strips to act as the enclosure. Fine wire from some cable shielding serves as the two conductors for the sensor. He attaches each wire to an upturned piece of tape, followed by the foil, and finally the foam. When the two halves are assembled in the video after the break, [Peter] hooks up his multimeter to show the change in resistance as the sensor is bent.

We think it will take a clever calibration algorithm to get this working reliably, but it’s no more troublesome than the optical flex sensors we saw in this links post. Continue reading “Building A Flex Sensor From Component Packing Materials”

Jeri Makes Flexible EL Displays

A failed chemistry experiment led [Jeri Ellsworth] to discover a flexible substrate for electroluminescent displays. We’re familiar with EL displays on the back of a glass panel like you would find in an audio receiver, but after making a mesh from aluminum foil [Jeri] looked at using the porous metal to host phosphors. She starts by cleaning foil and using a vinyl sticker to resist etching portions of the aluminum. It then goes into a bath of boric acid, electrified with the foil as the anode. As the foil etches she tests the progress by shining a laser through the foil. After this the phosphors are applied to the back surface of the foil, covered in a dielectric, and topped off with a conductive ink that will carry the AC necessary to excite the phosphors. This is layering materials in reverse compared to her EL PCB experiments. See [Jeri] explain this herself in the clip after the break.

You can see above that this produces a pretty well-defined display area. It reminds us of that color changing paint display. We think it would be worth a try to build a few 7-segment displays using this method.

Continue reading “Jeri Makes Flexible EL Displays”

Foil Impressioning Defeats Security Locks

Apparently it’s been around for fifteen years but using foil impressions to pick locks is new to us. This is similar to using bump keys but it works on locks that are supposedly much more secure. This method uses a heavy gauge aluminum foil to grab and hold the pins in the correct place for the lock to be turned. The foil is folded over and slits are cut where each pin will fall. It is then inserted into a lock on a tool shaped like a key blank. Jiggle the tool for a bit and the cylinder will turn. This just reminds us that we’re much more dependent on the good will of our fellow citizens to not steal our stuff, rather than the deterrent that a lock provides.

We’ve embedded a detail and fascinating demonstration of this method after the break. The materials in the video are from a Chinese-made kit. We’re not sure where you find these types of locks, but we don’t feel any less secure since our keys could be obtained from a distance anyway.

Update: Video now embedded after the break. The link is down but you can try the Google Cache version.

Continue reading “Foil Impressioning Defeats Security Locks”