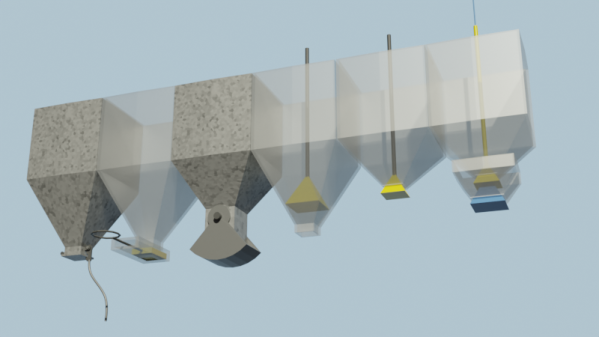
types of gates

Handling Bulk Material: The Spice Must Flow!

Your [Bornhack] plans include leaving lemons in patterns as an info display. Your squirrel feeder needs to only dispense nuts when the squirrels deserve it. As promised last week, an intro to gating, feeding, and moving bulk material.

Gates

Bulk material flow needs control. Starting is easy, it’s stopping that’s hard.
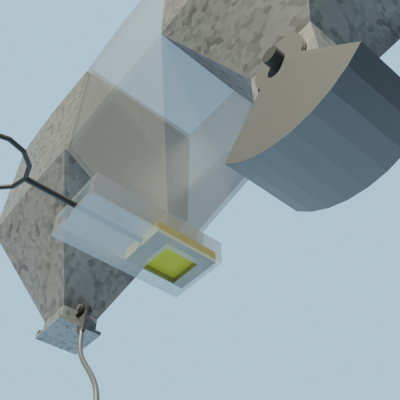
Dump Gate, Slide Gate, Clamshell Gate

If your need is just to dump out the entire contents of the bin, a dump gate works – a trapdoor with a latch. If you need to stop before emptying the bin, you can use a slide valve – a flat piece of material in a box that slides in and out. Friction from material bearing down on them causes large open/close forces. Material can  jam between the flap and the housing when closing.

A variation is the clam shell gate — a section of a cylinder on arms that swings aside, like a crane’s grab. They tend to leak, but with the material’s weight against the hinge pin, they are easier to close with a high force against them.

The upward bell gate, helps with in-bin flow pattern and seals well. Open by pulling from above or pushing from below, through the outlet. The material moving around the gate acts to improve the flow, and because the material at the lip is on an inclined surface, they tend to seal better. If it still has a leakage problem, a flexible lip can cure it.

A cone, suspended on a cable below the outlet of the hopper is a downward bell. Lowering the cable lets material flow between the outlet rim and the bell. When the cable is raised, if a lump sticks at one place the bell moves aside. The sealing surfaces are angles, so material rolls off. The bin is shallower and there’s no outlet pipe. This design ensures clearance so large particles don’t wedge against the wall as the bell closes.
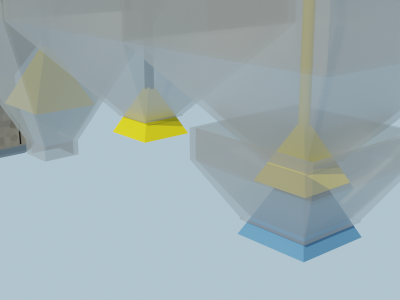
Upward Bell, Downward Bell, Double Bell

Any of these gates would close just fine if not for the material in the bin. Double gates exploit this. The main bin has a normal gate and outlet. The outlet is below the lip of the much smaller, lower control bin. If the control bin fills, the main bin stops. The control bin has a gate larger than the main bin. Closing the main gate as far as it will go reduces flow through the control gate to a trickle. The control gate can now be fully closed, which fills the control bin and blocks the main outlet.

You might not want to share environments between bins. Maybe one has pressure, nasty chemicals, or hot gases. In that case, a rotary airlock gate is a paddle wheel apparatus in a close fitting housing. Material is metered out as it turns. A double gate also works (blast furnaces use double bells). If you need to meter a set amount, a sliding cavity like a grocery store bulk bin works. So does a rotary airlock.

Locomotive sander systems spread sand on the rails to increase traction.  The sand is gated with a “sand trap”. A pipe supplies sand to a ‘valve’ with a sharp upward U bend. Of course this blocks. A compressed air line from a valve in the cab feeds into the upward end of the U bend. As long as air flows, the blockage is constantly cleared and sand flows. It’s collected and sent to the wheels.

Feeders

If you need a constant flow, independent of how much is in the bin, you need a feeder.

The rotary air lock can be a simple feeder. A conveyor feeder is a belt at the bottom of the bin. One side has a slight gap between bin and belt. Material covers the belt as high as the gap. A screw feeder is a helical screw at the bottom of the hopper, taking material off to the side. The screw needs a varying pitch, starting out slow and increasing, to let it fill gradually from all along the hopper. A vibratory feeder is a chute designed to arch, with a vibrator to make it flow anyway.

Any of these can have a poor pattern of feeding, taking from one place along it’s inlet. Fins and inserts in the bin can help – a doctor blade to regulate how deep the first couple inches of belt feed, or an anti-rathole type insert to keep mass flow going.

Conveyors

Unlike a feeder, a conveyor depends on whatever is feeding it to control the feed rate.  Feeders are for controlling feed rate. Conveyors for moving stuff. A feeder will change it’s output when it’s speed changes. A conveyor may change  how much is in each section (the ‘loading’) but the output is speed independent.

Screw conveyors should have a fixed pitch, and can be angled up to 45 degrees. Belts can be inclined up to the angle of repose of the material. These are best made with a slight ‘V’ in the belt so the material doesn’t roll off. Boards on the side also work, but introduce friction into the system as the material slides against them.

Don’t overlook skips —  a bucket pulled up an incline. The front wheels run on tracks slightly narrower than the back wheels. Dip the inside tracks down at the end to dump.

Moving floors made of long strips will move a pile of material if actuated in the proper sequence. Picture the order as ‘123123123123’: shove 1 backwards suddenly, and the material above it will stay with the mass, do 2 and 3, then slowly move all forward. They also move solid objects, so many trucks have such floors.

Finally, you can always fluidize the material and blow it about with air or water, then remove the fluid at the other end.  Think old time logging, with logs floated down the river.

Have fun hacking. We hope we’ve given you some options for dealing with walnuts.

assorted bulk materials

Bulk Material — What IS This Stuff, Anyway?

I hope last week’s introduction to bulk material handling got you all thinking up amazing hacks, and we’ll soon be reporting on DIY Cap’n Crunch Robots galore. This week we’ll look at how to measure particle sizes, separate particles, and even grind them up when you need to.

Measuring Material Properties

Last week we talked about cohesive strength. Bulk material behaves somewhere between a solid and a liquid — if you’ve done your homework, it flows down the funnel just fine. But if you haven’t, it sticks together and holds up the rest of the material. Cohesive strength is the measure of how much weight the material at the bottom of the funnel can hold up.

You can get a rough measurement by packing material in a box with a square hole at the bottom. One side of the hole should have a retractable slide. Slowly withdraw the slide, making the hole rectangular. Material will bridge over, and then at some point a larger chunk will fall out. This is about the size of the minimum opening that will not arch, and a practical measure of the material’s cohesive strength.

box with adjustable hole in bottom to measure cohesive strength
Image capture from The Million Dollar Rathole (video).

Many materials cohere better when wet. Dry a sample in a microwave to determine the percent moisture by weighing it before and after.

Cohesive strength is closely allied to shear strength. If you want to measure shear strength, cut two 1 cm wide rings of 5 cm diameter PVC pipe, stack them, pack with material, put a disk atop the material and load it,  then drag the top ring off the bottom with a spring scale. The force per unit area is the shear strength at that pressure. If it starts packing you’ll see it in the curve.

Packing factor is another useful measurement. Gently shake material to fill a rigid container and weigh it. Now empty the container and refill, packing the material as hard as you can with a length of 1” dowel. Reweigh, and the ratio of the two weights tells you how well the material packs.

Real bulk material is almost always made up of particles of varying sizes, shapes, and compositions. Dirt is particles of different kinds of mineral and organic matter varying from outright rocks to sub micron clay particles. If you’re having problems, getting a graph of material size distribution can be helpful.

For particles above about 75 μM, you can measure the sizes with sieves. If you want to be fancy, they sell nice sets of metal sieves with wire mesh in the bottom. Screen assortments are cheaper. Below 75 μM, you have to use a hydrometer. This is messy and takes a while, but does work.

The idea is to mix the material with soapy water and then use a hydrometer from the auto parts store to measure the density. The particles fall out by Stokes law, big ones first. Stokes law is just that the drag force on a sphere is proportional to the square of the radius. Mass will go up as cube of the radius, so large particles fall faster than small ones. As they fall out, the density of the fluid decreases. This page describes how to do it, and this page has a handy calculator for interpreting the results.

Grinding

You can also change the size of particles in your mix. If particles are too large, they can be crushed or ground. You can separate by size and only grind some of the sizes or discard some of the material. There’s a whole science to grinding. The finer you grind, the harder it gets to grind. Cosmetics and pharmaceutical companies are full of grinding experts.

In general, there are three ways to make something smaller – crush it, cut it, or hit it.

Crushing is straightforward. Use rollers or jaws, a rolling pin or a rock crusher. Don’t overlook the vise. A jaw crusher only crushes particles larger than the jaw space, useful to make a certain size. Rock crushers have a complex motion (video) that should nonetheless be easily imitated by a hacker project. Amateur/hobby gold prospectors have an accessible community.

Crushing action in rollers only works until the particle is small enough that the surface of the roller deforms instead of the particle. Stones have been used to crush grain into flour for most of history.

Oldies Marketplace – Meat Grinder by amiefedora. CC BY-ND 2.0

Cutting is best for soft things, like gummy worms, and tough things (video.). Make sure the cut material has an easy path out. Think of an old fashioned kitchen meat grinder. .

If you want small particles, you need an impact grinder. A coffee mill or blender works by striking the particle with a fast moving impactor. This can be a blade – useful if the material first needs to be cut up, as in a coffee mill – or blunt. Many industrial mills use two pivoting weights on a shaft, and this unit just uses chains (video).

Another impact mill is the ball mill. Rotate a drum on it’s side with steel balls and the material. The balls travel up the side, then fall back down, striking the material.

All these work by fracturing the material. What if you’re trying to powder something that doesn’t fracture, say rubber O rings? For that, there’s cryogenic grinding.

Many rubbery materials are really glasses — materials that are a gloppy liquid at a higher temperature, often brittle at a cool temperature, and soft in-between. The glass you’re probably thinking of is a brittle, breakable material at room temperature, but at high temperature is a liquid. The transition point is the ‘glass transition temperature’.

So what about our O rings? If they’re natural rubber their transition point is about -70° C. Below that temperature they’re brittle and can be ground up. Unfortunately,  grinding is going to put heat back in. So consider grinding slowly – some labs grind biological materials like skin samples with a special mortar and pestle cooled beforehand with liquid nitrogen. Just be sure everything in contact with the material has been cooled, and use a thick walled container with lots of thermal mass.

Separating Wheat From Chaff

Sometimes you have a mix and need to separate it. Your roommate dumped all the gummy bears and all those weird ginger candies into a bowl or whatever. Last week we introduced particle segregation as a bad thing. But when you want to un-mix a mixture, it can be a good thing. Any of the techniques from last week can be an aid.

Sieves and screens work to separate by size. They clog unless the material keeps moving over them. One simple way to do this is to flow the material over sieves on a slanted board, finest sieve first. Another is to mechanically shake the screen. Paper filters are just fine screens, and do clog.

A trommel is a slowly turning cylinder with walls of different sized screens along it’s length. Material is fed into the fine screen end and slowly moves towards the other.

Stokes law provides another way to separate materials as we saw above. Make an upward air draft in a vertical pipe. Deliver the material into the pipe part way up. Materials with more drag than weight will go up, larger materials will go down. You can use the air speed to control the size of particle. An industrial machine called an air classifier does this with higher velocity air blowing material into the rim of a spinning set of blades.

It could be the air (or another gas) you want to remove. There are a couple ways to do it. The first is the cyclone familiar to wood shops. The second is even simpler – inject the air/material mix into the top of a tall, slender container with a tube that extends about halfway into the container. Let the air out from an outlet pipe in the roof. The air flow expands, slows down, and the material falls out.

You can just blow the material sideways – the age old system of threshing wheat works this way. Wheat comes from the plant with a husk, you beat it with a flail to loosen the husk, giving you wheat grains and chaff mixed. Put the mix on a blanket and have four peasants toss it repeatedly. The chaff blows away in the wind.

gummy colas and skittles in a baking sheet
Inertial Separation

A very sensitive separation technique is inertial separation. Here’s a mix of gummy colas and jelly beans. We separated them by tilting and gently shaking the sheet. A material moves on a sheet by staying in place until the acceleration is more than some critical value. Then it rolls or slides.

If your material is dirt or such, run a magnet through it. There’s iron ore and bits of human generated iron in a lot of soil. It can get into motors and such. If you need it out run the material past magnets. An eddy current separator uses AC magnetic effects to do the same with nonferrous metals.

You can also segregate materials by dissolving them. A mixture of table salt and white sand would seem impossible, but if you stir it into water, then decant and boil off the water, the salt and sand can be recovered separately. But we think we’re veering into chemistry now, and we should stop.

Next time we’ll finish up by looking at controlling movement: building gates and contraptions that move your bulk material without clogging up.

Handling Bulk Material: Why Does My Cat Food Get Stuck?

Bulk material is stuff handled ‘in bulk’. One LEGO piece is a brick but 1,000 poured into a bag is bulk material. Corn starch, sand, flour, powder-coat powder, gravel, cat food, Cap’n Crunch, coins, screws, Styrofoam beads, lead shot, and gummy worms are bulk materials.

Applications abound where you need to move stuff in bulk. Selective sintering 3D printers, animal feeders, DIY injection molders, toner based PCB makers, home powder coating, automatic LEGO/domino/whatever sorters or assemblers, automated gardeners, airsoft accessories – handling bulk material is part of hacking. College science classes cover solids and liquids, but rarely bulk materials.

Most hackers just pray it works and tap the bin when it doesn’t. Industry does better, but the slang term “bin rash”, the long term result of tapping a 300 ton bin with sledgehammers (video),  shows they don’t get it right all the time either. At the same time, it’s a fun area you can experiment with using kitchen items. So come along with us for a short series on the basics of bulk material handling. Continue reading “Handling Bulk Material: Why Does My Cat Food Get Stuck?”