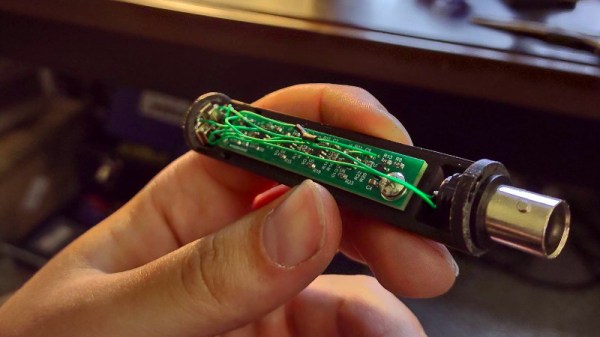
The quality of any measurement can only be as good as the instrument used to gather it, and for acoustic measurements, finding a good enough instrument can be surprisingly difficult. Commonly available microphones can be of good quality, but since they are invariably designed for speech or music, they need not have the flat or wide enough response and low noise figure demanded of an instrumentation microphone.
The result is both an extremely interesting project for those of us with an interest in audio, and a thorough delve into some aspects of its design for those who are merely curious. It uses four capsules in an effort to cancel out induced electrical noise, and boasts some impressive comparative measurements when tested against a commercial measurement microphone. We could almost see ourselves building this project.
A chainsaw can make short work of clearing out the back forty. It can also make a good horror movie. So while some people will say we don’t need another tool to allow more malicious scripting in the browser, we also know that, like any tool, you can use it or abuse it. That tool? PyScript, which is, of course, Python in the browser.
The tool is in the early experimental phase, so the project doesn’t suggest using it in a production environment yet. However, if it works well, the promise is not just that you can write browser-based applications in Python — you’ll have a handy way to reuse existing Python code and even be able to run the same code on the browser that currently runs on the server. This has a lot of implications for improved client/server applications, or cases where you want to be able to run against a local backend when disconnected and a remote backend when you do have a connection. Of course, you can interoperate with JavaScript, too.
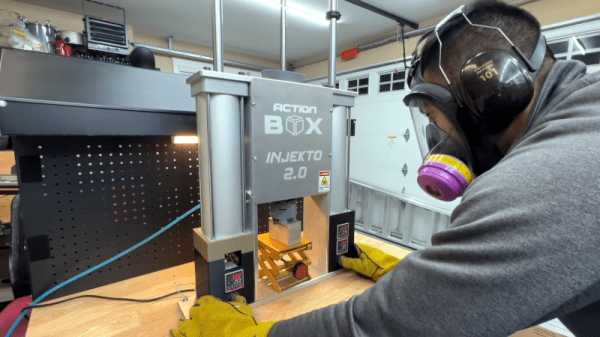
Last time we looked in on Injekto — a homemade plastic injection machine — it was at version 1.0. A recent video from the team that you can see below shows version 2 which is much improved and can work with 3D printed molds. Injection molding takes a lot of pressure and the machine certainly looks stout with lots of machined aluminum.
If you want to skip the build process, you can skip up to around the 9-minute mark. That’s where they show a machined mold and a 3D printed mold being used with the machine.
Personal head-up displays are a technology whose time ought by now to have come, but which notwithstanding attempts such as the Google Glass, have steadfastly refused to catch on. There’s an intriguing possibility in [Basel Saleh]’s CaptionIt project though, a head-up display that provides captions for everyday situations.
The hardware is a tiny I²C OLED screen with a reflector and a 3D-printed mount attached to a pair of glasses, and it’s claimed that it will work with almost any ARM v7 SBC, including more recent Raspberry Pi boards. It uses the vosc speech recognition toolkit to read audio from a USP audio device, with the resulting text being displayed on the screen.
The device is shown in action in the video below the break, and without trying it ourselves we can’t comment on its utility, but aside from the novelty we can see it could have a significant impact as an accessibility aid. But it’s as an electronic Babel fish coupled with translation software that we’d like to see it develop, so that inadvertent but hilarious international misunderstandings can be shared by all.
Regular readers will know that we’ve brought you plenty of HUD tomfoolery in the past.
In any era, the story of electronics has very much been about figuring out how to make something happen with what’s available at the time. And as is often the case, the most interesting developments come from occasions when needs exceed what’s available. That’s when real innovation takes place, even if circumstances conspire to keep the innovation from ever taking hold in the marketplace.
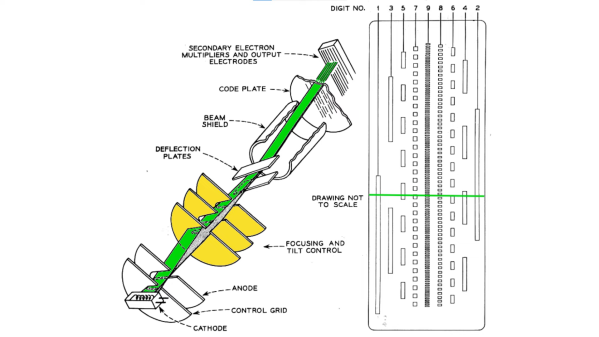
This gem of a video from the Antique Wireless Association has a perfect example of this: the long-lost analog-to-digital converter vacuum tube. Like almost every mid-20th-century innovation in electronics, this one traces its roots back to the Bell Laboratories, which was keenly interested in improving bandwidth on its massive network of copper lines and microwave links. As early as 1947, one Dr. Frank Gray, a physicist at Bell Labs, had been working on a vacuum tube that could directly convert an analog signal into a digital representation. His solution was a cathode ray tube similar to the CRT in an oscilloscope. A beam of electrons would shine down the length of the tube onto a shadow mask containing holes arranged in a “reflected binary code,” which would later be known as a Gray code. The analog signal to be digitized was applied to a pair of vertical deflector plates, which moved the beam into a position along the plate corresponding to the voltage. A pair of horizontal deflector plates would then scan the beam across the shadow mask; where electrons fell on a hole, they would pass through to an output plate to be registered as a bit to be set.
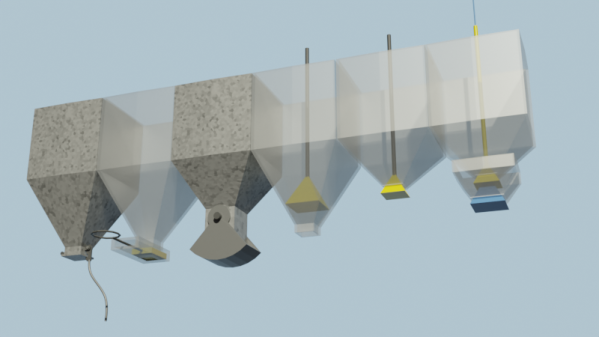
Your [Bornhack] plans include leaving lemons in patterns as an info display. Your squirrel feeder needs to only dispense nuts when the squirrels deserve it. As promised last week, an intro to gating, feeding, and moving bulk material.
Gates
Bulk material flow needs control. Starting is easy, it’s stopping that’s hard.
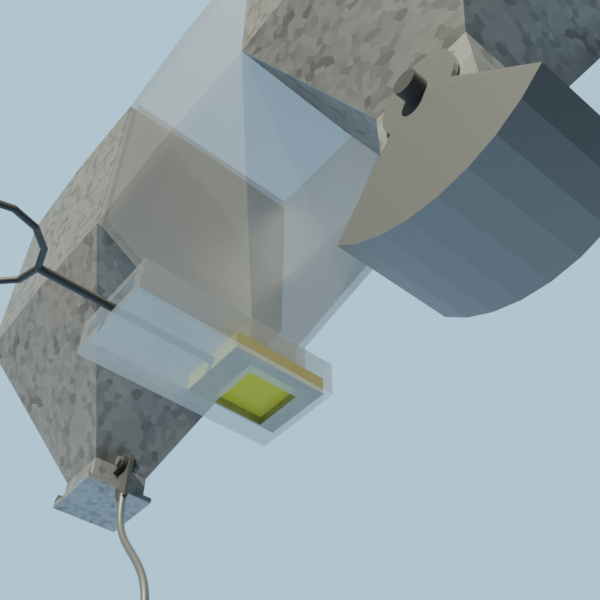
Dump Gate, Slide Gate, Clamshell Gate
If your need is just to dump out the entire contents of the bin, a dump gate works – a trapdoor with a latch. If you need to stop before emptying the bin, you can use a slide valve – a flat piece of material in a box that slides in and out. Friction from material bearing down on them causes large open/close forces. Material can jam between the flap and the housing when closing.
A variation is the clam shell gate — a section of a cylinder on arms that swings aside, like a crane’s grab. They tend to leak, but with the material’s weight against the hinge pin, they are easier to close with a high force against them.
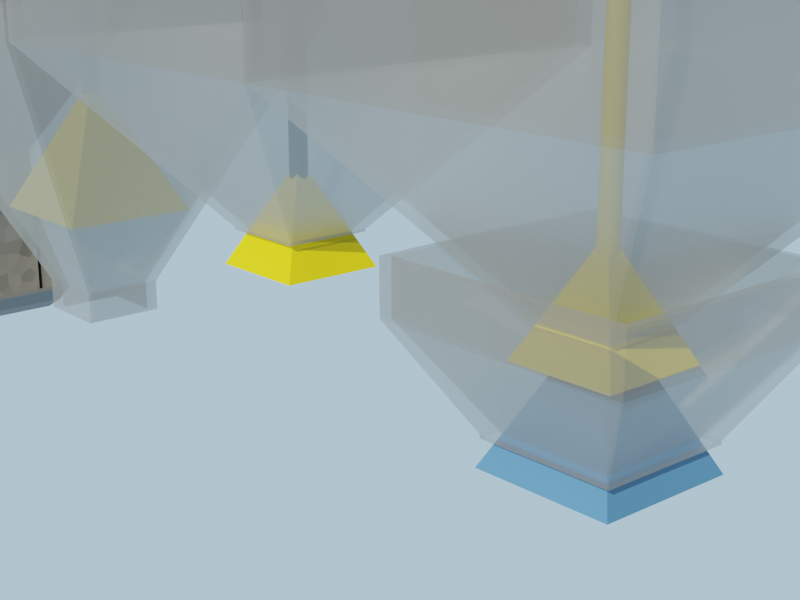
The upward bell gate, helps with in-bin flow pattern and seals well. Open by pulling from above or pushing from below, through the outlet. The material moving around the gate acts to improve the flow, and because the material at the lip is on an inclined surface, they tend to seal better. If it still has a leakage problem, a flexible lip can cure it.
A cone, suspended on a cable below the outlet of the hopper is a downward bell. Lowering the cable lets material flow between the outlet rim and the bell. When the cable is raised, if a lump sticks at one place the bell moves aside. The sealing surfaces are angles, so material rolls off. The bin is shallower and there’s no outlet pipe. This design ensures clearance so large particles don’t wedge against the wall as the bell closes.
Upward Bell, Downward Bell, Double Bell
Any of these gates would close just fine if not for the material in the bin. Double gates exploit this. The main bin has a normal gate and outlet. The outlet is below the lip of the much smaller, lower control bin. If the control bin fills, the main bin stops. The control bin has a gate larger than the main bin. Closing the main gate as far as it will go reduces flow through the control gate to a trickle. The control gate can now be fully closed, which fills the control bin and blocks the main outlet.
You might not want to share environments between bins. Maybe one has pressure, nasty chemicals, or hot gases. In that case, a rotary airlock gate is a paddle wheel apparatus in a close fitting housing. Material is metered out as it turns. A double gate also works (blast furnaces use double bells). If you need to meter a set amount, a sliding cavity like a grocery store bulk bin works. So does a rotary airlock.
Locomotive sander systems spread sand on the rails to increase traction. The sand is gated with a “sand trap”. A pipe supplies sand to a ‘valve’ with a sharp upward U bend. Of course this blocks. A compressed air line from a valve in the cab feeds into the upward end of the U bend. As long as air flows, the blockage is constantly cleared and sand flows. It’s collected and sent to the wheels.
Feeders
If you need a constant flow, independent of how much is in the bin, you need a feeder.
The rotary air lock can be a simple feeder. A conveyor feeder is a belt at the bottom of the bin. One side has a slight gap between bin and belt. Material covers the belt as high as the gap. A screw feeder is a helical screw at the bottom of the hopper, taking material off to the side. The screw needs a varying pitch, starting out slow and increasing, to let it fill gradually from all along the hopper. A vibratory feeder is a chute designed to arch, with a vibrator to make it flow anyway.
Any of these can have a poor pattern of feeding, taking from one place along it’s inlet. Fins and inserts in the bin can help – a doctor blade to regulate how deep the first couple inches of belt feed, or an anti-rathole type insert to keep mass flow going.
Conveyors
Unlike a feeder, a conveyor depends on whatever is feeding it to control the feed rate. Feeders are for controlling feed rate. Conveyors for moving stuff. A feeder will change it’s output when it’s speed changes. A conveyor may change how much is in each section (the ‘loading’) but the output is speed independent.
Screw conveyors should have a fixed pitch, and can be angled up to 45 degrees. Belts can be inclined up to the angle of repose of the material. These are best made with a slight ‘V’ in the belt so the material doesn’t roll off. Boards on the side also work, but introduce friction into the system as the material slides against them.
Don’t overlook skips — a bucket pulled up an incline. The front wheels run on tracks slightly narrower than the back wheels. Dip the inside tracks down at the end to dump.
Moving floors made of long strips will move a pile of material if actuated in the proper sequence. Picture the order as ‘123123123123’: shove 1 backwards suddenly, and the material above it will stay with the mass, do 2 and 3, then slowly move all forward. They also move solid objects, so many trucks have such floors.
Finally, you can always fluidize the material and blow it about with air or water, then remove the fluid at the other end. Think old time logging, with logs floated down the river.
Have fun hacking. We hope we’ve given you some options for dealing with walnuts.
Induction cook tops are among the most efficient ways of cooking in the home that are commercially available to the average person. Since the cook surface uses magnetic fields to generate heat in the cookware itself, there is essentially no heat wasted. There are some other perks too, such as faster cooking times and more fine control, not to mention that it’s possible to build your own induction stove. All you need is some iron, wire, and a power source, and you can have something like this homemade induction cooker.
This induction heater has a trick up its sleeve, too. Instead of using an air coil to generate heat in the cookware, this one uses an iron core instead. The project’s creator [mircemk] built an air core induction stove in the past, and this new one is nearly identical with the exception of the addition of the iron core. This allows for the use of less wire, and uses a driver circuit called a Mazzilli ZVS driver running through some power MOSFETs to power the device. A couple inductors limit the current to 20A, but it appears to work just as well as the previous stove.
This build puts a homemade induction stove well within reach of anyone with an appropriate power supply and enough wire and inductors to build the coils. [mircemk] has made somewhat of a name for himself involving project that use various coils of wire, too, like this project we featured recently which uses two overlapping air-core coils to build an effective metal detector.