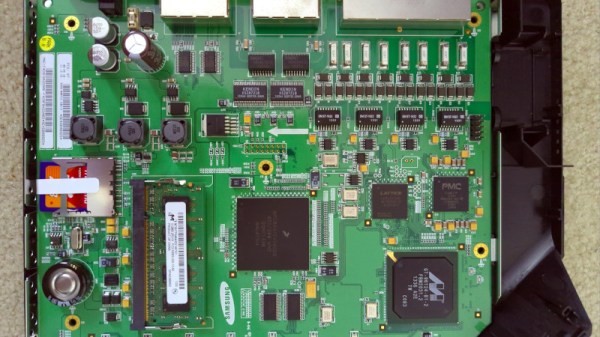
When it comes to internet connections, here in 2022 so many of us have it easy. Our ISP provides us with a fibre, cable, or DSL line, and we just plug in and go. It’s become ubiquitous to the extent that many customers no longer use the analogue phone line that’s so often part of the package. But before there was easy access to DSL there were leased lines, and it’s one of these that [Old VCR] is dissecting. The line in question is a T1 connection good for 1.536 Mbit/s and installed at great cost in the days before his cable provider offered reliable service, but over a decade later is now surplus to requirements. The ISP didn’t ask for their router back, so what else to do but give it the hacking treatment?
In a lengthy blog post, he takes us through the details of what a T1 line is and how it’s installed using two copper lines, before diving into the router itself. It’s an obsolete Samsung device, and as he examined the chips he found not the MIPS or ARM processors we’d expect from domestic gear of the period, but a PowerPC SoC from Freescale. Connecting to the serial port reveals it as running SNOS, or Samsung Network Operating System from an SD card, and some experimentation finds a default password reset procedure through the bootloader commands. The rest of the piece is dedicated to exploring this OS.
There was a time before the advent of the Raspberry Pi and similar cheap Linux-capable boards, that hacking a router was the way to get a cheap embedded Linux system, but now it’s much more done to liberate a router from the clutches of manufacturer and telco. Still, it’s very much still part of the common fare here at Hackaday.
For a quick file transfer between two computers, SCP is a fine program to use. For more complex, large, or regular backups, however, the go-to tool is rsync. It’s faster, more efficient, and usable in a wider range of circumstances. For all its perks, [Michael Stapelberg] felt that it had one major weakness: it is a tool written in C. [Michael] is philosophically opposed to programs written in C, so he set out to implement rsync from scratch in Go instead.
[Michael]’s path to deciding to tackle this project is a complicated one. His ISP upgraded his internet connection to 25 Gbit/s recently, which means that his custom router was the bottleneck in his network. To solve that problem he migrated his router to a PC with several 25 Gbit/s network cards. To take full advantage of the speed now theoretically available, he began using a tool called gokrazy, which turns applications written in Go into their own appliance. That means that instead of installing a full Linux distribution to handle specific tasks (like a router, for example), the only thing loaded on the computer is essentially the Linux kernel, the Go compiler and libraries, and then the Go application itself.
With a new router with hardware capable of supporting these fast speeds and only running software written in Go, the last step was finally to build rsync to support his tasks on his network. This meant that rsync itself needed to be built from scratch in Go. Once [Michael] completed this final task, he found that his implementation of rsync is actually much faster than the version built in C, thanks to the modernization found in the Go language and the fact that his router isn’t running all of the cruft associated with a standard Linux distribution.
For a software project of this scope, we find [Michael]’s step-by-step process worth taking note of for any problem any of us attempt to tackle. Not only that, refactoring a foundational tool like rsync is an involved task on its own, let alone its creation simply to increase network speeds beyond what most of us would already consider blazingly fast. We’re leaving out a ton of details on this build so we definitely recommend checking out his talk in the video below.
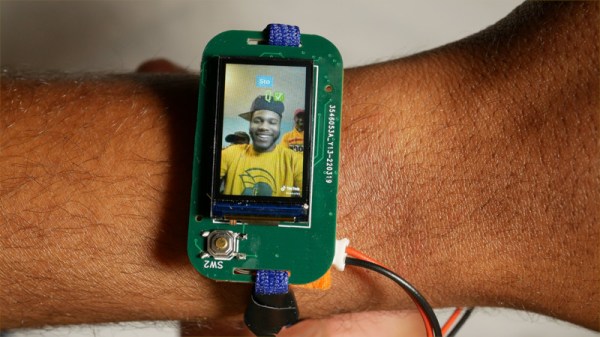
One of the ultimate objects of desire in the early 1980s was the Seiko TV wristwatch. It didn’t matter that it required a bulky external box in your pocket for its electronics, it was a TV on your wrist, and the future was here! Of course, now we have the technology to make wrist-mounted video a practical reality, but it’s sad to see we’ve opted to use our phones for video and never really followed up on the promise of a wrist-mounted television. There’s always hope though, and here it is in the form of [Dave Bennett]’s ESP32-powered TikTok wristwatch.
On the wrist is the ESP32 itself with an audio DAC and amplifier, LCD screen, and battery, but sadly this combo doesn’t have quite the power to talk to TikTok directly. Instead that’s done using Python on a companion PC with the resulting videos uploaded to the device over WiFi. It’s not the bulky electronics of the Seiko TV, so we’ll take it. All the info can be found on GitHub, and there’s a YouTube video below the break.
So the viral videos of a generation can now be taken on the move without resorting to a slightly less portable mobile phone. It may not be the most unobtrusive of timepieces, but it’ll certainly get you noticed.
[Blair Neal] has been working on an information database for artists and hackers – a collection of non-conventional display technologies available to us. We’ve covered this repository before, six years ago – since then, it’s moved to a more suitable platform, almost doubled in size, and currently covers over 40+ display technology types and related tricks. This database is something you should check out even if you’re not looking for a new way to display things right now, however, for its sheer educational and entertainment value alone.
[Blair] doesn’t just provide a list of links, like the “awesome-X” directories we see a lot of. Each entry is a small story that goes into detail on what makes the technology tick, its benefits and fundamental limitations, linking to illustrative videos where appropriate. It’s as if this guide is meant to give you an extensive learning course on all the ways you can visualize things on your creative journey. All of these categories have quite a few examples to draw from, highlighting individual artworks that have made use of any technology or trick in a particular way.
If you’re ever wondered about the current state of technology when it comes to flexible or transparent displays, or looked for good examples of volumetric projection done in a variety of ways, this is the place to go. It also talks about interesting experimental technologies, like drone displays, plasma combustion or scanning fiber optics. Overall, if you’re looking to spend about half an hour learning about all the ways there are to visualize something, this database is worth a read. And, if there’s a display technology the author might’ve missed and you know something about, contributions are welcome!
Someone setting out to compile information about an extensive topic is always appreciated, and helps many hackers on their path. We’ve seen that done with 3D printer resin settings and SMD part codes, to name just a few. What’s your favourite hacker-maintained database?
[Marcel] thought – what if he had more control over his house ventilation system? You could add some nifty features, such as automatically ventilating your house in the mornings when everyone’s away, only creating noise when nobody’s around to hear it. Sadly, most ventilation systems are not automation-friendly at all – he was lucky, however, as his system came with a wireless remote. [Marcel] reverse-engineered this remote, created a USB dongle speaking the same protocol, and tied it into his Home Assistant setup!
The remote in question is Orcon R15, with an Atmel MCU talking to a CC1101 chip through SPI. He sniffed the SPI communications when pressing different buttons, figured out the protocol by comparing the recordings, and built a test setup with a spare Arduino and CC1101 module. It worked, and he set out to design a separate dongle, using an ATMega32U4. The dongle looks pretty neat, and fits a Hammond enclosure – what’s not to like?
Then he set out to develop the firmware, and didn’t disappoint on that front either. His code doesn’t just imitate the original remote perfectly in terms of control, it also has user-friendly pairing flow, keeps track of the system’s current state, and still lets the original remote be used in parallel. Eagle files for the PCB are available on the project page, with the code and a PDF schematic available in the GitHub repo. This entire journey is described in the Hackaday.io page, and we would recommend you check it out for all the insights it provides!
Ventilation systems don’t tend to be designed for automation, and it’s endearing to see hackers working on conquering this frontier. Last time we’ve seen a ventilation system hack, it had the additional challenge of being landlord-friendly, and we think the hacker nailed it!
I hope last week’s introduction to bulk material handling got you all thinking up amazing hacks, and we’ll soon be reporting on DIY Cap’n Crunch Robots galore. This week we’ll look at how to measure particle sizes, separate particles, and even grind them up when you need to.
Measuring Material Properties
Last week we talked about cohesive strength. Bulk material behaves somewhere between a solid and a liquid — if you’ve done your homework, it flows down the funnel just fine. But if you haven’t, it sticks together and holds up the rest of the material. Cohesive strength is the measure of how much weight the material at the bottom of the funnel can hold up.
You can get a rough measurement by packing material in a box with a square hole at the bottom. One side of the hole should have a retractable slide. Slowly withdraw the slide, making the hole rectangular. Material will bridge over, and then at some point a larger chunk will fall out. This is about the size of the minimum opening that will not arch, and a practical measure of the material’s cohesive strength.
Many materials cohere better when wet. Dry a sample in a microwave to determine the percent moisture by weighing it before and after.
Cohesive strength is closely allied to shear strength. If you want to measure shear strength, cut two 1 cm wide rings of 5 cm diameter PVC pipe, stack them, pack with material, put a disk atop the material and load it, then drag the top ring off the bottom with a spring scale. The force per unit area is the shear strength at that pressure. If it starts packing you’ll see it in the curve.
Packing factor is another useful measurement. Gently shake material to fill a rigid container and weigh it. Now empty the container and refill, packing the material as hard as you can with a length of 1” dowel. Reweigh, and the ratio of the two weights tells you how well the material packs.
Real bulk material is almost always made up of particles of varying sizes, shapes, and compositions. Dirt is particles of different kinds of mineral and organic matter varying from outright rocks to sub micron clay particles. If you’re having problems, getting a graph of material size distribution can be helpful.
For particles above about 75 μM, you can measure the sizes with sieves. If you want to be fancy, they sell nice sets of metal sieves with wire mesh in the bottom. Screen assortments are cheaper. Below 75 μM, you have to use a hydrometer. This is messy and takes a while, but does work.
The idea is to mix the material with soapy water and then use a hydrometer from the auto parts store to measure the density. The particles fall out by Stokes law, big ones first. Stokes law is just that the drag force on a sphere is proportional to the square of the radius. Mass will go up as cube of the radius, so large particles fall faster than small ones. As they fall out, the density of the fluid decreases. This page describes how to do it, and this page has a handy calculator for interpreting the results.
Grinding
You can also change the size of particles in your mix. If particles are too large, they can be crushed or ground. You can separate by size and only grind some of the sizes or discard some of the material. There’s a whole science to grinding. The finer you grind, the harder it gets to grind. Cosmetics and pharmaceutical companies are full of grinding experts.
In general, there are three ways to make something smaller – crush it, cut it, or hit it.
Crushing is straightforward. Use rollers or jaws, a rolling pin or a rock crusher. Don’t overlook the vise. A jaw crusher only crushes particles larger than the jaw space, useful to make a certain size. Rock crushers have a complex motion (video) that should nonetheless be easily imitated by a hacker project. Amateur/hobby gold prospectors have an accessible community.
Crushing action in rollers only works until the particle is small enough that the surface of the roller deforms instead of the particle. Stones have been used to crush grain into flour for most of history.
Cutting is best for soft things, like gummy worms, and tough things (video.). Make sure the cut material has an easy path out. Think of an old fashioned kitchen meat grinder. .
If you want small particles, you need an impact grinder. A coffee mill or blender works by striking the particle with a fast moving impactor. This can be a blade – useful if the material first needs to be cut up, as in a coffee mill – or blunt. Many industrial mills use two pivoting weights on a shaft, and this unit just uses chains (video).
Another impact mill is the ball mill. Rotate a drum on it’s side with steel balls and the material. The balls travel up the side, then fall back down, striking the material.
All these work by fracturing the material. What if you’re trying to powder something that doesn’t fracture, say rubber O rings? For that, there’s cryogenic grinding.
Many rubbery materials are really glasses — materials that are a gloppy liquid at a higher temperature, often brittle at a cool temperature, and soft in-between. The glass you’re probably thinking of is a brittle, breakable material at room temperature, but at high temperature is a liquid. The transition point is the ‘glass transition temperature’.
So what about our O rings? If they’re natural rubber their transition point is about -70° C. Below that temperature they’re brittle and can be ground up. Unfortunately, grinding is going to put heat back in. So consider grinding slowly – some labs grind biological materials like skin samples with a special mortar and pestle cooled beforehand with liquid nitrogen. Just be sure everything in contact with the material has been cooled, and use a thick walled container with lots of thermal mass.
Separating Wheat From Chaff
Sometimes you have a mix and need to separate it. Your roommate dumped all the gummy bears and all those weird ginger candies into a bowl or whatever. Last week we introduced particle segregation as a bad thing. But when you want to un-mix a mixture, it can be a good thing. Any of the techniques from last week can be an aid.
Sieves and screens work to separate by size. They clog unless the material keeps moving over them. One simple way to do this is to flow the material over sieves on a slanted board, finest sieve first. Another is to mechanically shake the screen. Paper filters are just fine screens, and do clog.
A trommel is a slowly turning cylinder with walls of different sized screens along it’s length. Material is fed into the fine screen end and slowly moves towards the other.
Stokes law provides another way to separate materials as we saw above. Make an upward air draft in a vertical pipe. Deliver the material into the pipe part way up. Materials with more drag than weight will go up, larger materials will go down. You can use the air speed to control the size of particle. An industrial machine called an air classifier does this with higher velocity air blowing material into the rim of a spinning set of blades.
It could be the air (or another gas) you want to remove. There are a couple ways to do it. The first is the cyclone familiar to wood shops. The second is even simpler – inject the air/material mix into the top of a tall, slender container with a tube that extends about halfway into the container. Let the air out from an outlet pipe in the roof. The air flow expands, slows down, and the material falls out.
You can just blow the material sideways – the age old system of threshing wheat works this way. Wheat comes from the plant with a husk, you beat it with a flail to loosen the husk, giving you wheat grains and chaff mixed. Put the mix on a blanket and have four peasants toss it repeatedly. The chaff blows away in the wind.
Inertial Separation
A very sensitive separation technique is inertial separation. Here’s a mix of gummy colas and jelly beans. We separated them by tilting and gently shaking the sheet. A material moves on a sheet by staying in place until the acceleration is more than some critical value. Then it rolls or slides.
If your material is dirt or such, run a magnet through it. There’s iron ore and bits of human generated iron in a lot of soil. It can get into motors and such. If you need it out run the material past magnets. An eddy current separator uses AC magnetic effects to do the same with nonferrous metals.
You can also segregate materials by dissolving them. A mixture of table salt and white sand would seem impossible, but if you stir it into water, then decant and boil off the water, the salt and sand can be recovered separately. But we think we’re veering into chemistry now, and we should stop.
Next time we’ll finish up by looking at controlling movement: building gates and contraptions that move your bulk material without clogging up.
For anyone looking to buy a 3D printer at home, the first major decision that needs to be made is whether to get a resin printer or a filament printer. Resin has the benefits of finer detail, but filament printers are typically able to produce stronger prints. Within those two main camps are various different types and sizes to choose from, but thanks to some researchers at Switzerland’s École polytechnique fédérale de Lausanne (EPFL) there’s a new type of resin printer on the horizon that can produce prints nearly instantaneously.
The method works similarly to existing resin printers by shining a specific light pattern on the resin in order to harden it. The main difference is that the resin is initially placed in a cylinder and spun at a high speed, and the light is shined on the resin at different angles with very precise intensities and timings in order to harden the resin in specific areas. This high-speed method allows the printer to produce prints in record-breaking time. The only current downside, besides the high price for the prototype printer, is that it’s currently limited to small prints.
With the ability to scale in the future and the trend of most new technologies to come down in price after they have been on the market for some amount of time, it would be groundbreaking to be able to produce prints with this type of speed if printers like these can be scalable. Especially if they end up matching the size and scale of homemade printers like this resin printer.