Measuring Planck’s Constant With LEDs And A DMM

The remarkable thing about our universe is that it’s possible to explore at least some of its inner workings with very simple tools. Gravity is one example, to which [Galileo]’s inclined planes and balls bear witness. But that’s classical mechanics: surely the weirdness that is quantum mechanics requires far more sophisticated instrumentation to explore, right?

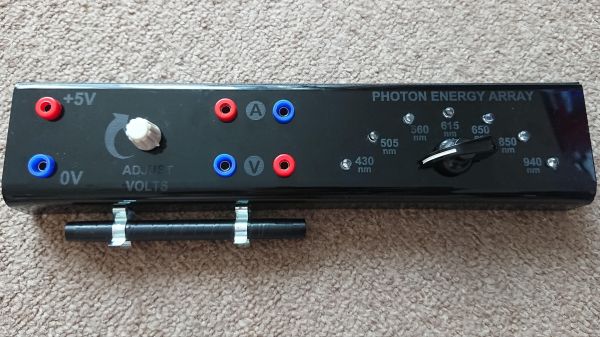
That’s true enough — if you consider a voltmeter and a Mark 1 eyeball to be sophisticated. That’s pretty much all you need for instruments to determine Planck’s constant to a decent degree of precision, the way that [poblocki1982]’s did. There’s a little more to it, of course; the method is based on measuring the voltage at which LEDs of various wavelengths start shining, so a simple circuit was built to select an LED from the somewhat grandly named “photon energy array” and provide a way to adjust and monitor the voltage and current.

By performing the experiment in a dark room with adapted eyes, or by using an opaque tube to block out stray light, it’s possible to slowly ramp the voltage up until the first glimmer of light is seen from each LED. Recording the voltage and the wavelength gives you the raw numbers to calculate the Planck constant h, as well as the Planck error Δh, with the help of a handy spreadsheet. [poblocki1982] managed to get within 11% of the published value — not too shabby at all.

Does this all still sound too complicated for you? Maybe a Watt balance made from Lego is more your speed.

Current Sink Keeps The Smoke In

One of the most versatile tools on anyone’s work bench, at least as far as electrical projects are concerned, is a power supply. Often we build our own, but after we’ve cobbled together some banana jacks with a computer’s PSU or dead-bug soldered a LM317 voltage regulator to a wall wart, how will that power supply perform? Since it’s not desirable to use a power supply that’ll let the smoke out of everything it powers (or itself, for that matter) a constant current sink, or load, can help determine the operating limits of the power supply.

[electrobob] built this particular current sink from parts he had lying around. The theory of a constant current sink is relatively straightforward so it’s easily possible to build one from parts out of the junk drawer, provided you can find a few transistors, fuses, an op amp, and some heat sinks. The full set of schematics that [electrobob] designed can be found on his main project page. He’s also gone a step further with this build as well, since he shorted out his first prototype and destroyed some of the transistors. But, using a few extra transistors in his design also improves the safety and performance of the load, so it’s a win-win.

This constant current load also has the added feature of being able to interface with a waveform generator (an Analog Discovery, specifically) and as a result can connect and disconnect the load quickly. If you aren’t in need of an industrial-grade constant current sink and you have some spare parts lying around, this would be a great one to have around the work bench.